Working with Relationships in the Model Diagram
A model shows tables connected with lines that indicate relationships between the tables. If the data source has been indexed and discovered, all discovered relationships that have three or more matches and an RPS greater than 75 are displayed by default. See
About the Relationship Probability Score (RPS) for more information about how relationships are discovered and scored.
These are the types of relationships which are distinguished by line color and style.
Relationship Type | Description | Line Color |
Discovered | Relationships are discovered using TDV’s proprietary algorithms. | Solid orange |
User-Defined | User-defined relationships that are specified by the user. Users can define relationships between tables both within and across data sources. | Solid red |
Primary Key-Foreign Key (PK-FK) | Defined in the database by the DBA. | Solid blue |
View Dependency | The view is dependent on the connected resource. | Dashed green |
Multicolumn | Relationships between multiple columns that form a compound key in one table, and matching columns in another table. | Solid brown |
Invalid | Relationships that you have marked as invalid. | Dotted orange |
Defining Relationships
You can define relationships between resources that you know exist. Discovery calls this type of relationship User-Defined.
Relationship definitions are independent of models. When you define a relationship between two resources, this relationship is displayed in any model that has the same two resources.
To define a new relationship
1. Open a model.
2. If necessary, add the resources for which you want to define relationships.
3. Click the New Relationship button.
Discovery displays the New Relationship dialog.
4. Specify the details about the relationship as follows:
Field | Description |
From Resource | Choose the from-resource from the drop-down list. |
To Resource | Choose the to-resource from the drop-down list. |
Type | Always USER_DEFINED when defining a relationship. |
Cardinality | Choose the type from the drop-down list: UNKNOWN ONE_TO_ONE ONE_TO_MANY MANY_TO_ONE MANY_TO_MANY |
Score | Always 100 for USER_DEFINED relationships. |
5. Under Columns:
a. Click the Add Column Pair button.
b. Click in the highlighted field under From Column(s) and choose the from-column.
c. Click in the highlighted field under To Column(s) and choose the to-column.
d. Continue adding column pairs.
e. Optionally, use the arrow keys to change the order of the relationships. This has no effect on the model—only on how relationships are displayed in this list.
6. Click OK to save the relationship.
Discovery displays the new user-defined relationship using a red connecting line. You can see the details about it in any one of these ways:
— Edit Relationship dialog—Select the relationship, right click, and choose Edit Relationship. See
Editing Relationships.
— View Relationship Details—Select the relationship, right click, and choose View Relationship Detail. Discovery displays three tabs underneath the model Diagram. See
Viewing Relationship Details.
— Relationships tab—Click on the Relationships tab. The new relationship is listed in the relationships table in a tabular format. See
Working with the Relationships Tab.
Viewing Relationship Details
You can view details about a selected relationship in three tabs beneath the model diagram. Both the Relationships tab and the Relationship Details tabs display indicators to help you identify columns and relationships of different types. See
Relationship and Column Type Indicators for examples.
To view relationship details
1. Display the relationship details tabs in one of these ways:
— Click the Show Relationship Detail button.
— Select a relationship line, right-click, and choose View Relationship Detail from the menu.
— Double-click a relationship line.
— Double-click a blank space anywhere in the model diagram.
Discovery displays the Relationship Details panel beneath the model. If you cannot see it, locate the horizontal bar and drag the bar upwards to expand the panel vertically as illustrated below:
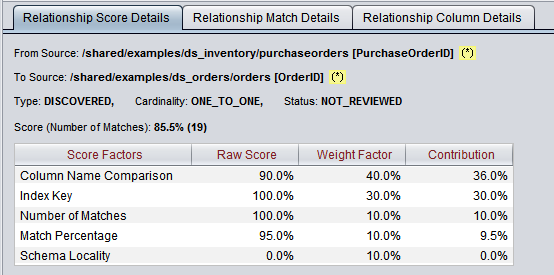
2. Click the Relationship Score Details tab.
The Relationship Score Details tab displays the following information for the currently selected relationship:
— From Source: The path and name of the from source. A yellow asterisk (*) indicates that this is a primary key column. A yellow plus-sign (+) indicates that this is a denormalized column.
— To Source: The path and name of the to source. A yellow asterisk (*) indicates that this is a primary key column. A yellow plus-sign (+) indicates that this is a denormalized column.
— Type: The type of relationship—can be DISCOVERED, FOREIGN_KEY, USER-DEFINED, MULTICOLUMN, or UNKNOWN.
— Cardinality: The cardinality of the relationship, which can be ONE_TO_ONE, ONE_TO_MANY, MANY_TO_ONE, MANY_TO_MANY.
— Status: The status of the relationship, which can be UNKNOWN, NOT_REVIEWED, VALID, or INVALID.
— Score (Number of Matches): The score as a percentage and the actual number of matches.
— Score table: The score factors and their values for this relationship.
— Data Domains (Influencing Matches): Lists the data domains that influenced the discovered relationships.
3. Click the Relationship Match Details tab:
The Relationship Match Details tab displays the actual data in the tables in the relationship. You can view items that match, items in the from-table that do not match, and items in the to-table that do not match.
Matches—Displays the actual matched data in the tables in the relationship.
Unmatches From—Displays the data rows with no matches in the from resource.
Unmatches To—Displays the data rows with no matches in the to resource.
4. Click the Relationship Column Details tab.
The Relationship Column Details tab displays the columns in the From Source and To Source tables including the column name, column data type, and the relationship.
Relationship and Column Type Indicators
The relationship icon in the Relationship column indicates the columns that have the relationship.
If the selected relationship includes multiple columns, there are multiple relationship icons in the From Source and To Source columns with numbers next to them. The numbers indicate which columns match and together form the multicolumn relationship. The example below shows a multicolumn relationship formed by 14 matching columns
If the relationship includes a denormalized column, it is denoted with (+) mark on the target or source column of the relationship. Note that only one end of source/target pair can be denormalized, not both. See
Working with Denormalized Data for more information.
The denormalized indicator is displayed both on the Relationships tab and on the Relationship Column Details tab. On the Relationship Column Details tab, the delimiter used in the denormalized column is listed in the Relationship column. The tab and space characters (delimiters that are not visible) are indicated as \t and \s, respectively.

Editing Relationships
You can edit a discovered or user-defined relationship in the model diagram. What you can change depends on the relationship type:
• Discovered—You can change only the relationship status.
• User-Defined—You can change anything except the relationship type or score.
• Foreign Key—You cannot change anything, because a foreign key relationship is defined by the data source. However, you can view details about a foreign key relationship.
Relationships are independent of models. When you edit a relationship, the relationship is updated on the server and on any model in which it appears.
To edit a relationship
1. Open a model.
2. Select a relationship, and either click the Edit Relationship button or double-click a relationship line.
Discovery displays the relationship in the Edit Relationship dialog box.
3. Edit the relationship Status based on its type.
Relationship Type | Things You Can Edit |
DISCOVERED | The Status defaults to NOT_REVIEWED. You can change this to: VALID—Confirms that the relationship is valid and makes the RPS 100. INVALID—Removes the relationship from the model. UNKNOWN—Marks this relationship as unknown. |
USER_DEFINED | Anything except Type and Score. See Defining Relationships, for information. |
FOREIGN_KEY | Nothing; you can only view its definition. |
4. Click OK.
Validating and Invalidating Discovered Relationships
After relationships have been discovered, you can view them in the model diagram and either validate them (which gives them an RPS of 100), or invalidate them.
To validate or invalidate a discovered relationship
1. Open a model.
2. Select a relationship and click the Edit Relationship button or double-click a relationship line.
Discovery displays the Edit Relationship dialog.
3. For Status, select either VALID or INVALID.
INVALID relationships are removed from the model diagram.
4. Click OK.
Deleting User Defined Relationships
You can delete only user-defined relationships. You cannot delete discovered or foreign key relationships.
To delete a user-defined relationship
1. In the model diagram, select the relationship you want to delete.
2. Click the Delete Relationship button.
Viewing Relationships Based on Type
You can display only certain types of relationships using the show/hide relationships buttons. See
Displaying Relationship Information.
The buttons are only available (not dimmed) if the model has relationships of that type.
Viewing Relationships Based on RPS Score
You can display only relationships above a specific RPS score. (See
About the Relationship Probability Score (RPS).) By default, Discovery creates and displays relationships with a score of 75 or higher. You can change the minimum score using the Min Score field at the top of the model diagram.