|
In this section:
|
|
How to:
|
|
Reference:
|
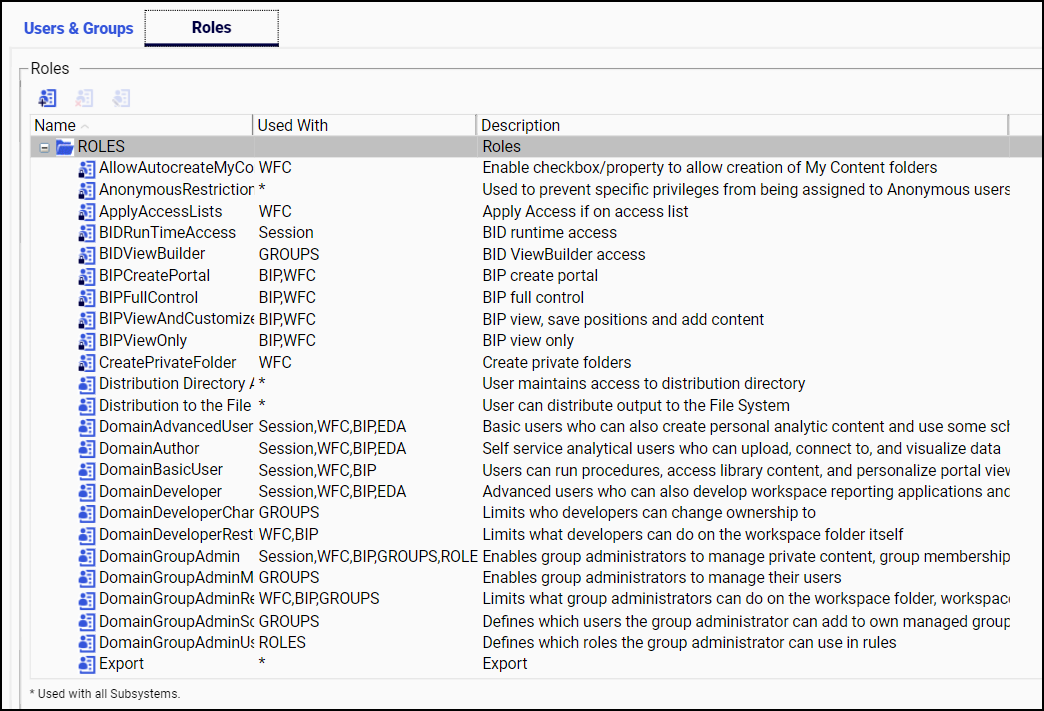
The Roles tab lists the name of each role, the subsystems to
which it applies, and a description of what it does, as shown in
the following image.
A role icon with a lock indicates that the role is read-only
and cannot be edited or deleted. All pre-installed roles are read-only. Locked and pre-installed roles are not updated automatically
when you choose to install a custom resource template. However, you may choose to revise them as part of your configuration
of the custom resource template. For more information, see Adding Customizations to the Custom Resource Template.
Access to WebFOCUS Server applications is determined by the permissions assigned to any group that fits the access control template for that server
instead of the pre-defined locked role. For more information, see Understanding Access Control Templates.
The Roles tab allows you to perform the following actions:
- Create, edit, delete,
or clone a role.
- View or edit the
access rules on a role.
- View or edit the
effective policy on a role for a user or group.
- View the rules that
use a selected role.
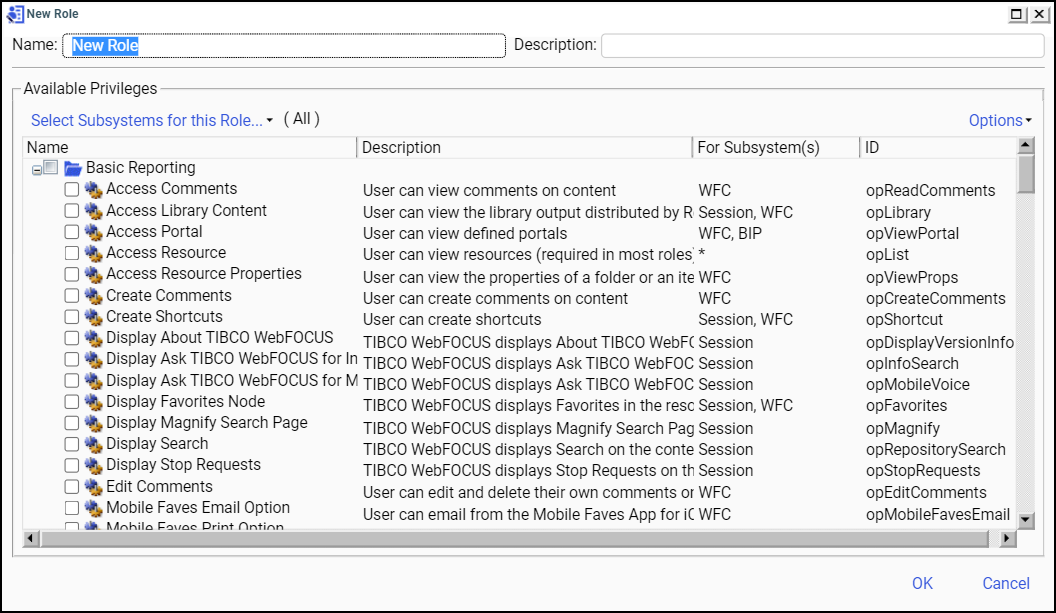
When you create or view a role, its privileges are displayed
in a list that includes the privilege name, description, subsystems
affected, and privilege ID, as shown in the following image.
If the description is too long to display, rest your mouse on
it to display a tooltip with the full description. Resting your mouse on a privilege name brings up a tooltip that includes
the privilege ID at the end, or you can scroll to the ID column. The
privilege ID is a unique internal identifier and, except for Customer Support Services, is not generally
used.
Privilege Categories
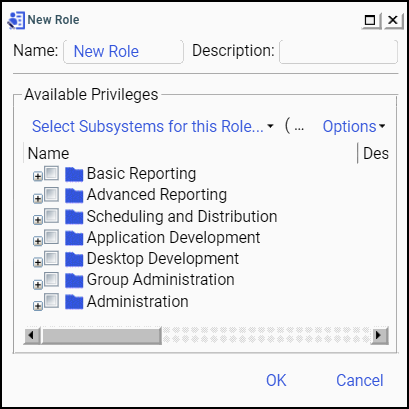
When
you create a new role, you assign privileges to the role. To make
the privileges easier to find, they are grouped into several
categories, as shown in the following image and described in the
following table.
|
Privilege Category
|
Description
|
|
Basic Reporting
|
Privileges that can be assigned to most
users, including those with minimal training. All of the other sets
of privileges are granted in addition to the basic reporting features.
|
|
Advanced Reporting
|
Privileges that can be assigned to users
who need to create and share their own reports. They are generally granted
as a supplement to the basic reporting privileges, not as a replacement
for them.
|
|
Scheduling and Distribution
|
Privileges that can be assigned to users, developers,
and administrators so they can create schedules that distribute
reports with ReportCaster.
|
|
Application Development
|
Privileges that can be assigned to developers
that enable them to create complete WebFOCUS applications using
only web-based tools. To enable access to the full set of WebFOCUS
application development capabilities, you should also assign the privileges
in the Desktop Development category to your development team.
|
|
Desktop Development
|
Privileges that enable developers to use
the Windows-based WebFOCUS desktop products. These privileges must
be assigned along with those in the Application Development, Advanced
Reporting, and Basic Reporting categories to enable the full set
of development capabilities.
|
|
Group Administration
|
Privileges that can be assigned to department
or tenant group administrators so that they can manage their users
and the content created by their users.
|
|
Administration
|
System administrator privileges that are
generally only assigned to WebFOCUS administrators.
|
|
Legacy
|
Privileges that enable legacy product behavior
for customers migrating to WebFOCUS 8 from previous versions.
|
Within each category, privileges are listed in alphabetical order by their Name in English. The order of localized privilege
names remains the same in all other languages, ensuring that privileges remain in a consistent order regardless of the language
in which they are displayed. The use of a consistent location makes privileges easier to locate and identify.
You can select privileges individually by selecting the check box next to them or
you can select an entire category of privileges by selecting the
check box next to the folder for the category. You can also select a category and
then remove some of the automatically selected privileges under
that category.
The appearance of the check box next to the title entry for a category indicates the range of privileges selected within it.
If none of the privileges within a category are selected, the check box is blank. If one or more of the individual privileges
within a category are selected, the check box contains a block. If all of the privileges within the category are selected,
the check box contains a check mark.
For more information about the privileges
included in each category, see Privileges.
Migration Functionality and User Defined Roles (UDR)
In WebFOCUS 7.x, users are assigned to a specific role
and placed in a group or multiple groups. In WebFOCUS 8.x, user
abilities are determined by rules based on groups, rather than user
roles. The migration process maps WebFOCUS 7.x user roles to WebFOCUS
User Default Roles (UDRs), which are implemented through rules,
associated with the groups and workspaces, to which a user has access.
If you are using WebFOCUS 8 in a migrated environment, you can
see UDR information by enabling the display of the User Default
Role tab in the Security Center. For more information, see the TIBCO WebFOCUS® Migration technical content.
Procedure: How to Display the User Default Role Tab in the Security Center
- In the Administration Console, on the Configuration tab, click Other to display the Other settings page.
- Select the User Default Roles (Used For Migration) (IBI_ENABLE_UDR) check
box, and then click Save.
- When you receive the Successfully Saved message, click OK.
- Sign out of your current session.
- Sign in again as an administrator, and navigate to the Security Center.
- In the Security Center, click the New User button, or
click an existing user, and then click Edit User.
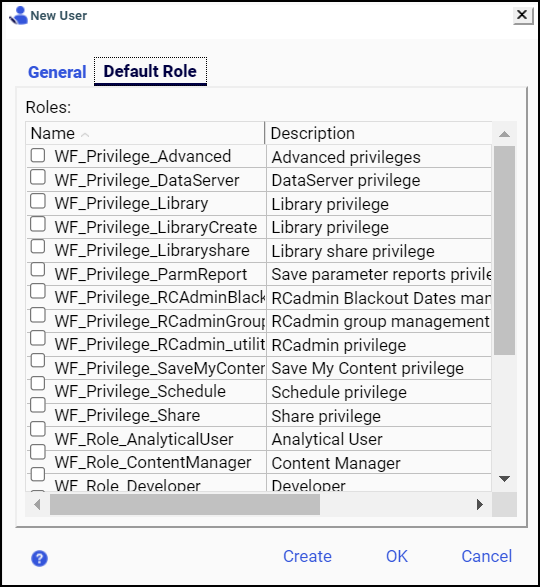
The New User or Edit User dialog box opens, with
the Default Role tab enabled, as shown in the following image.


