Creating a Custom Resource Template

In this section:

How to:

Custom resource templates are adaptations of standard resource templates designed to support a unique set of business or operating requirements. Workspaces created from custom resource templates conform to a specialized combination of rules and resources. Custom resource templates help ensure that the privileges and resources required by a particular group or activity are automatically built in to all of the workspaces created for their support.

To create a custom resource template, an administrator generates a workspace that combines the resources and deployment type, Enterprise or Tenant, that best suits the proposed custom resource template, creates a folder for it, and makes a copy of the standard template scenario.xml file whose combination of resources and deployment best match those of the workspace.

When these three components are ready, the administrator exports the scenario.xml file in the custom template folder to create the full set of files for a resource template. The Title and Name assigned to the workspace become the Title and Name of the new template and are added to the Workspaces node shortcut menu to enable users to select the custom resource template when they create new workspaces.

In addition to these basic steps, administrators can customize the privileges or roles assigned to a custom resource template, and arrange variables and the order in which they are displayed.

Before you create a custom template, it is important to understand the concepts such as privileges, roles, resources, groups, and IBFS subsystems. For more information about these features, see the corresponding topics in User Administration. You should also review the resource templates already included in your installation in order to become familiar with possible combinations of privileges, roles, and rules.

Resource Template Location and Files

By default, both built-in and custom resource templates are contained in the resource_templates folder, located in drive:\ibi\WebFOCUS82\config\ for Windows or install_directory/ibi/WebFOCUS82/config/ for UNIX or Linux, as shown in the following image.

The Root folder in the config directory showing the location of the repos.xml, rules.xml, scenario.xml, and variables, xml files.

If you are using the integrated installation, drive:\ibi\WebFOCUS_WFI\WebFOCUS\config\resource_templates\ibiEnterpriseDomain for Windows or install directory/ibi/WebFOCUS_WFI/WebFOCUS/config/resource_templates/ibiEnterpriseDomain for UNIX or Linux.

In the IBFS system, resource templates are located on the Legacy home page in the Resources tree under WebFOCUS /FILE/IBFS_templates. This path is visible when the Resources tree is converted to Full View mode.

The following table describes the resources created in each resource template folder.

Name

Type

Purpose

root

Directory structure

Contains resources, such as report procedures or portal pages. Some subdirectories may be empty, but they are required.

repos.xml

File

Specifies the properties of all resources created by the template.

reposTree.xml

File

Lists the resources that have been exported into the template for troubleshooting or documentation purposes. This file is automatically created when a template is created, but it is not required when a template is run.

Note: This file is not included in the resource templates.

rules.xml

File

Specifies the security rules created by the template.

scenario.xml

File

Specifies the information necessary to create a resource template. This file is often distributed with a resource template to aid in the creation of a custom template, but is not required when a template is run.

variables.xml

File

Specifies how the resource template prompts for required information. Items specified include the name of each prompt, the prompt sort order, and the type of prompt field (normal or check box).

Resource Template Variables

When you use a resource template, WebFOCUS determines whether the template contains any variables, and prompts you to provide a value for each variable, if necessary. You can specify the names, descriptions, and titles of resources, such as folders, groups, portals, and portal pages. You can also provide the summaries of folders or items that will appear to users or administrators.

For example, your template can include an IBFS content folder with a predetermined name and description. The folder can be empty, or it can contain subfolders and some content. The folder itself can also have folder properties defined, such as the Sort Order and Auto Create My Content Folders properties. When this resource template is run, you will be prompted for the title and name to use in the creation of this folder.

The Resource Template Management interface allows you to supply a user-friendly display description for variables. You can also specify the order in which the variables are shown in the template dialog box and the type of variable to display.

The following table describes the types of variables that are used with resource templates.

Variable Type

Purpose

normal

This type of variable is typically used for the description of groups or for the title of folders and portal pages seen by the end user. Any alphanumeric data is allowed in a normal variable.

check

This type of variable is typically used for the name of IBFS resources. Data supplied to a check variable is validated against the rules for components of an IBFS path.

Creating a Model Using the Enterprise Resource Template

How to:

You can export any IBFS resources and security rules you wish into a custom resource template. First, you must create the resources and rules that you wish to use in your custom template. For example, you might wish to create a department-specific group with subgroups for each business role, along with a department-specific content folder. You might also wish to give all users access to a common content folder and portal, or to include custom roles in the template.

When you have finished making changes, you can export the custom template for later use.

Procedure: How to Create a Resource and Policy Model

This feature is only available from the Legacy Home Page.

  1. Open the Legacy Home Page.
  2. On the BI Portal, in the Resources tree, right-click the Workspaces node, point to View, and then click Repository View.
  3. Right-click the Workspaces node, and point to New.
    • Click Enterprise Workspace to create a custom template for department or division workspaces within an enterprise.
    • Click Tenant Workspace to create a custom template for workspaces for clients of a SaaS provider.
  4. Type %%desc%% in the Title field.

    As you type, the %%desc%% value is automatically assigned to the Name field.

  5. Type %%name%% in the Name field using lowercase characters.
  6. To include optional resources in the model workspace, perform the following steps:
    1. To include a portal, select the Create Portal check box, and then click Workspace Portal.
    2. To include shared portal pages, select the Create Portal check box, and then click Workspace Page in a Shared Portal.
    3. To include an associated application directory on the WebFOCUS Server, select the Create Reporting Server Application check box.

      Note: When using the Create Reporting Server Application option, we recommend that you develop a strategy for authorizing workspace users to the Application Directories on the WebFOCUS Server. For more information, see Understanding Access Control Templates.

  7. Click OK.
  8. When you receive a confirmation message stating that resource template processing is complete, click OK.

    The Workspaces Node now includes a content folder titled %%desc%%. The content folder contains a My Content and a Hidden_Content folder. If you included additional resources, such as a portal, these resources appear on the Resources tree as well.

  9. To review the rules in place, right-click the new content or portal resource, point to Security, and then click Rules on this Resource.

    By default, the rules on this resource dialog box will display rules for the four basic workspace user groups and Managers.

Procedure: How to Create the Custom Template Folder

By default, only administrators are authorized to run and create resource templates.

This feature is only available from the Legacy Home Page.

  1. Open the Legacy Home Page.
  2. On the BI Portal, right-click the Workspaces node, point to View, and then click Full View.
  3. Expand the FILE folder, right-click the IBFS_templates folder, and then click New Folder.
  4. Type the name of your new template in the Title field and a brief description of the template in the Summary field.

    The name will be the IBFS name of your custom template. You will be able to modify the display title of the template later.

    Note: The template name must follow the conventions for IBFS names. For example, spaces are replaced with underscores (_). For more information about IBFS naming conventions, see IBFS Filesystem and Subsystems.

  5. Click OK.

    A folder with the name of your new template appears under the IBFS_templates node.

Procedure: How to Copy a scenario.xml File for the Custom Template

The scenario.xml file tells WebFOCUS what to export into your custom resource template. Before you can make any customizations, you must move a copy of the scenario.xml file that best fits the resources needed for the custom resources template from the model template folder to the Custom Resource folder. Once you have created a copy of the standard resource template xml file, if you choose to use a different Name or Title for workspaces created from this template, you need to update the values assigned to the scenario.xml file as described in the topic, How to Update the Scenario File.

This feature is only available from the Legacy Home Page.

  1. Under the IBFS_Templates folder, expand the folder containing the template that most closely matches the type of workspace and resources you want to create.

    The folder you select must match the configuration of workspace type and resources you selected when creating the model workspace. For example, if the model workspace is an Enterprise Workspace with no additional resources, copy the scenario.xml file from the Enterprise Workspace folder.

  2. Right-click the scenario.xml file in your selected folder, and then click Copy.
  3. Right-click the new custom template folder, and then click Paste.

    The custom template folder displays a copy of the scenario.xml file.

  4. In the new custom template folder, right-click the scenario.xml file, and then click Edit.

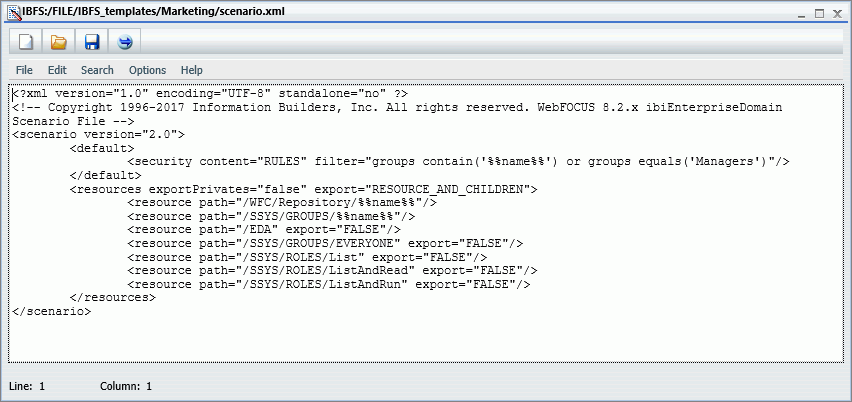
    The text editor opens and displays the contents of the scenario.xml file for your selected template type. In this example, the scenario.xml file for the enterprise resource template, as shown in the following image.

    The text editor displaying the contents of the scenario.xml file, with the Security and Resources section contents visible.

    Attributes in the security tag apply additional filters to the rules that will be exported when creating workspaces based on this custom template. In this example, the custom template will only export the Rules on EDA, in which the subject matches %%name%% or Managers.

    The resources section specifies that private content will not be exported and that specified resources and their descendants will be exported. Each resource related to the template is specified by its full IBFS path. In some cases, the resource path name is parameterized, such as /WFC/Repository/%%name%%. In other cases, a static path name is specified, such as /SSYS/ROLES/List. When you wish to export the rules on a subsystem, but not the resources it contains, specify the resource path with the export="FALSE" option.

    Note: Any new variables included must be in lowercase.

  5. When your review is complete, close the text editor.

Adding Customizations to the Custom Resource Template

How to:

You can update the roles and rules assigned to the custom template.

This feature is only available from the Legacy Home Page.

Procedure: How to Disable Auto Create My Content Folders

The model folder created by the Enterprise Resource template allows users to save personal content into top-level folders. You may wish to disable this feature in your custom template.

Even though this setting is visible on the Advanced tab of the Properties panel that opens from the Workspaces area that opens from the Hub or the WebFOCUS Home Page, we recommend that you make this change in the Legacy Home Page environment.

This is one of only several customizations you can make to the custom resource template.

  1. Right-click the Workspace folder created from a custom template, and then click Properties.
  2. In the Properties dialog box, clear the Auto Create My Content Folders check box, and save your changes.

Procedure: How to Enable Access to a Common Portal or Folder

You may wish to grant groups created by your template access to an existing portal or content folder. If everyone will have the same access privileges, you can create a rule granting SSYS/GROUPS/EVERYONE an appropriate role for the use of the common resource. If you prefer not to include this rule in the template, but wish to use it later, you can create this rule or any other rule later.

This feature is only available from the Legacy Home Page.

To enable access to a common portal or folder:

  1. Create the common portal or folder.

    You do not need to design the portal or populate the folder at this point. You just need it to exist so you can set rules on it.

  2. Right-click the resource, point to Security, and then click Rules.
  3. Select a group, and click a role and access type.
  4. Click Apply, and then click OK to close the window.

Procedure: How to Update the Scenario File

This feature is only available from the Legacy Home Page.

  1. With the Resources tree in Full View mode, expand the FILE node, then expand the IBFS_templates node, then expand your template folder.
  2. Right-click the scenario.xml file and click Edit.

    If you created custom roles, you can use search and replace to globally rename the role resources in the file. For example, you can replace SSYS/ROLES/Workspace with SSYS/ROLES/Abc, as shown in the following image.

    Search and Replace domain names
  3. Make your changes and click Save.

    Note: IBFS path names are case-sensitive.

  4. When your changes are complete, click Save.
  5. Click File, and then click Exit to close the file.

Exporting the Custom Resource Template

How to:

When all customizations are complete, export the template.

Procedure: How to Export a Custom Resource Template

This feature is only available from the Legacy Home Page.

  1. Open the Legacy Home Page.
  2. With the Resources tree in Full View, right-click your template folder, and the click Export Template.
  3. When you receive a confirmation that template processing is complete, click OK.
  4. Right-click the template folder and click Refresh to see the new resources.

Updating Resource Template Properties

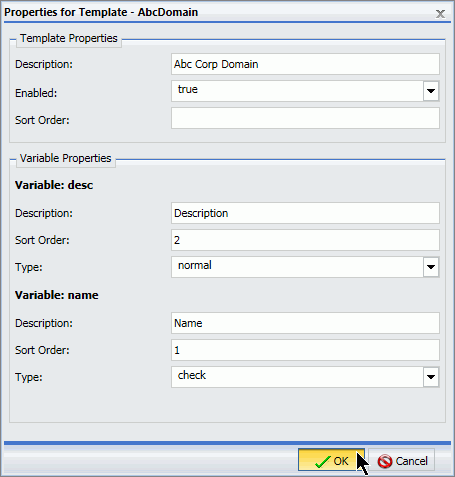
To update the properties of a resource template, right-click the template folder, and then click Properties. The Properties for Template dialog box appears, as shown in the following image.

The Properties for Template dialog box.

The Properties for Template dialog box allows you to edit the template description and sort order, and to enable or disable the template to show it or hide it in the list of available templates. You can also change the descriptions of the variables shown in the specific template dialog box, determine their sort order within the template dialog box, and configure what type of variable they are.

Note: If a variable prompts for values used in the IBFS path name or a resource, set the Variable Type to Check to ensure that unsupported IBFS characters for the value are rejected.

Removing the Model

Once you have exported your resource template, the resource and policy model objects in your repository are no longer needed. You can leave them in place if you plan to re-create your template in the future or if you wish to create additional variants of the template. Otherwise, you can delete the model objects at this point. You can always re-create them again in the future with your template.

Procedure: How to Test the New Custom Resource Template

To test the presence of the new custom resource template in the Workspaces node, you must ensure that a command for it appears on the Workspace node shortcut menu, and that the Create Workspace dialog box includes the name of the custom template in the title.

This feature is only available from the Legacy Home Page.

  1. In the BI Portal, right-click the Workspaces node, and point to New.
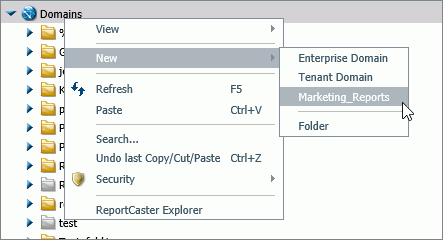
  2. Ensure that the name of the Custom Resource template appears on the New submenu, as shown in the following image.
    The New Domains/Workspaces shortcut menu with the custom template domain/workspace command.
  3. Click the name assigned to the Custom Resource Template such as, Marketing_Reports.
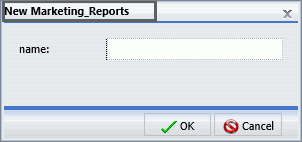
  4. Ensure that the title above the Create a Workspace dialog box contains the name of the custom resource template, as shown in the following image.
    The new domain/workspace dialog box with the custom resource template title.
  5. Create the workspace as described in How to Create a Workspace.

    Review the new workspace to ensure that the resources and privileges it contains conform to those of the custom resource template.