Workspaces are a basic building block of WebFOCUS content organization. Each workspace combines a collection of user groups, a link to the metadata on which content in the workspace is based, and a set of rules that makes them all work together. Workspaces enable users to maintain private content, to share that content if their user role permits, and to access governed content published by others.
In the Resources tree, workspaces appear as root-level folders under the Workspaces node. These folders partition content into sections that users can easily identify, and create an organized content structure for a workgroup.
There are two types of workspaces, Enterprise and Tenant. Enterprise workspaces support installations that affect a single enterprise and are organized by department and content within that enterprise. Tenant workspaces support installations that affect multiple enterprises and are organized by tenant clients of a software as a service vendor.
Tenant workspaces are available only to the users assigned to the tenant. They are not available to users assigned to any other tenant.
Resources, such as Portals, Shared Portal Pages, or WebFOCUS Server Templates, are also part of workspaces. To create these resources, you must first create a workspace. Workspaces link the content used by these resources to the users to which they will be made available. The rules defined within workspaces govern the access of users to the content in each resource. When these resources are no longer needed, they are deleted by deleting the workspace to which they are assigned.
By default, resource templates are used as the basis for all new workspaces. When you create a new workspace, the resource template that corresponds to the type of workspace you select and the resources you want to include with it is invoked. The preconfigured groups and rules within a resource template define a range of availability from the broadest level of access to the most restricted level. WebFOCUS defines a basic set of templates, but administrators can create their own resource templates and add them to the list of available resource templates.
My Workspace is a specialized workspace that gives users a readily-accessible location where they can create content for their own use and share it with others. It is included, by default, in a product installation, and it is designated, by default, to be the workspace in which content created directly from the Home Page or outside of any other named workspace is stored.
Like other workspaces, My Workspace is created from the resource template and uses the same security rules assigned to all templates. However, instead of the four groups that are typically assigned to workspaces, it contains only the Basic Users group and the Authors group.
As with any other workspace, administrators must actively manage the assignment of users to the two groups within My Workspace. Privileges granted to a user in My Workspace are entirely independent of privileges granted to a user in any other workspace.
The My Content folder in My Workspace serves as the dedicated location in which members of the Authors group can create new content. The Shared folder is also included and becomes visible when users share private content within their own instance of My Workspace.
Note that the workspace entitled My Workspace is distinct from the view entitled My Workspace. Both the view and the workspace contain private content created by the user who is currently signed in.
However, the workspace only contains content created in or saved to it by the user who is currently signed in. The view displays private content from the My Content folders of all of the workspaces available to that user. The My Workspace view, therefore, contains a broader range of content than the workspace entitled My Workspace.
If it is necessary to use a different workspace as the default workspace for new content, administrators can replace My Workspace with another workspace by updating the path that appears in the Default Workspace Repository Path (IBI_DEFAULT_WORKSPACE_PATH) setting on the BI Portals page.
However, even when another workspace is defined as the default workspace, users can still work within the workspace entitled My Workspace by opening it from the Hub or the WebFOCUS Home Page content view.
The Getting Started workspace is a specialized workspace that contains content displayed in the Getting Started carousel that can appear at the top of the Workspaces view from the Hub, or the WebFOCUS Home Page in the Cloud instance of the product. When you first install the product, this workspace contains content that is designed to introduce new users to the capabilities of WebFOCUS software. Administrators can add their own customized content to this workspace in order to tailor the introductory content to the needs of their organization. Depending on the privileges of the Getting Started workspace group to which they are assigned, individual users can run, edit, create, or schedule items within this workspace and its associated carousel.
The Getting Started workspace is included, by default, in the Cloud instance of the product, but is not included in the On Prem instance. Like other workspaces, it is created from the resource template and uses the same security rules assigned to all templates.
The Getting Started workspace includes the four user groups that are typically assigned to workspaces, and adds the Authors group. The inclusion of all five groups created by the resource template allows administrators to assign new users to the complete range of capabilities that most closely matches the role they will typically play.
As with any other workspace, administrators must actively manage the assignment of users to groups within the Getting Started workspace. Privileges granted to a user in the Getting Started workspace are entirely independent of privileges granted to that user in any other workspace.
The folders provided, by default, with the Getting Started workspace also differ from other workspaces created from the resource template. The Getting Started workspace does not display a My Content folder. However, it does display a Visualizations folder. This folder contains pre-packaged visualizations that are not displayed in the Getting Started carousel, but are available to users as examples of WebFOCUS content.
Administrators can replace the Getting Started workspace with a different workspace by changing the value assigned to the Default List Repository Path (IBI_DYNAMIC_LIST_PATH) setting on the BI Portals settings page, located on the Configuration tab of the Administration Console. This setting also determines the workspace that appears in the top level carousel on the Home View of the WebFOCUS Home Page.
When an administrator replaces the default path to the Getting Started workspace in this setting, the name of the top carousel is replaced with the name of the different workspace and the content contained in that workspace appears in the carousel. Administrators must assign users to the groups within that workspace in order to make the content displayed in the top level carousel available to them. Note that the Authors group is absent from any other workspace that would replace the Getting Started workspace.
If the value in this setting is blank, the Getting Started carousel does not appear at the top of the Home View, but the Getting Started workspace and its group assignments remain in place.
Even when a different workspace, or no workspace at all, is identified in this setting, users can still work within the workspace entitled Getting Started from the WebFOCUS Home Page content view.
The WebFOCUS security model offers administrators the flexibility to establish complex security policies. However, many organizations find that their security needs can be met by a small number of standard user roles and a straightforward pattern of access rights. WebFOCUS provides resource templates for enterprises with departments or divisions, and SaaS providers who require both common and tenant-specific reporting resources when creating workspaces.
WebFOCUS provides several resource templates that will create folders, groups, roles, and rules for typical enterprise or SaaS deployments. You can implement the templates as is, or adapt them to your requirements. You can also develop custom resource templates for your organization.
When you create a new workspace from a resource template, a new group is automatically created for the workspace itself, along with subgroups for each of the following four user types within it: Basic User, Advanced User, Developer, and Group Administrator. When Administrators assign users to one of these groups, they automatically give those users the privileges assigned to the user role when working with that workspace.
Members of the Basic User group can view content within their workspace. They can create folders within the My Content folder and save deferred reports to them. They can also copy autolink parameters from a previously created report and save them in their folders. They cannot share, publish, copy, or paste any folder or content.
Members of the Advanced User group have all of the privileges of Basic Users, and they can create and share their own content and folders.
Members of the Developers group have all of the privileges of Basic and Advanced Users, and they can upload and connect to data, edit metadata, and create and organize workspace content. They can manage content made visible to other users. They can also copy and paste folders and content from their workspace to another workspace, but they must be sure that the workspace they target for this operation maintains connections to the same metadata as that used to create the content they are copying.
Members of the Group Admin group determine the role each user can have within a workspace by adding users to or removing users from one of the four user type groups and can change the General Access setting assigned to the workspace.
These four user types cover the basic access levels that the majority of users will require when working with workspaces, freeing administrators to focus on the assignment of users to these four groups instead of requiring them to configure access level profiles for each user.
Or
Open the WebFOCUS Home Page and on the Banner, select Workspaces, to open the Workspaces area.
Note: Expand the Resources tree, on the left of the content area, if it is not open by default.
Or
In the breadcrumb trail, select Workspaces.
Or
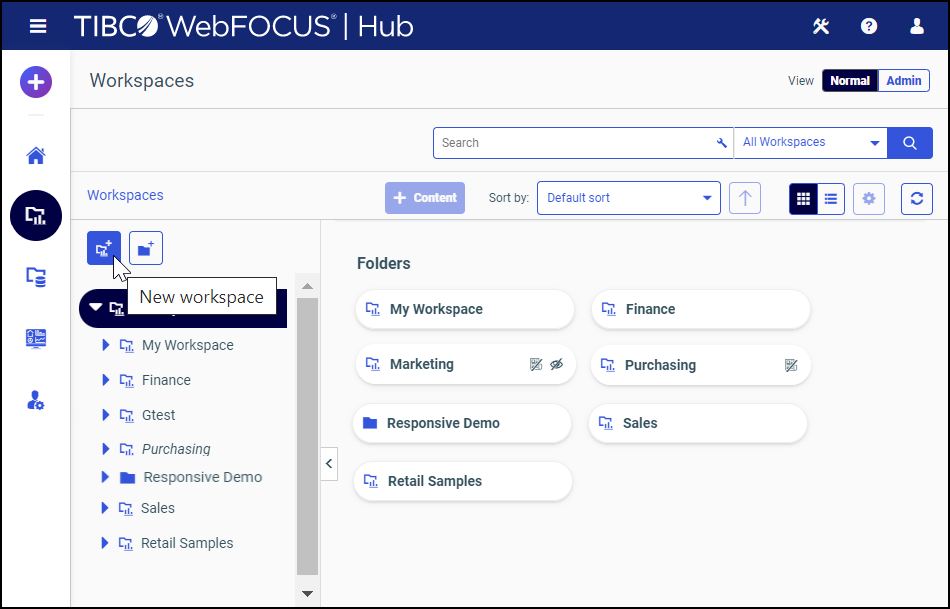
On the WebFOCUS Home Page, open the Workspaces view, and in the Action Bar, under Create New, click Workspace.
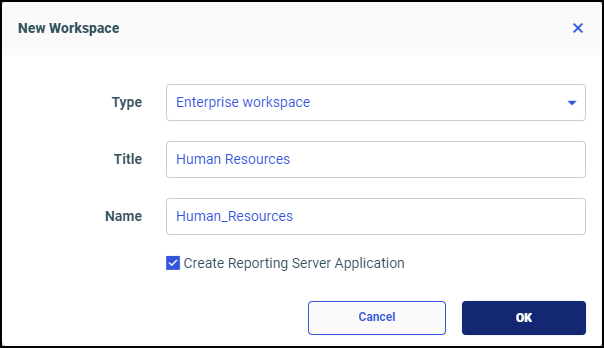
As you type, the description you type in the Title field, adjusted to conform to IBFS rules, is automatically assigned to the Name field.
Administrators can localize the title for different languages by opening the Properties panel after the workspace is created and adding localized titles for the languages on display in the Language Properties dialog box linked to the Properties panel by the View All button.
Note: If you include the Create Reporting Server Application option, you need to create and implement an authorization strategy that grants workspace users appropriate access to application directories on the WebFOCUS Server. For more information, see Understanding Access Control Templates.
As you select or clear this check box, the value in the Name field is updated dynamically to remove characters that are not allowed for resource names.
When you type the description of a new workspace in the Title field of the New Workspace dialog box, the same characters are typed automatically in the Name field. The Name field description is automatically validated for compliance with IBFS naming rules. If you type a restricted character into the Title field, the Name field substitutes the restricted character with one that is permitted. For example, if you type a space in the Title field, the Name field will replace it automatically with an underscore (_) character, as shown in the following image.
The value in the Title field is displayed to end users automatically, and the value in the Name field is used for internal operations.
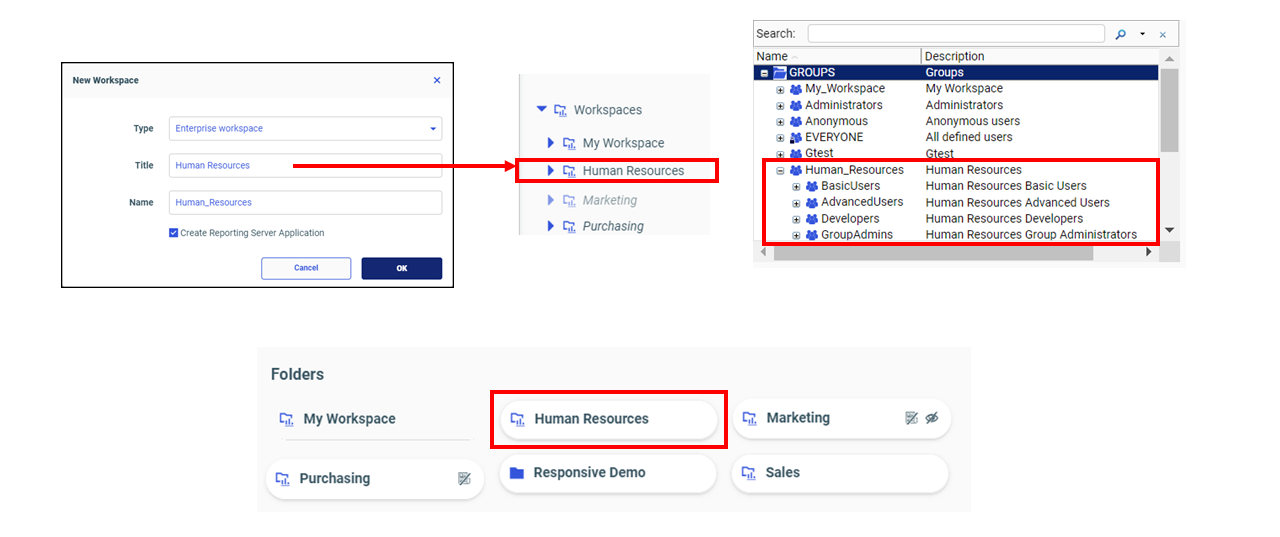
When you create a new workspace, the results appear in the Workspaces view and in the Security Center. Required resources are created based on your selection.
When you create a workspace from the Workspaces area, a folder for the new workspace is displayed on the Resources tree and in the Folders section of the content area. In the Security Center, a group for the new workspace appears in the Groups pane of the Users and Groups tab. The Resources tree and the content area show Titles, by default. Groups listed in the Security Center show both the Name and the Title of the workspace simultaneously. The results are visible in the Workspaces area and in the Security Center, as shown in the following image.
When creating a workspace from the Workspaces area of the Hub or WebFOCUS Home Page, there is no option to create a portal or shared portal page along with the workspace, so these results are not visible. However, if you create a workspace from the Legacy Home Page, you do have the option to include a portal or shared portal page in the process.
If you select the Workspace Portal option from the Legacy Home Page version of the New Workspace dialog box, the portal becomes available along with the other results. A folder for the new workspace appears on the Resources tree and in the Folders section of the content area. An icon for the portal also appears in the Portals carousel. In the Security Center, a group for the new workspace appears in the Groups pane of the Users and Groups tab. The Resources tree, content area, and Portals carousel show Titles, by default. Groups listed in the Security Center show both the Name and the Title of the workspace simultaneously. These results are visible in the Workspaces area, in the Portal carousel, and in the Security Center.
If you select the Workspace Page in a Shared Portal option, the shared portal page becomes available along with the other results. This option creates an empty Fluid Canvas page in a shared portal. In the Shared Enterprise Portal itself, a folder for the shared page appears in the Resources tree. These results are visible on the WebFOCUS Home Page.
Each resource template creates multiple groups, roles, security rules, and folders, and, if selected, portals, portal pages, or WebFOCUS Server applications. However, there are several differences between an Enterprise Resource template and a Tenant Resource template.
Both kinds of template create the following groups:
The rules applied to these groups form a default security policy. Functional capabilities within the workspace increase respectively for basic users, advanced users, and developers. Group administrators do not have the ability to run reports, but they can manage the ownership of resources and manage group membership within their workspace. In organizations where an individual has more than one role, the user account can be added to all the groups necessary to achieve the desired blended set of privileges.
These templates also create rules on the Workspaces, Portals, and Reporting Servers nodes. For more information about the default rules, see Creating a Custom Resource Template.
How to: |
WebFOCUS ships with a set of six resource templates for enterprise workspaces and a set of six resource templates for tenant workspaces. Both sets are enabled, by default. The type of workspace and options available for selection when creating a workspace, determines the resource template that runs and the resources that are created for it.
Even though you can create a new workspace from the WebFOCUS Home Page, in order to take advantage of the full range of resources when doing so, we recommend that do so from the Legacy Home Page.
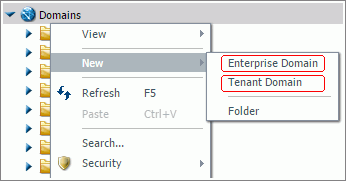
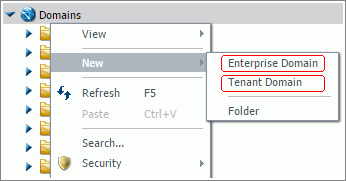
To create a new enterprise workspace or a new tenant workspace, sign in as an administrator, and open the Legacy Home page. In the BI Portal Resources tree, right-click the Workspaces node, and point to New, as shown in the following image.
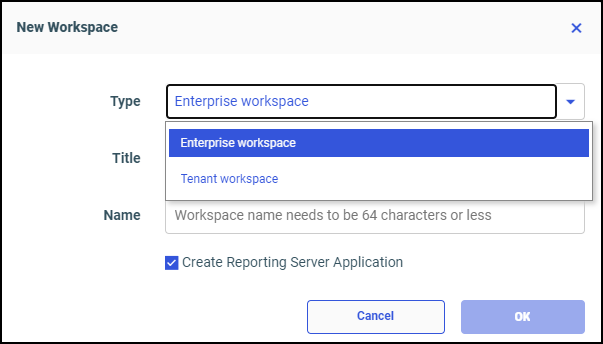
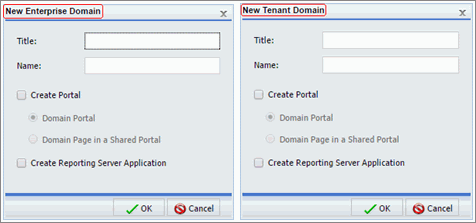
Depending on the type of Workspace you select, one of the following similar looking dialog boxes appears.
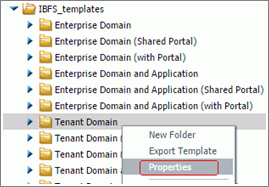
This initial selection of Enterprise Workspace or Tenant Workspace, and the additional options you select from the dialog boxes, invokes one of the following underlying resource templates:
Enterprise Workspaces
Tenant Workspaces
Typically, a WebFOCUS environment is either configured to support an enterprise deployment model or a SaaS tenant deployment model, but not both. As such, an administrator might want to disable an entire set of resource templates to prevent the display of the non-supported model on the Workspace node shortcut menu. To disable all SaaS tenant resource templates or all enterprise resource templates, you need to assign the value false to the Enabled setting of only one of the templates in the set.
This feature is only available from the Legacy Home Page.
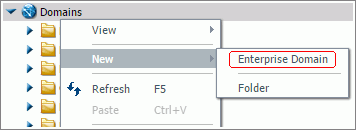
Only the Enterprise Workspace command appears in the shortcut menu, as shown in the following image.
If a hidden group of Resource Templates must be restored, an administrator must reset the Enabled list value to true for the previously-disabled resource template.
This feature is only available from the Legacy Home Page.
Both the Tenant Workspace and the Enterprise Workspace commands appear in the shortcut menu, as shown in the following image.
In this section: |
How to: |
A workspace can only be deleted by an administrator who has rights to delete all of the resources within it.
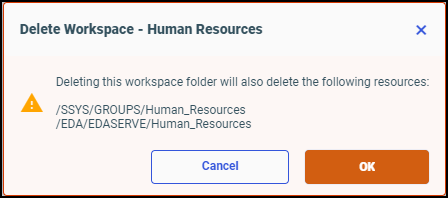
When you delete a workspace, the resources associated with it are also deleted. This means the workspace group and its subgroups are deleted. Other optional resources that may have been created with the workspace are also deleted, for example, if the workspace references:
Notes: The cascade delete process only removes users from groups within a workspace. It does not delete the users themselves.
Note: In this message, the list of resources that will be deleted depends upon the resources that were originally included in the workspace. Therefore, the details in this message will vary with each deleted workspace.
Even though deleting a workspace automatically deletes the groups associated with it, this action does not delete the users assigned to those groups. Users from the deleted groups remain in the Users pane in the Security Center. If users from deleted groups are no longer needed, an administrator can delete them from the Repository. For more information see, How to Delete a User.
The predefined roles created by resource templates can be customized in the Security Center. For example, if you want your Advanced Users to be able to use InfoAssist only from Reporting Objects, but not with metadata, you can remove the InfoAssist from Metadata privilege from the Advanced User role.
Running the resource template does not overwrite roles that already exist. Any customizations that you made to the workspace roles are retained and apply to users in all workspaces, including those previously created.
Note: Roles are checked when users sign in. Therefore, changes to user roles take effect immediately for users who sign in after you save the role changes. Users who are signed in when you change a role may need to sign out and sign back in again for the changes to take effect.
For more information about how to modify roles, see Managing Roles.