Using the Procedure View Panel

In this section:

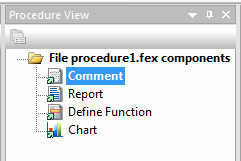
The Procedure View panel contains the panel customization commands and the Procedure View tree. This panel displays all components in a procedure. You can add new components to a procedure, such as a Report, Define, Define Function, Chart, Set, Join, Use, and others.

If a component in the procedure is open, a green arrow appears next to the component icon.

When a new procedure is created, the Comment component opens automatically. In a previously created procedure that is reopened, the last report component or chart component opens automatically.

The Procedure View panel is available when you create or open a procedure or report. The Procedure View panel is shown in the following image.

For more information on customizing the Procedure View panel, see Customizing WebFOCUS App Studio Panels.

Displaying Components of a Procedure Using the Procedure View Tree

The Procedure View tree displays the components and folders associated with a procedure.

Open Folder Node

Displays different options depending on the selected component or components in the procedure.

Procedure Contents Tree

Shows the components in a procedure.

Defining the Components of a Procedure

In this section:

A procedure is a .fex file that defines how data is retrieved and displayed. Procedures request data from the data source using a Master File to understand how the data is organized. When you run a procedure, it executes a series of commands that process your data and transform it into a readable output.

Procedures can consist of the following components:

You can add these components to new or existing procedures, and are responsible for the order in which you add them. For more information, see Order of Components in the Procedure View Panel. The following topics describe how these components modify a procedure.

Report

You can add a report to a procedure. In report mode, you can create and style simple or complex reports, add data to the Report canvas, and style that data creating a graphical representation of the report page. This allows you to view how the report displays at run time.

MAGNIFY Engine

The MAGNIFY Engine canvas contains the following ENGINE SET statements which are available for selection.

  • ACTION. Possible values are add or delete. The add option is the default and inserts or updates a record. A record is updated if its WF_INDEX_UNIQUE_KEY value already exists in the index. The delete option finds the WF_INDEX_UNIQUE_KEY of the record value and deletes it from the index.
  • BASEURL. The WebFOCUS Report base URL.
  • BATCHSIZE. The number of records to burst at one time. It is recommended that the BATCHSIZE property is always used.
  • CONNECTION ATTRIBUTES. The Magnify Indexing Servlet.
  • DATASOURCE. The Magnify index library directory.
  • DELIMITER. The separator for multiple categorizations. This is used in conjunction with aggregation-based alias names.
  • FEEDTYPE. Possible values are incremental or full. The incremental option is the default and updates an existing record in the index or adds the data as a new record. This mode prevents duplicate records from being added to the index library. The full option adds all data to the index from the data source. If a record is repeated in the feed, it is duplicated in the Magnify index library.
  • MIME. The document mime type, required for file indexing. Possible values are text/plain or application/openurl. The text/plain option is the default.

Engine

The Engine component exposes the WebFOCUS ENGINE SET statement and enables you to enter ENGINE commands or connection attributes, and override parameters.

Note: The Engine component is only used to create ENGINE statements. You are responsible for having the knowledge of the ENGINE SET command or the Connection Attribute needed.

SQL Report

The SQL Report component launches the SQL Report Wizard, where you can create a new SQL report, create an SQL report from an external .sql file, pass SQL commands to an RDBMS using SQL passthru, or import SQL commands from an existing .sql file.

Define

You can use the Define feature to create a virtual field as a component in a procedure.

Note: To enable the objects when creating a Define, click the New button.

A virtual field is evaluated on each retrieved record that passes any selection criteria on real fields. Define the virtual field by assigning a format and typing an expression, or composing it using the calculator fields and functions. The result of the expression is treated as though it were a real field stored in the data source.

Define Function

You are able to create your own functions by using the Define Function Wizard. The Define Function Wizard assists in the creation of a user function. The created functions can later be retrieved through the Function Arguments dialog box, using the Retrieve User Functions button. By clicking Retrieve User Functions, your created functions will be available for use.

Set

You can add the Set component to a procedure to select Environment Parameters and customize the procedures. The Set component controls the way that reports and charts appear on the screen or printer, the content of reports and charts, data retrieval characteristics that affect performance, and system responses to user requests. It also helps you set up your metadata and manipulate information, such as dates. For more information about SET parameters, see the Developing Reporting Applications technical content.

Join

If a report requires data from two or more related data sources, you can temporarily join the files and report from them as if they were one. Joined files remain physically separate, but are treated as one data source structure.

The Join component provides a graphical method for creating and manipulating all types of Joins. To create a Join, you must specify a host data source, and then a cross-referenced data source. Both host and cross-referenced files are Master Files.

You create the Join as an component that is separate from any other component or procedure. You are responsible for placing the Join object in the correct position within your procedure, (that is, before a Define, Report, or Chart), and running it. The Join remains active for the entire session, unless you explicitly clear it.

Use

When you access a WebFOCUS data file, WebFOCUS searches for a Master File with the specified file name, and then searches for a data source with the same name. With the Use component, you can specify the name and location of a WebFOCUS data source.

You can apply the Use component to a procedure in WebFOCUS App Studio when the default naming convention is not used, the data source cannot be found in the standard search path, or an explicit extra option is desired.

When you identify a WebFOCUS data source with the Use component, a Use directory is created, which is a list of data source definitions. When a Use directory is in effect, WebFOCUS locates a data source using the information in the directory instead of searching for it using the default name and search path. A Use directory enables you to access up to 1022 data sources and applies only to WebFOCUS data sources.

Allocation

For a file managed by the operating system, such as a comma-delimited data file, the physical file name is the actual name of a file as it appears to the operating system. A logical name is the shorthand name that points to a physical file name. Logical names simplify code by allowing short names to be used in place of the longer physical file name.

With the Allocation Wizard, you can create a FILEDEF command and generate platform independent file paths for all portable platforms by creating FILEDEF syntax with application names.

Execute

The Execute component allows one procedure to execute or call another procedure. The called procedure behaves as a completely separate procedure, with its own context. The Execute component allows you to view and select available procedures, supply values for parameters in the called procedure, and test the called procedure.

Once this procedure is specified, Execute displays these parameters and prompts you to provide values for them. You can provide values for all parameters in the procedure, or you can choose to provide values for only some of the parameters. If you provide values for only some of the parameters, you must provide values for the other parameters using another method. For example, values are passed from another part of the application. After providing parameter values, you can test the called procedure.

Execute is available from all development areas of the product.

HtmlForm

The HtmlForm component enables you to add HTML code to the active procedure. HTML forms are used to display HTML content. You can choose to reference or embed HTML forms in your procedure.

Note: HTML pages created in the HTML canvas are not meant to be used with an -HTMLFORM that uses run-time references. The HTML canvas cannot evaluate -HTMLFORM when run-time references to file names and objects are used.

Include

The Include component allows you to include a whole or partial procedure in another procedure. A partial procedure might contain heading text or syntax that should be included at run time based on a test in the calling procedure. It enables the reuse of code, making applications easier to write and maintain. After an included procedure runs, control returns to the calling procedure.

An Include component can be placed anywhere in a procedure.

Olap Dimensions

The Olap Dimensions component allows you to create a temporary OLAP hierarchy and dimensions to build reports from, without modifying the Master File. Instead, you create a local hierarchy, where the information is stored in the active procedure. After you create the local hierarchy, you can build a report.

Match

The Match component launches the Match Wizard, where you can merge two or more data sources and specify which records to merge and which to sort out. The wizard creates a new data source (a HOLD file) which merges fields from the selected records. You can report from the new data source and use it as you would any other HOLD file. The merge process does not change the original data sources.

You select the records to be merged into the new data source by specifying sort fields in the Match Wizard. You specify one set of sort fields (using the BY phrase) for the first data source, and a second set of sort fields for the second data source. The Match Wizard compares all sort fields that have been specified in common for both data sources, and then merges all records from the first data source whose sort values match those in the second data source into the new HOLD file. You can specify up to 32 sort sets, which includes the number of common sort fields.

In addition to merging data source records that share values, you can merge records based on other relationships. For example, you can merge all records in each data source whose sort values are not matched in the other data source. Yet another type of merge combines all records from the first data source with any matching records from the second data source.

You can merge up to 16 sets of data in one Match request. For example, you can merge different data sources, or data from the same data source.

Note: The limit of 16 applies to the most complex request. Simpler requests may be able to merge more data sources.

Other

The Other component enables you to enter commands that connect other components. This feature is useful for writing code that does not have a graphical tool (such as Dialogue Manager). However, you can also use Other for any kind of manual coding, for example, to code a virtual field or a report. When used this way, the Other component automatically converts to the corresponding component type.

An Other component can be placed anywhere in a procedure.

Dialogue Manager

Dialogue Manager is the part of the WebFOCUS language that controls the execution of your application components. You can add flexibility to your application design by dynamically managing the flow of control in procedures using Dialogue Manager commands and variables whose values are supplied at run time.

You can select five different types of Dialogue Manager components to add to your procedure.

  • DM If. Creates a Dialogue Manager IF statement by having you type an expression and choosing a label. You can choose to create an IF template if you want.
  • DM Goto. Creates a Dialogue Manager GOTO statement by having you type a label.
  • DM Label. Creates a Dialogue Manager label by having you type a label name.
  • DM Repeat. Creates a Dialogue Manager REPEAT statement by having you choose labels, amper values, steps, times, and expressions. You can choose to create a REPEAT template if you want.
  • Dialogue Mngr. Opens the Dialogue Manager canvas where you can manually create your Dialogue Manager code. For more information, see Using Dialogue Manager.

Order of Components in the Procedure View Panel

Components can be added to the Procedure View panel in any order. After adding a component you may need to change the order.

The order of components in the Procedure View panel can be significant. For example, suppose you have a report component and a define component, where the define component is a field used in the report. In this case, the define component must appear before (above) the report component in the Procedure View panel. Otherwise, the system will display a message when you try to run the report.

To move a component, click and drag it over another component until the target component is highlighted. As the component is moved, the pointer displays a box image. Release the mouse button and the moved component will appear after the highlighted component.

To copy a component, hold down the Ctrl key, click the component and drag it up or down. As the component is copied, the pointer displays a plus (+) sign. Release the mouse button and Ctrl key and the copied component will appear after the highlighted component.

Note: You can move or copy a component in the Procedure View panel even if the component is open in its respective canvas.

Creating Procedures and Procedure Components

How to:

This section describes how to create procedures and procedure components.

Procedure: How to Create a New Procedure

  1. In the Environments Tree panel, right-click a folder, point to New, and then click Procedure.
    The Procedure View panel opens.
  2. To add components to your procedure, right-click the procedure folder or component that you want to add a new component after, select New, and click the component name.
  3. To run a procedure at any time, in the Procedure View panel, right-click any component and select Run complete procedure from the shortcut menu. The current state of the procedure is used even if it has not been saved.

    Note: If you select Run complete procedure when the procedure is in an invalid state you will get an error message asking if you would like to run the procedure with the last good content.

Procedure: How to Create a Report as a Component of a Procedure

  1. Create a new procedure, or open an existing procedure.
  2. In the Procedure View panel, right-click the procedure folder or the component that you want to create the report after, point to New, and click Report.

    The Select Data Source dialog box opens.

  3. Select a Master File from the list and click OK.

    The Report canvas and the Procedure View Panel open.

  4. Double-click fields in the Object Inspector to add them to the report.
  5. Format your report by using the options on the Report tab, Format tab, Data tab, and Layout tab.

    Tip: The Field tab appears when you select a data column on the Report canvas.

  6. To save your report, click the Save button on the Quick Access Toolbar, or select Save or Save As from the Hamburger menu.
  7. To run your report, click the Run button on the Quick Access Toolbar, or select Run from the Hamburger menu.

Procedure: How to Create an Engine Statement

  1. From the Procedure View panel, right-click the procedure folder or the component that you want to create the Engine statement after, point to New, then click Engine.

    The Engine canvas opens.

  2. Select an Engine from the Engine list, or manually type in an Engine name.
  3. Select an existing connection from the Connection list, or type a parameter statement in the SET parameters field.
  4. Click the Test button to test the Engine statement.

Procedure: How to Create an SQL Report

  1. From the Procedure View panel, right-click the procedure folder or the component that you want to create the SQL report after, point to New, then click SQL Report.

    The Welcome to the WebFOCUS SQL Report Wizard window opens.

  2. Depending on the type of SQL report you wish to create, follow the respective instructions in Launching the Report Wizard.

Procedure: How to Define a Virtual Field

  1. Open an existing procedure, or create a new procedure.
  2. In the Procedure View panel, right-click the procedure folder or the component that you want to create the virtual field after, point to New, and click Define.

    The Open File dialog box opens.

  3. Select a Master File from the list and click OK.

    The Define canvas opens.

  4. Type a name for the virtual field in the Define Field Name input box.
  5. Click the Format button.

    The Format dialog box opens.

  6. Select the formatting options you want to apply to the virtual field and click OK.
  7. Build an expression in the expression box. You can double-click fields from the Fields List to add them to the expression. Use the calculator buttons under the expressions window to provide numbers and operators in the expression. Use the Functions button to add a WebFOCUS function to the virtual field using the Function Arguments dialog box.
  8. Optionally, click the Title tab to provide a title for the virtual field.
    The title is used as the column title when the virtual field is added to a chart or report.
  9. Optionally, click the Description tab to type a description for the virtual field.
  10. Click Options to specify additional behaviors for the virtual field in the Options dialog box.

    Select the Override missing values handling check box to specify how null or missing values should be handled. Select the Associate the temporary field with the real field that is selected check box to place the virtual field into the same segment as the selected real field.

  11. Click the Check button to validate the generated code.

    The Check dialog box opens displaying the component code and either an error message, or text stating that no error exists.

  12. Click OK to close the Check dialog box. Click New to create a new virtual field, or close the Define canvas.

    You can define multiple virtual fields for a procedure. You can view all virtual fields within a Define component in the Defined Fields list.

    After you define a virtual field, you can create a report that uses the virtual field. Right-click the Define component, point to New, and click Report.

Procedure: How to Create a User Define Function

To create a user define function:

  1. Right-click a procedure component in the Procedure View panel, point to New, and click Define Function.

    The Welcome to the Define Function Wizard window opens.

  2. Click Next.

    The Name dialog box opens.

  3. Type a name and description for the function and click Next.

    The Parameters dialog box opens.

  4. Click the Add new item button to add new parameters to the function.

    You can rename the parameters by double-clicking on the name column. For each parameter, clicking the ellipsis button in the Format column will open the Format dialog box, allowing you to edit the format of that parameter. Double-clicking in the Description column for each parameter will allow you to edit the description for parameter.

  5. Click Next.

    The Defined Fields dialog box opens. One defined field (with the same name as your function) is already entered.

    Note: A function is comprised of expressions that returns a value to the caller of the function.

  6. Click the Add new item button if you want to add more defined fields.

    You can rename the fields by double-clicking on the name column. For each field, clicking the ellipsis button in the Format column will open the Format dialog box, allowing you to edit the format of that field. Clicking the ellipsis button in the Expression column will open a dialog box where you can edit what the function will do.

    Note: The last defined field must have the same name as the function. This is why one defined field is already entered with the same name as the function. If multiple expressions are present, then the defined field with the same name as the function must be in the last position. If no defined field has the same name as the function, or if the defined field is not in the last position, you will be unable to progress to the next window.

  7. Click Next.

    The Define Function Wizard Complete window displays. The function, as well as its parameters and logic, are displayed before completion.

  8. If you want to create more functions, click New to bring up the Define Function Wizard again, allowing you to create another function.

    This can be done as many times as needed, allowing you to create multiple functions in the procedure, without having to exit and repeat certain steps.

    Selecting a Define Function component and clicking Open will open the Define Function Wizard. Here, you can change any part of the already created function by going through each window.

    Selecting a Define Function component and clicking Delete will delete the function.

Procedure: How to Create a Define Function Library

To create a define function library:

  1. Right-click a Data Servers folder in the Environments tree panel, point to New, point to Data & Metadata, and click Define Function Library.

    The Welcome to the Define Function Wizard window opens.

  2. Click Next.

    The Name dialog box opens.

  3. Type a name and description for the function and click Next.

    The Parameters dialog box opens.

  4. Click the Add new item button to add new parameters to the function.

    You can rename the parameters by double-clicking on the name column. For each parameter, clicking the ellipsis button in the Format column will open the Format dialog box, allowing you to edit the format of that parameter. Double-clicking in the Description column for each parameter will allow you to edit the description for parameter.

  5. Click Next.

    The Defined Fields dialog box opens. One defined field (with the same name as your function) is already entered.

    Note: A function is comprised of expressions that returns a value to the caller of the function.

  6. Click the Add new item button if you want to add more defined fields.

    You can rename the fields by double-clicking on the name column. For each field, clicking the ellipsis button in the Format column will open the Format dialog box, allowing you to edit the format of that field. Clicking the ellipsis button in the Expression column will open a dialog box where you can edit what the function will do.

    Note: The last defined field must have the same name as the function. This is why one defined field is already entered with the same name as the function. If multiple expressions are present, then the defined field with the same name as the function must be in the last position. If no defined field has the same name as the function, or if the defined field is not in the last position, you will be unable to progress to the next window.

  7. Click Next.

    The Define Function Wizard Complete window displays. The function, as well as its parameters and logic, are displayed before completion.

  8. If you want to create more functions within the Define Function Library, click New and select Define Function, allowing you to create another function.

    This can be done as many times as needed, allowing you to create multiple functions in the procedure, without having to exit and repeat certain steps.

    Selecting a Define Function component and clicking Delete will delete the function within the Define Function Library.

Procedure: How to Set Parameters for a Procedure

  1. Open an existing procedure, or create a new procedure.
  2. In the Procedure View panel, right-click the procedure folder or the component that you want to create the Set after, point to New, and click Set.

    The Set canvas opens.

  3. From the Available Settings list, double-click a parameter.

    The selected parameter is added to the Used Settings list. The available values for that parameter display in the Current Value list.

    Note: You can also select a parameter and click the Add button to add it to the Used Settings list.

  4. Select a value from the Current Value list.
  5. Click the Check button to validate the generated code.

    The Check dialog box opens displaying the component code and either an error message, or text stating that no error exists.

  6. Click OK, and close the Set canvas.

    This setting is now on, and will affect the way the procedure works.

Procedure: How to Join Data Sources

  1. Open an existing procedure, or create a new procedure.
  2. In the Procedure View panel, right-click the procedure folder or the component that you want to create the Join after, point to New and click Join.

    The Open File dialog box opens.

  3. Select a Master File (host file) and click OK.

    The Join canvas opens and displays the fields in the Master File.

  4. On the Join tab, in the Join group, click Add.

    You can also right-click the Join canvas and select Add File.

  5. Select a Master File (cross-referenced file) and click OK.

    The new Master File is added to the canvas. Common fields in both files are joined by a Join connector line.

  6. Click Save.
  7. Click Run.

    A dialog box opens, displaying the component code, and either an error message or text stating that no error exists.

  8. Click OK and close the Join canvas.

    You can add another component to the procedure by right-clicking the Join component, pointing to New, and clicking the component. When you are prompted to select a Master File, select the same host file you used to create the Join component. This allows you to use the joined data sources.

Note: For more information on how to create each type of Join, see Creating Joins Using Join Functionality.

Procedure: How to Identify a Data Source With the Use Feature

  1. Open an existing procedure, or create a new procedure.
  2. In the Procedure View panel, right-click the procedure folder or the component that you want to create the Use after, point to New, and click Use.

    The Use canvas opens.

  3. Select a USE action:
    • Clear/Replace current list of USE databases clears all entries or replaces the current list of USE data source with those in the list box.
    • Append to the present database list adds data sources to the current USE directory.
    • Replace only specified files in list changes one or more data source assignments in the current USE directory.
  4. In the Use canvas, do one of the following:
    • Type the name of a WebFOCUS data source in the Database Filename field.
    • Click Browse to search the network drives and directories for the file you want to add.
    • Type the Universal Naming Convention (UNC) name of the file in the Database Filename field. For example:

      \\Server1\Disk1\filename.ext

      The Universal Naming Convention (UNC) allows you to type the server name without entering the explicit path to the server. However, in order to take advantage of the UNC you must first attach to the server. For information on attaching to a server or mapping network drives, consult your Network Administrator.

      Enter the Master File name to be associated with the data source in the MASTER File field.

  5. If the data source is not located locally, type the name of the server on which the file resides, in the Database Server field.
  6. Click Add.
  7. Repeat steps 3 through 6 for any additional data sources you want to identify.
  8. Click the Check button to validate the generated code.

    The Check dialog box opens displaying the component code and either an error message, or text stating that no error exists.

  9. Click OK and close the Use canvas.

Procedure: How to Define a Logical Name With the Allocation Wizard

  1. Open an existing procedure, or create a new procedure.
  2. In the Procedure View panel, right-click the procedure folder or the component that you want to create the Allocation after, point to New, and click Allocation.

    The Welcome to the Allocation Wizard window opens.

  3. Click Next and specify the logical name for the allocation.

    The name can be from one to eight characters. If you are identifying a data source, the name must be the same as the name of the Master File.

  4. Click Next and select the device for the logical name.
    • Disk associates the logical name with a file. This is the default option.
    • Printer associates the logical name with a printer.
    • Http associates the logical name with a URL, by allocating the Master File to the result of running the URL.
    • Terminal indicates that the keyboard and monitor are the input source and output destination for the file.
    • Clear clears the allocation assigned to a file name.
  5. Click Next to select additional options.

    Note: The options vary depending on which device is selected. The steps below detail how the Allocation Wizard continues with the selected device.

    Tip: At any time, you may click Back to go back and change the device, or any of the device settings.

  6. When selecting Disk as the device:
    1. Select the application folder that contains the physical file.

      Note: The application folders from the Reporting Server are shown by default and depend on the area from which the Allocation Wizard is invoked. Some examples of the Reporting Server application folders are Data Servers and Workspaces.

    2. Click Next and type the new file name.

      or

      Click the Browse button to display the Open dialog box and select from the list of existing files.

      Note: The default file type is Data Files (*.dat). You may also select Temporary Files (*.ftm), and All Files (*.*), as the type of file.

    3. Click Next to specify additional options for the Disk device.

      These additional options are:

      • Appends records to the end of the file (without this option, the file is overwritten).
      • Fixed length records indicates that you are assigning a logical name to a file with a fixed record length.
      • Record Size specifies the record length of the file, when using the Fixed length records option.
    4. Click Next to view the summary of the allocation settings you selected for the Disk device.
  7. When selecting Printer as the device:
    1. Select the application folder that contains the physical file.

      Note: The application folders from the Reporting Server are shown by default and depend on the area from which the Allocation Wizard is invoked. Some examples of the Reporting Server application folders are Data Servers and Workspaces. You may specify a file in a directory that is not in the Reporting Server Application Path by using the Advanced option from the completed Allocation.

    2. Click Next and enter the new file name.

      or

      Click the Browse button to display the Open dialog box and select from the list of existing files.

      Note: The default file type is Data Files (*.dat). You may also select Temporary Files (*.ftm), and All Files (*.*), as the type of file.

    3. Click Next to type the name of the printer.
    4. Click Next to view the summary of the allocation settings you selected for the Printer device.

      The following syntax is applied to the FILEDEF statement when using a Printer device:

      FILEDEF OFFLINE PRINTER BASEAPP/TEMPOFFLINE.FTM (PRINTER \\ibiprint\28C1
  8. When selecting Http as the device:
    1. Type the full URL path.
    2. Click Next to view the summary of the allocation settings you selected for the Http device.
  9. When selecting Terminal as the device:
    1. Click Next to specify additional options for the Terminal device.
      • You may choose to send the keyboard input to WebFOCUS as entered (lowercase or mixed-case). The default is mixed-case. Select this option to specify lowercase.
    2. Click Next to view the summary of the allocation settings you selected for the Terminal device.
  10. When selecting Clear as the device:
    1. Click Next to view the summary of the allocation settings that you cleared.

Procedure: How to Call a Procedure From Another Procedure

In the following example, you will create two procedures: a report procedure and an Execute procedure. The first procedure, named salesrep, will contain a sales report with parameter prompts. The second procedure, called svalues, will contain the values for the parameters in salesrep, and will execute the called procedure, salesrep. The result will be a sales report with parameter values filled in.

  1. Create a report called salesrep, with two multiselect parameter fields, for example, State and Region and two sum fields, for example, Quantity Sold and Revenue.
  2. Create a procedure, called svalues. From the Procedure View, right-click Comment, point to New, and then click Execute.
  3. From the Open File dialog box that displays, select the procedure to call (for example, salesrep).

    The Resolve procedure parameters dialog box opens, as shown in the following image.

  4. Select values for the Statename and Region parameters. For example, Connecticut and Florida for Statename and NorthEast and SouthEast for Region.
  5. Click OK.

    The code in the Execute canvas shows the Execute code, with the selected parameter values, as shown in the following image.

    Execute code
  6. Run the svalues procedure.

    The Sales Report displays, as show in the following image.

Procedure: How to Merge Data Sources Using the Match Wizard

  1. Open an existing procedure, or create a new procedure.
  2. In the Procedure View panel, right-click the procedure folder or the component that you want to create the Match after, point to New, and click Match.

    The Open File dialog box opens.

  3. Select a Master File to use first in the MATCH logical expression.
  4. Click OK.

    The Match Wizard opens in a new canvas. It uses typical wizard behavior in which you click a series of Next buttons to navigate from one window to the next. You can also use the Match Preview area to navigate the Match Wizard.

  5. From the Available fields list, select the fields you want to use to build the Match request.

    You can add a Match Alias (how the field appears in the HOLD file field list) and a Prefix Operator for each field.

    Note: You can remove fields from this list by clicking the Delete button. If you add more than one field, you can also use the Move Up and Move Down buttons to rearrange the orders of the fields.

  6. Select either PRINT, SUM, or LIST from the drop-down list.
  7. To add a field as BY field, click a field in the Available Fields list and click the Add field button in the BY fields list box.

    Note: You must have at least one BY field.

  8. Click the Where/If tab if you want to create a WHERE expression or IF condition. This limits the records that are merged together.
  9. Click the Add WHERE expression or Add IF condition button to open the Expression Builder. Use the Expression Builder to create the Where/If condition.
  10. Click Next.

    Step 3 of the Match Wizard opens.

  11. Click the Browse button to select the data source you want to merge with the original data source.

    The Open File dialog box opens.

  12. Select a Master File and click OK.
  13. Click Next.

    Step 4 of the Match Wizard opens.

  14. Add the fields for the second data source, including a Where/If field criteria if you want, as in step 5.
  15. Click Next.

    Step 5 of the Match Wizard opens.

  16. Type a name for the HOLD file and select the type of MATCH phrase.
  17. Click Finish.

    The Match Wizard - Summary window opens, where you can review the final MATCH request.

Syntax: How to Use -HTMLFORM Syntax

-HTMLFORM sends report output to the HTML file you create for a webpage, and displays that page in the browser. The output can be saved as an HTML file that can be displayed later.

The syntax is:

-HTMLFORM filename [SAVE AS htmlpage]

or

-HTMLFORM BEGIN
.
.
.
-HTMLFORM END

where:

filename

Is the HTML file that contains placeholders for the report or reports that WebFOCUS creates with the command:

ON TABLE HOLD HTMTABLE AS report                  
SAVE

Indicates that the HTML page, created when the HTML file filename and the report or reports generated by WebFOCUS are combined, is to be saved.

AS htmlpage

Is the file name for the HTML page that is created when the HTML file filename and the report or reports generated by WebFOCUS are combined. This file is saved so that it can be displayed later.

-HTMLFORM BEGIN

Indicates the beginning of an inline HTML form in a procedure.

-HTMLFORM END

Indicates the end of an inline HTML form in a procedure.