Working with Data Channels
This page shows us how to configure and deploy data channels.
Contents
Overview
A data channel is a configurable and deployable component that maps between an external protocol and scoring flows. A data sink is a data channel that consumes output data with a known schema and a standard serialization format. It defines the format of the end result. On the other hand, a data source is a data channel that provides input data with a known schema and a standard serialization format.
Adding a Data Channel
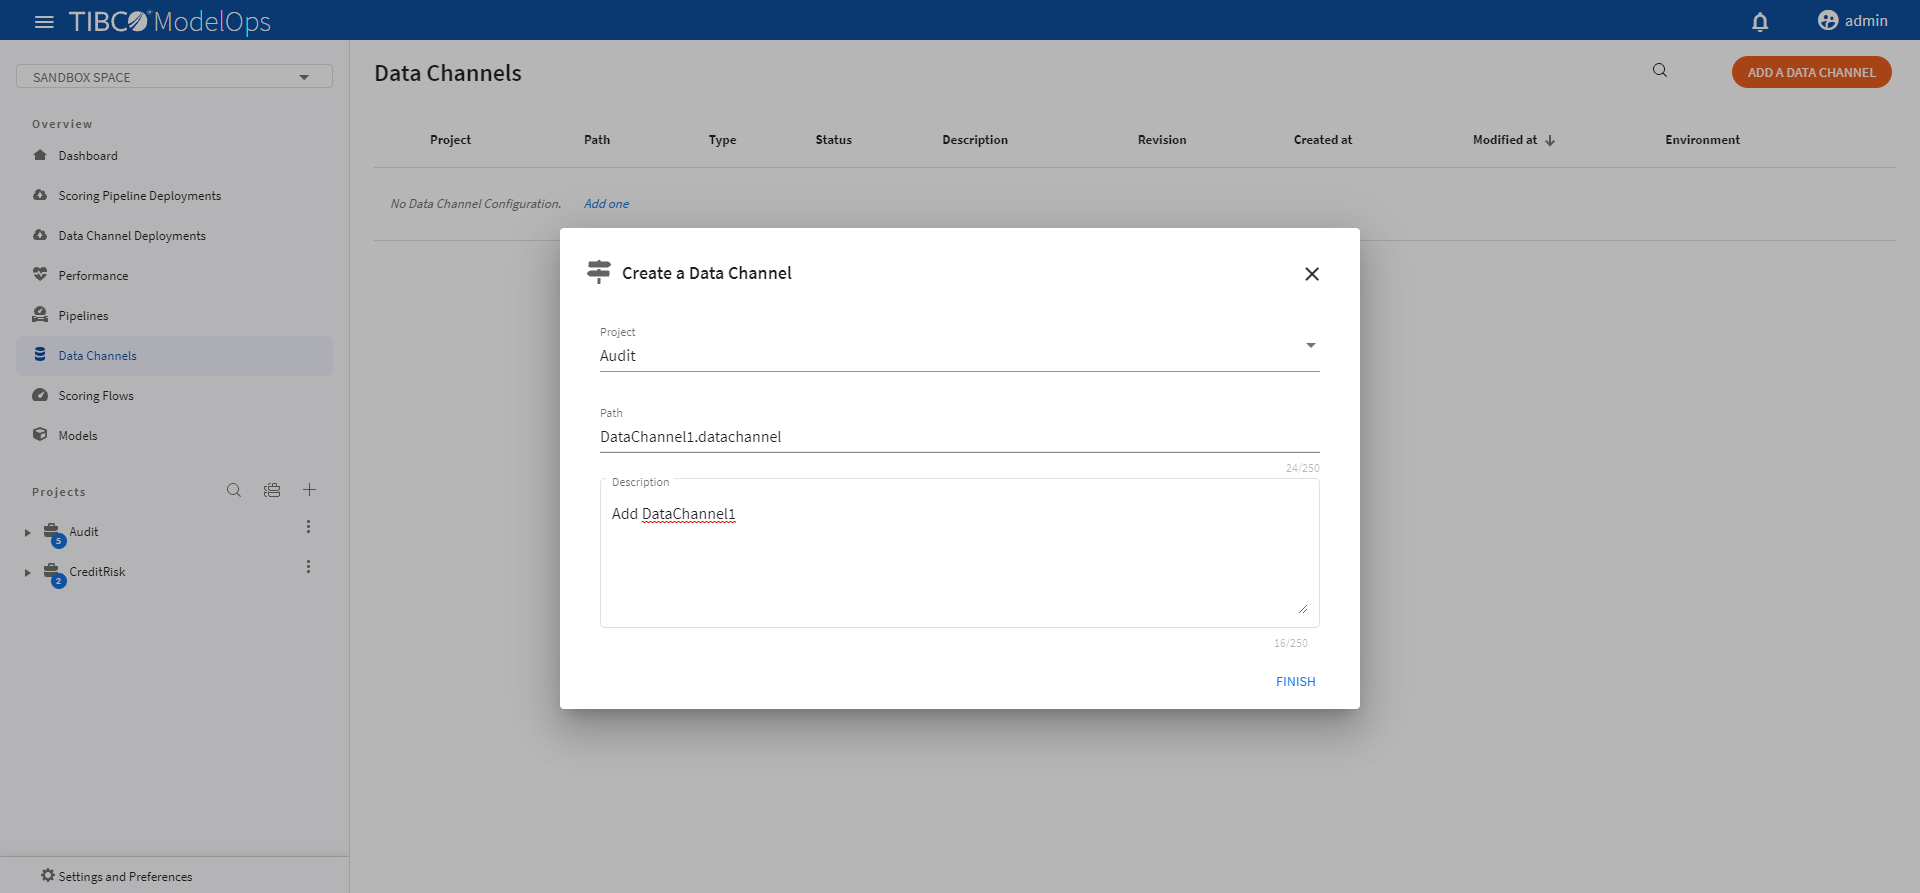
- In the Project Explorer pane, under Overview section, select Data Channels.
- Click ADD A DATA CHANNEL to create a new data channel. You can also click the Add one option to add a new data channel if there are none present.
- On the Create a Data Channel page, select the project, for which you wish to create the data channel, from the drop-down list.
- Add data channel name and description, if needed.
- Click FINISH.
Configuring Data Channels
This section shows how to configure a data channel.
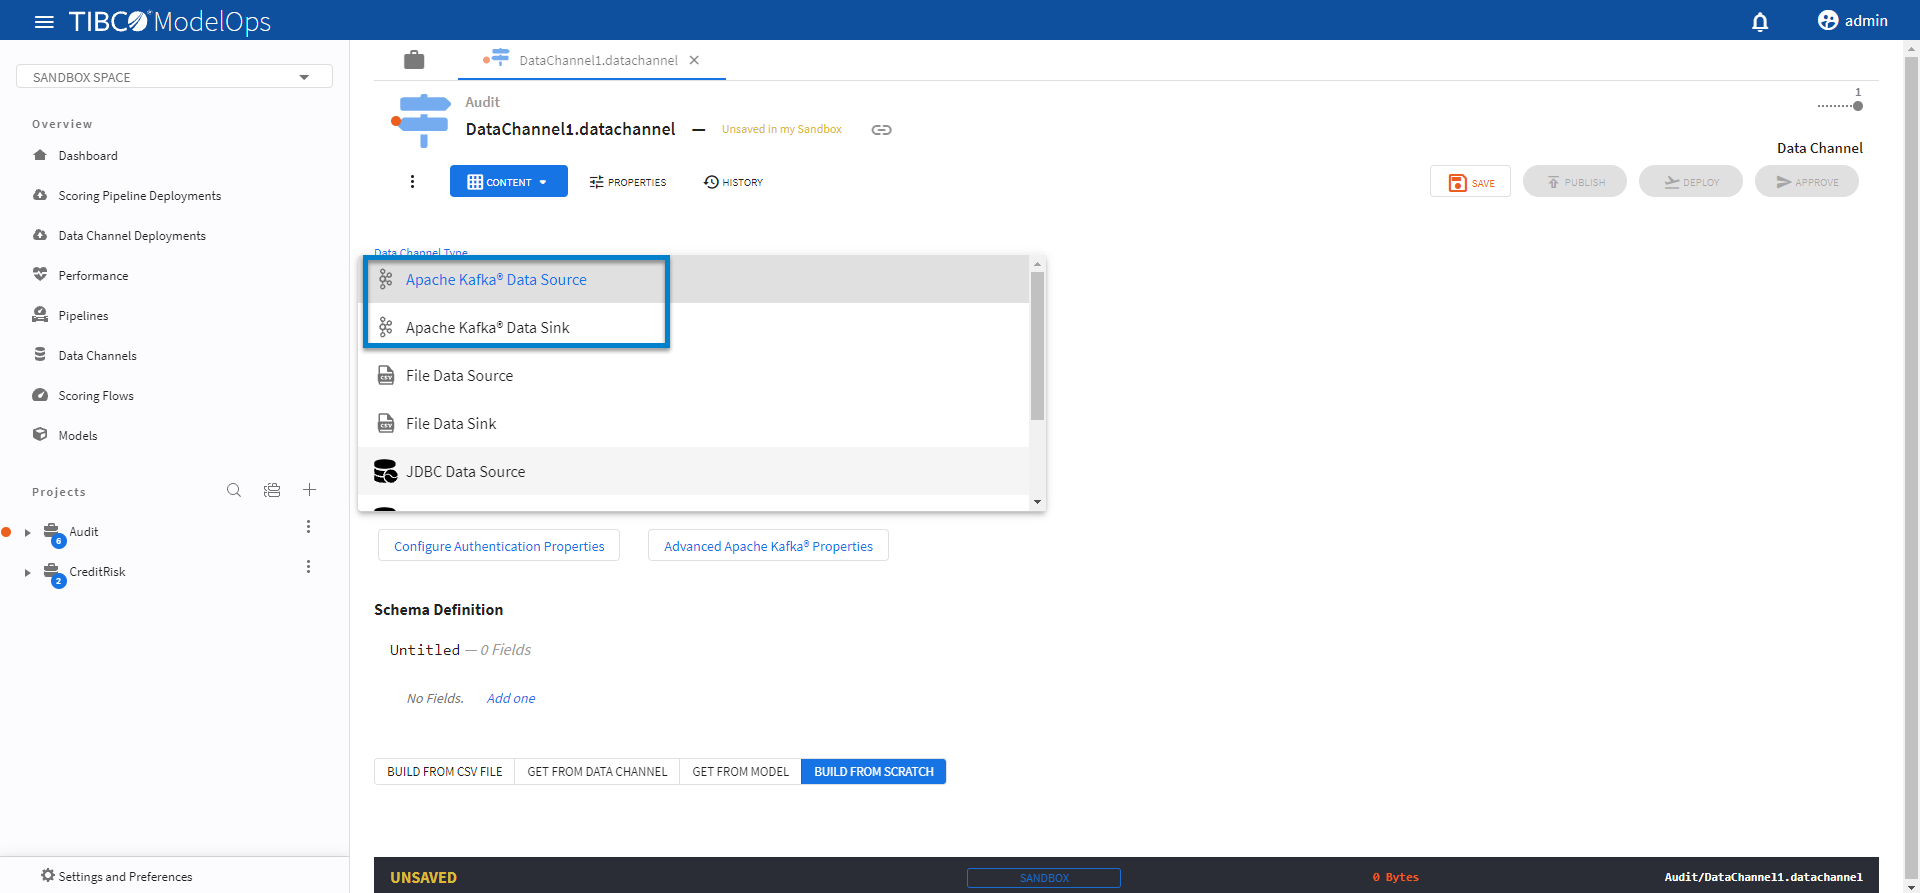
Configuring Kafka Data Channels
- In the Project Explorer pane, under Overview section, select Data Channels.
- Select the data channel, which you wish to configure, from the list.
- On the Data Channel Type tab, select Apache Kafka® Data Source/Sink from the down-list.
- Add topic under the respective field.
- Next, add brokers in the respective fields.
- A broker is comma-separated list of address:port[config=value|config=value] Kafka brokers. The default value is
localhost:9092. This value can also be an Azure Event Hubs connection string. The config=value section of the broker list allows you to specify advance configuration directly in the broker list. - For example, if you require a security.protocol and security.mechanism, you can specify a broker list:
test.com:9093[security.protocol=SASL_SSL,sasl.mechanism=PLAIN|sasl.jaas.config=org.apache.kafka.common.security.plain.PlainLoginModule required username=“admin” password=“********”;]test2.com:9093[security.protocol=SASL_SSL|sasl.mechanism=SCRAM-SHA-256|sasl.jaas.config=org.apache.kafka.common.security.scram.ScramLoginModule required username=“admin” password=“********”;]
- To configure the authentication properties, click the Configure Authentication Properties button.
- Click Advanced Apache Kafka Properties to configure the config=value part of the broker string.
- A broker is comma-separated list of address:port[config=value|config=value] Kafka brokers. The default value is
- On the Schema definition tab, you get the following option to add a schema definition.
- Build from CSV file: Extracts schema from a CSV file. You need to select a
csvfile if you choose this option. - Get from data channel: Adds schema from an existing data channel. You need to select a data channel if you choose this option.
- Build from model: Extracts schema from a model. You need to select a model if you choose this option.
- Build from scratch: Builds schema from scratch.
- Build from CSV file: Extracts schema from a CSV file. You need to select a
- Once done, click SAVE and then PUBLISH.
This publishes your data channel to Published Space.

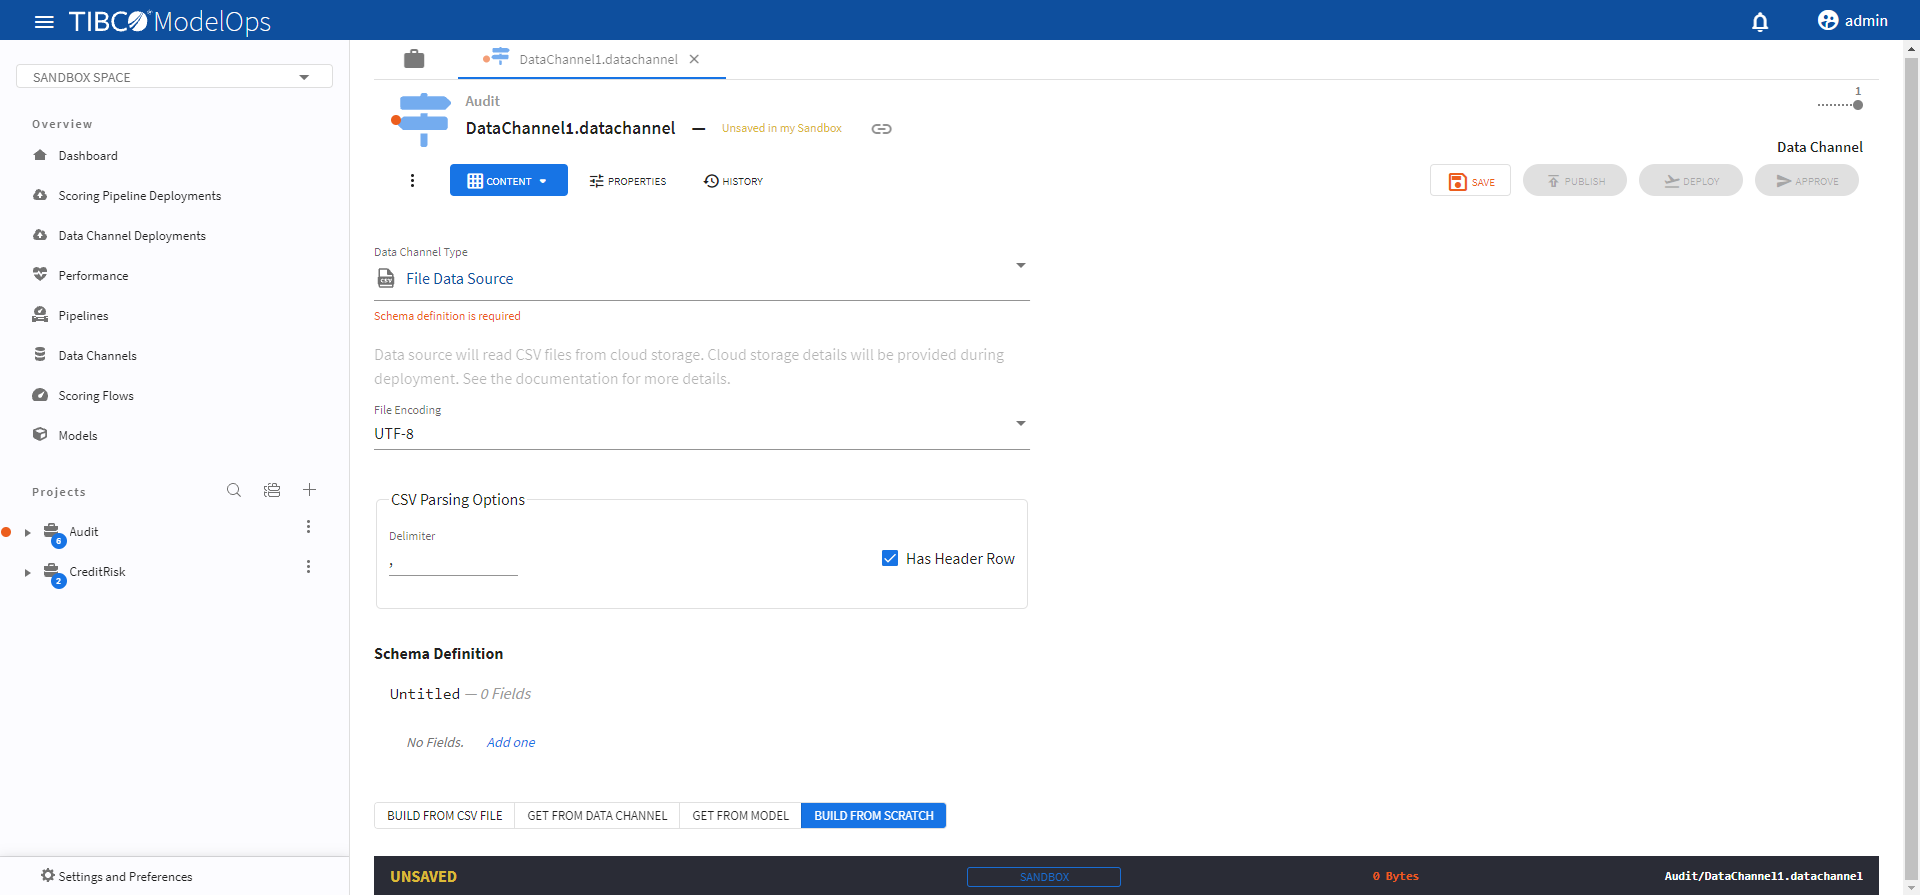
Configuring File Data Channels
- In the Project Explorer pane, under Overview section, select Data Channels.
- From the list, select the data channel to be configured.
- On the Data Channel Type tab, select File Data Source/Sink from the drop-down list.
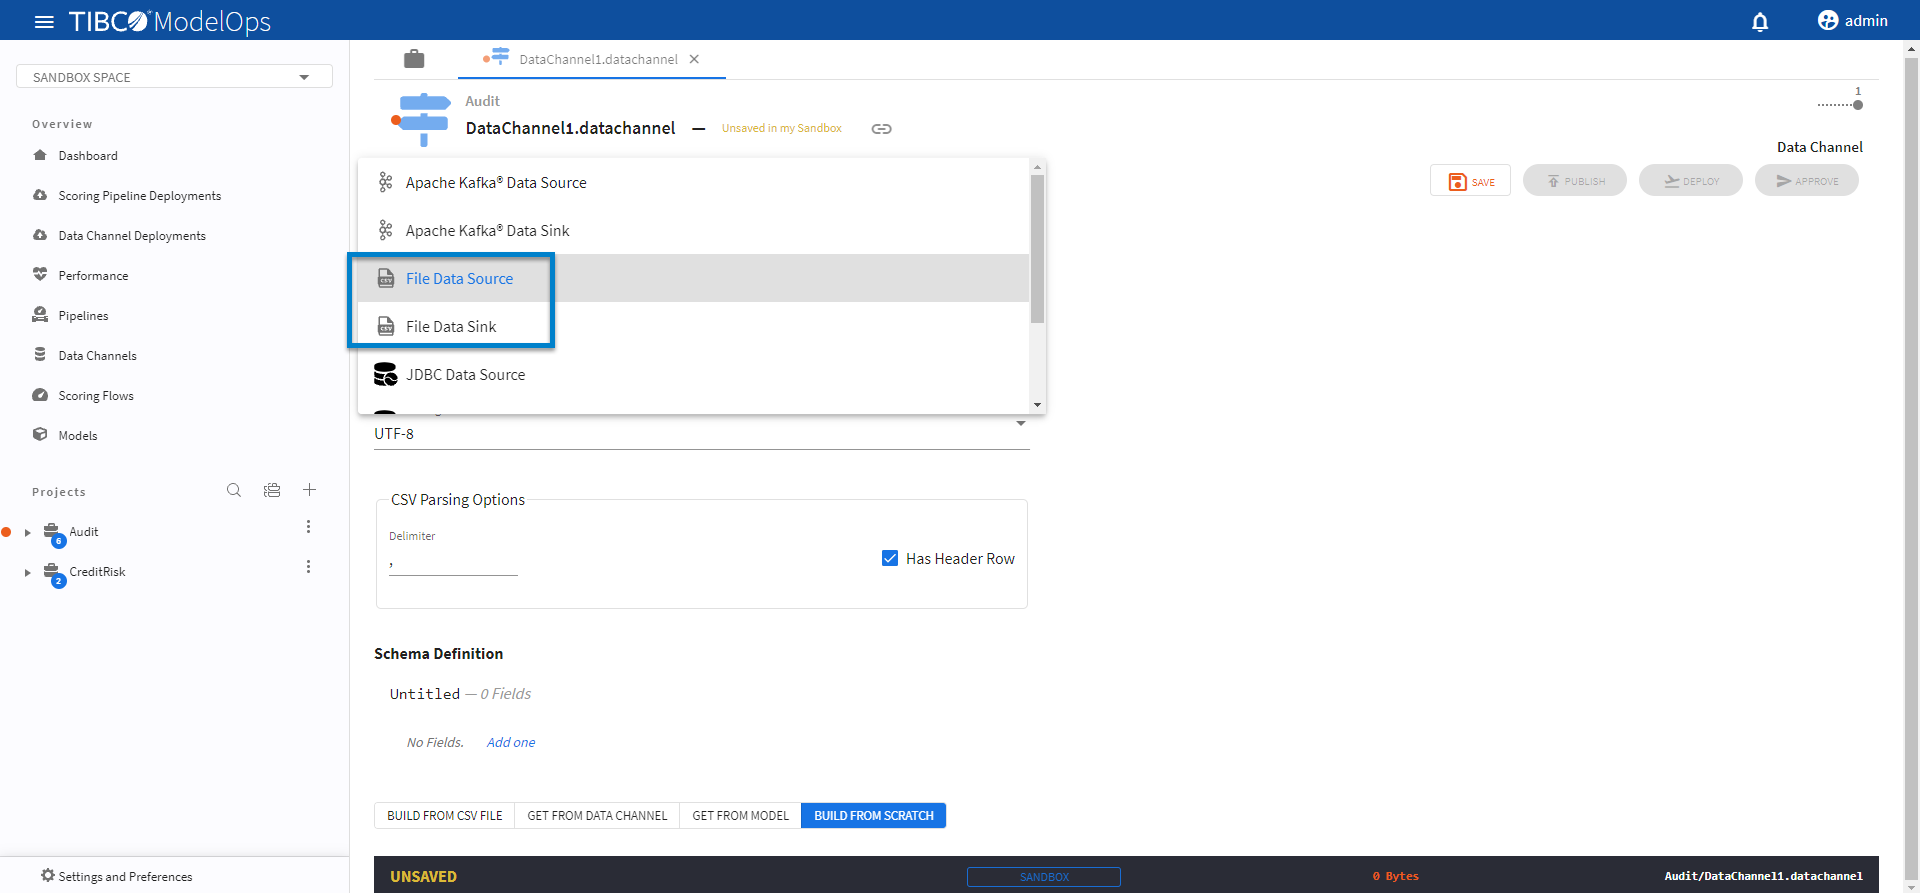
- Under File Encoding, select an encoding value from the drop-down list.
- For CSV Parsing Options, enter the value in the Delimiter field. You also get the option to check off the Has Header Row option.
- On the Schema definition tab, you get the following option to add a schema definition.
- Build from CSV file: Extracts schema from a CSV file. You need to select a
csvfile if you choose this option. - Get from data channel: Adds schema from an existing data channel. You need to select a data channel if you choose this option.
- Build from model: Extracts schema from a model. You need to select a model if you choose this option.
- Build from scratch: Builds schema from scratch.
- Build from CSV file: Extracts schema from a CSV file. You need to select a
- Once done, click SAVE and then PUBLISH.
This publishes your data channel to the Published Space.
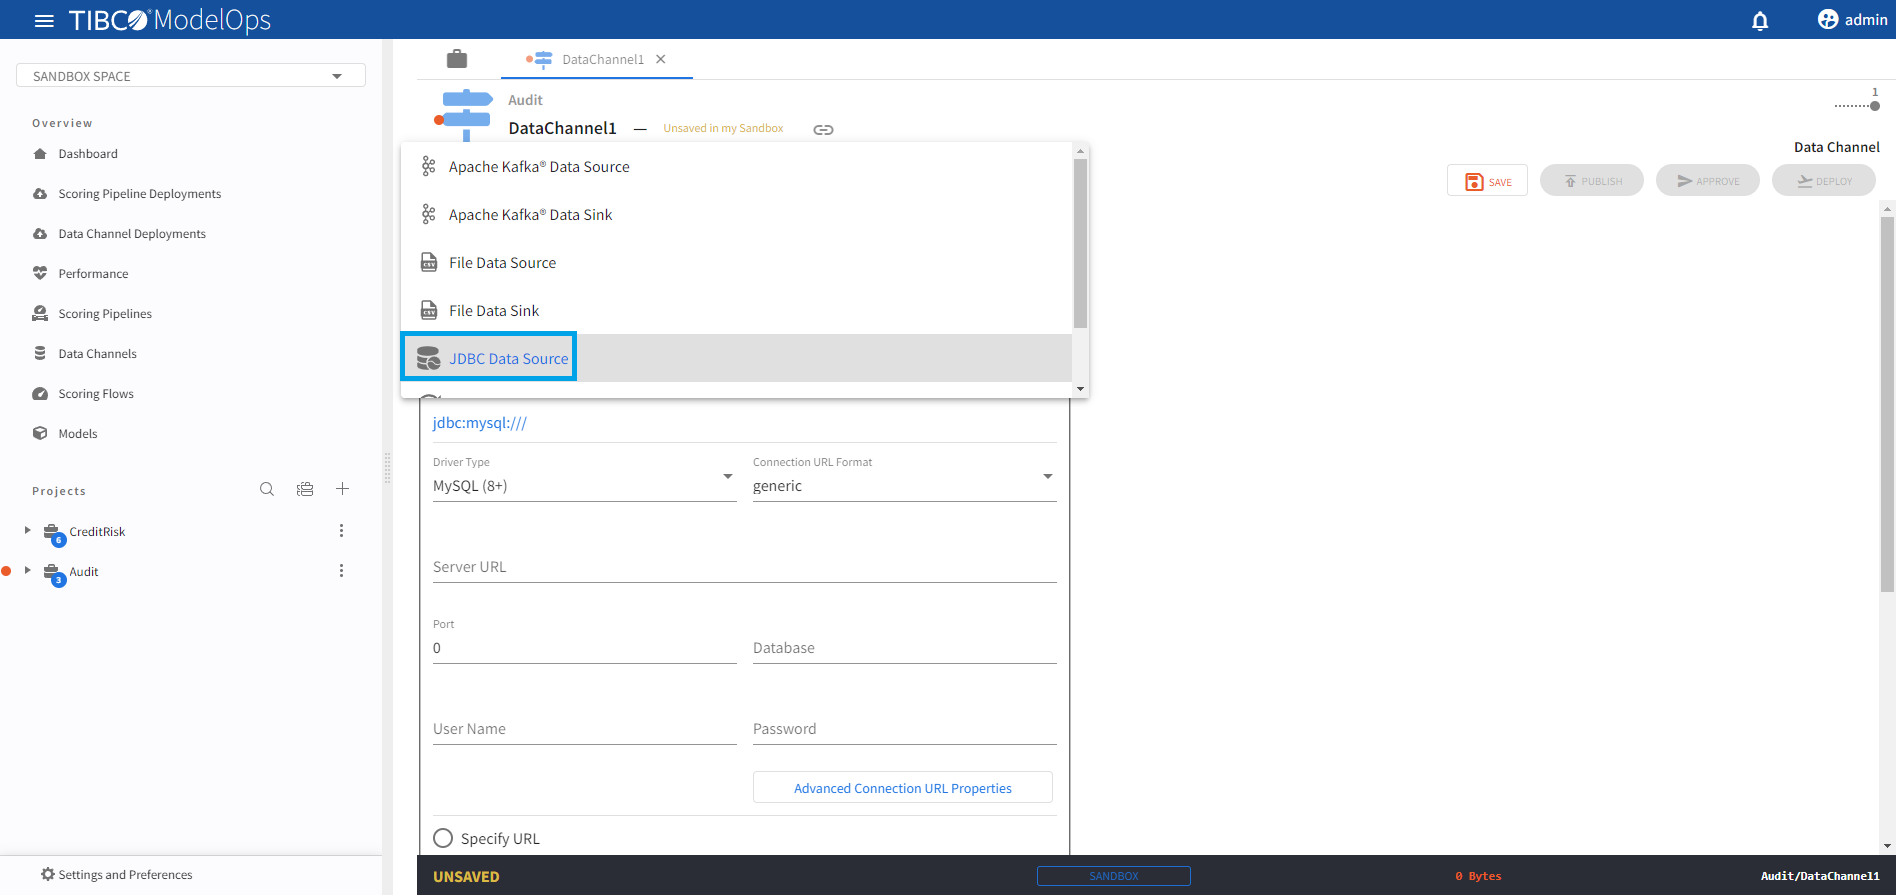
Configuring JDBC Data Channels
- In the Project Explorer pane, under Overview section, select Data Channels.
- From the list, select the data channel to be configured.
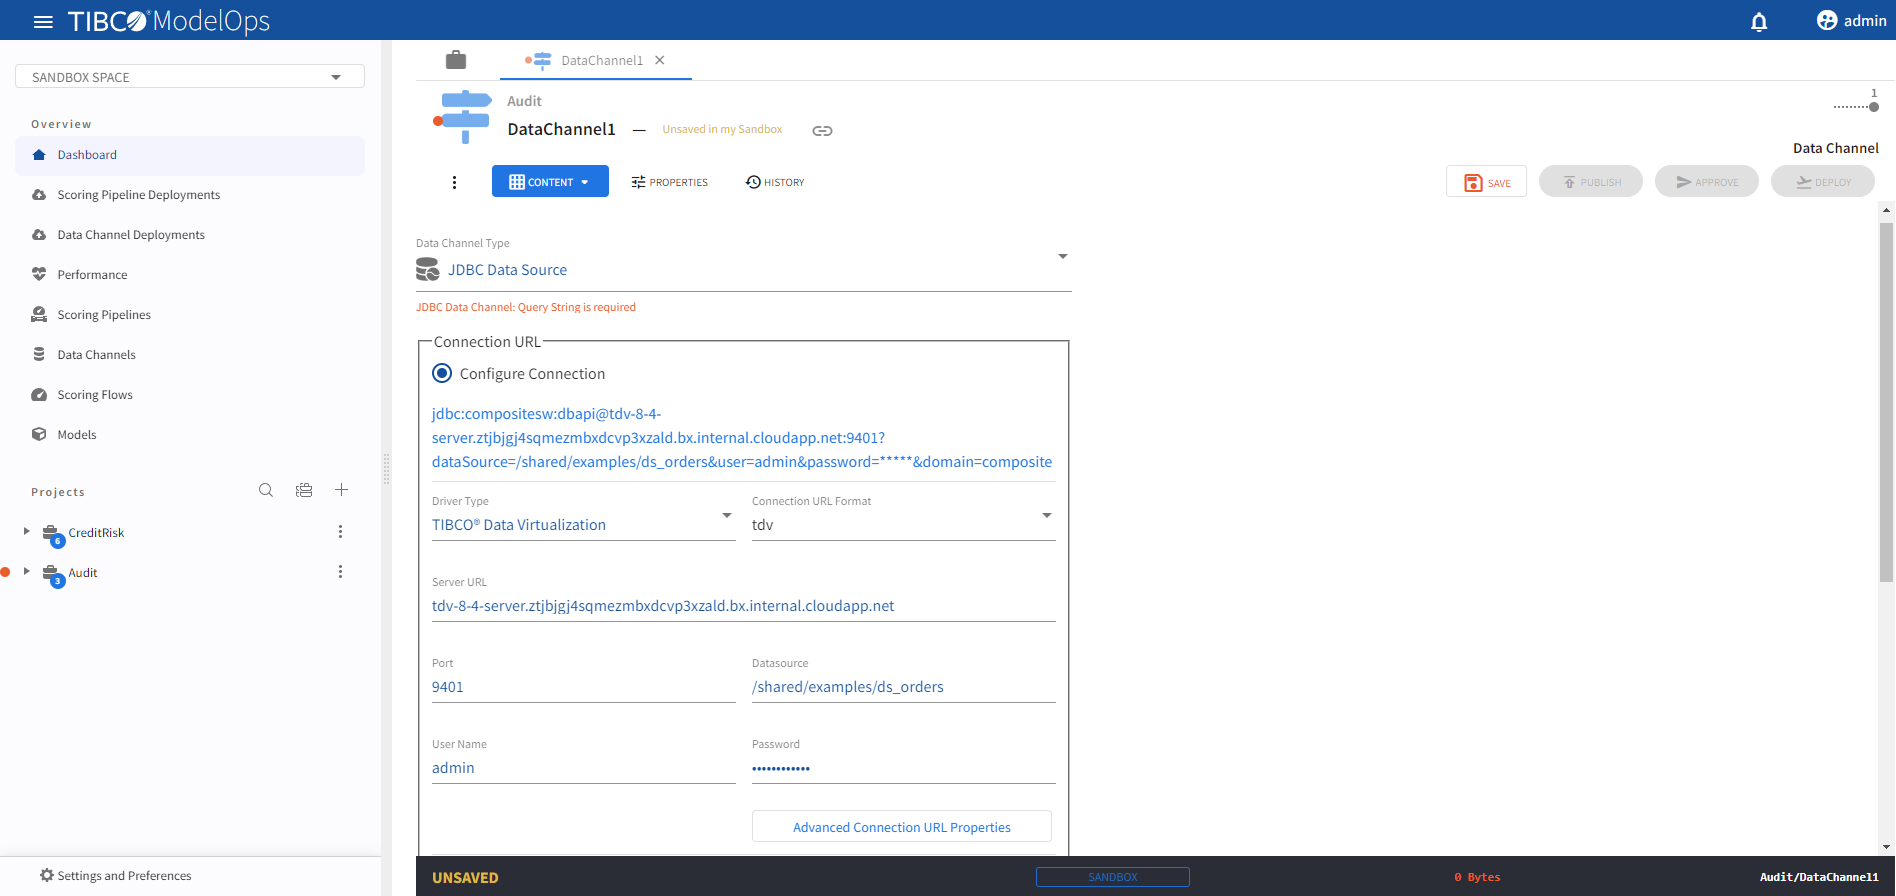
- On the Data Channel Type tab, select JDBC Data Source from the drop-down list.
-
Under the Connection URL group box, two radio button options are available.
-
Configure Connection: Use this option to provide the various parts required to automatically configure a database Connection URL.
- Driver Type: Choose one of MySQL(8+) or TIBCO® Data Virtualization JDBC driver types from the drop-down list.
- Connection URL Format:
- MySQL(8+) - Select from one of generic, address-equals or key-value format types from the drop-down list. These options specify the MySQL syntax to use for automatic connection URL configuration. The MySQL connection URL syntax is further described here.
- TIBCO® Data Virtualization - Leave the default tdv option as is for TIBCO® Data Virtualization.
- Server URL: Enter a database Server URL here.
- Examples:
- mysql8-db.clocq573g2xt.us-east-1.rds.amazonaws.com
- tdv-8-4-server.ztjbjgj4sqmezmbxdcvp3xzald.bx.internal.cloudapp.net
- Examples:
- Port: Database port number (e.g. 3306).
- Datasource: Source database name.
- Examples:
- /shared/examples/ds_orders
- testdb
- Examples:
- User Name: Database user.
- Password: Password for the provided database user on a password text field.
- Advanced Connection URL Properties: Click this button to show a new popup dialog to directly configure any advanced connection URL properties as Key-Value pairs.
-
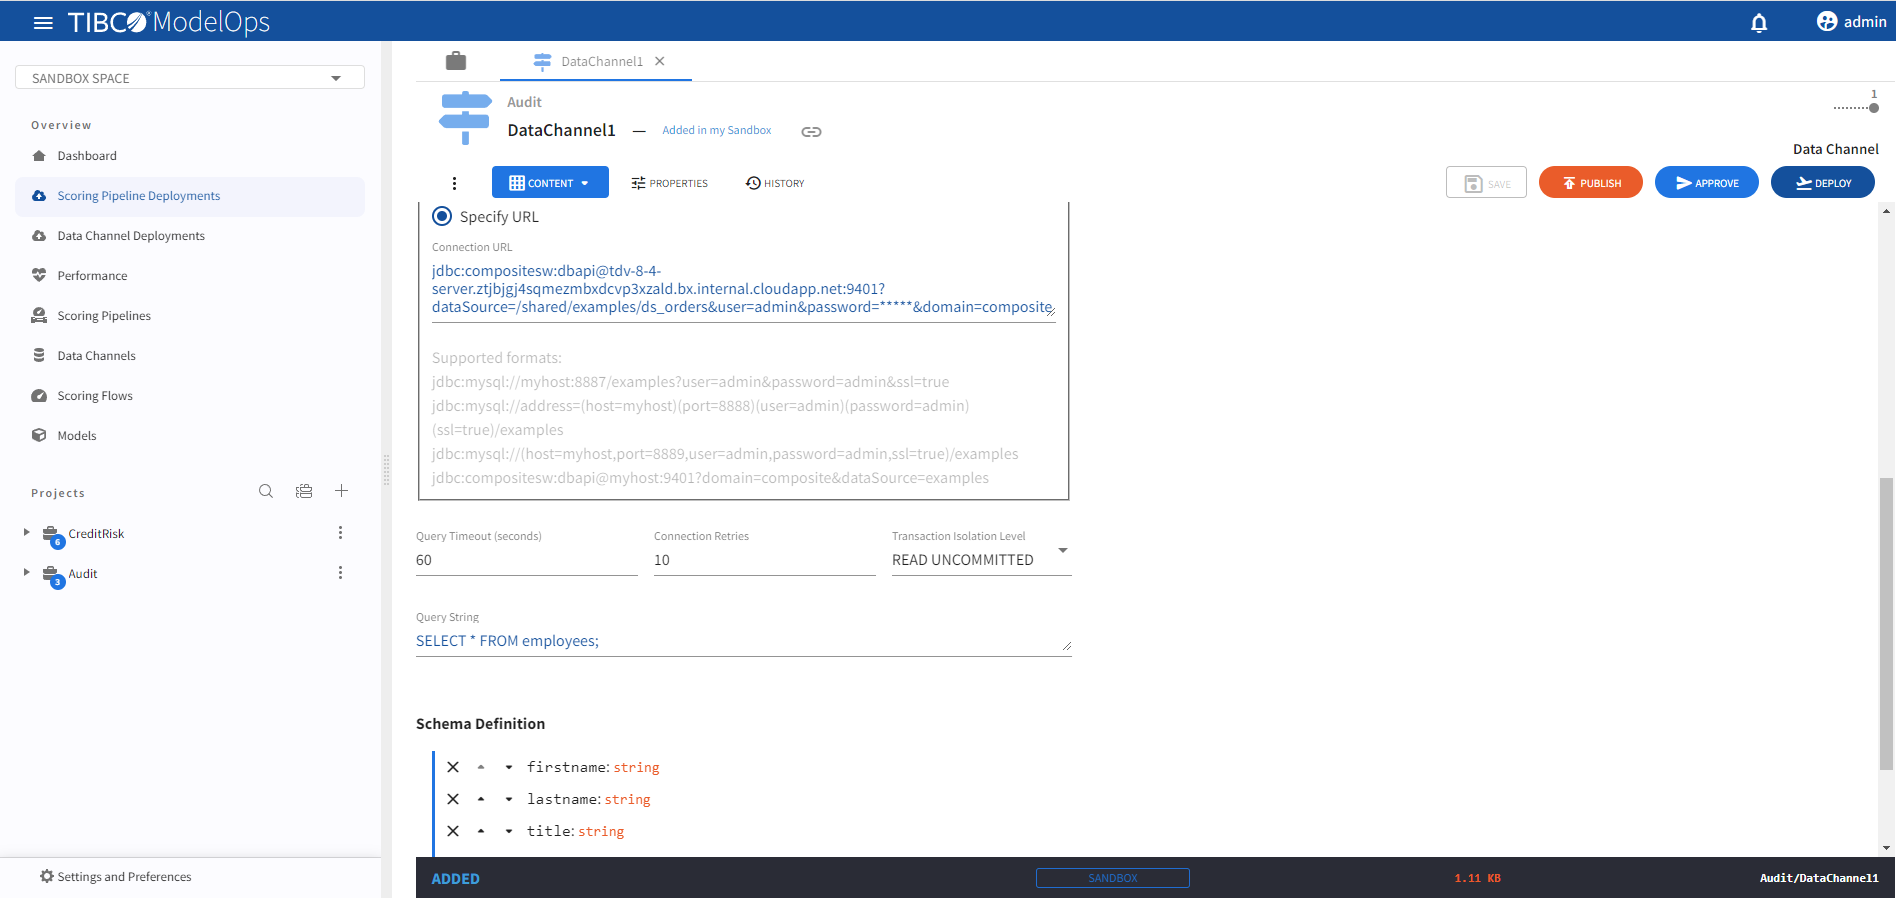
Specify URL: Use this text box option to directly provide either a MySQL(8+) or TIBCO® Data Virtualization connection URL.
- Examples of connection URLs:
jdbc:compositesw:dbapi@tdv-8-4-server.ztjbjgj4sqmezmbxdcvp3xzald.bx.internal.cloudapp.net:9401?domain=composite&dataSource=/shared/examples/ds_orders&user=admin&password=*****jdbc:mysql://mysql8-db.clocq573g2xt.us-east-1.rds.amazonaws.com:3306/demodb?user=dataadmin&password=*****
- Examples of connection URLs:
-
-
Use the Query Timeout (seconds) option to specify a timeout value in seconds for long running queries (defaults to 60 seconds).
- For the Connection Retries option specify a value (> 0) for maximum attempts to reconnect to the database server upon failed connections. Connection retries are attempted whenever a database connection is established i.e. either before a query execution or during periodic health checks (defaults to 10 retries).
- Select a Transaction Isolation level to use from the drop-down list. These options are further described here.
- For the Query String option, provide either a SELECT or EXECUTE style SQL query statement.
- On the Schema definition tab, you get the following option to add a schema definition.
- Build from CSV file: Extracts schema from a CSV file. You need to select a
csvfile if you choose this option. - Get from data channel: Adds schema from an existing data channel. You need to select a data channel if you choose this option.
- Get from model: Extracts schema from a model. You need to select a model if you choose this option.
- Build from scratch: Builds schema from scratch.
- Build from CSV file: Extracts schema from a CSV file. You need to select a
- Once done, click SAVE and then PUBLISH.

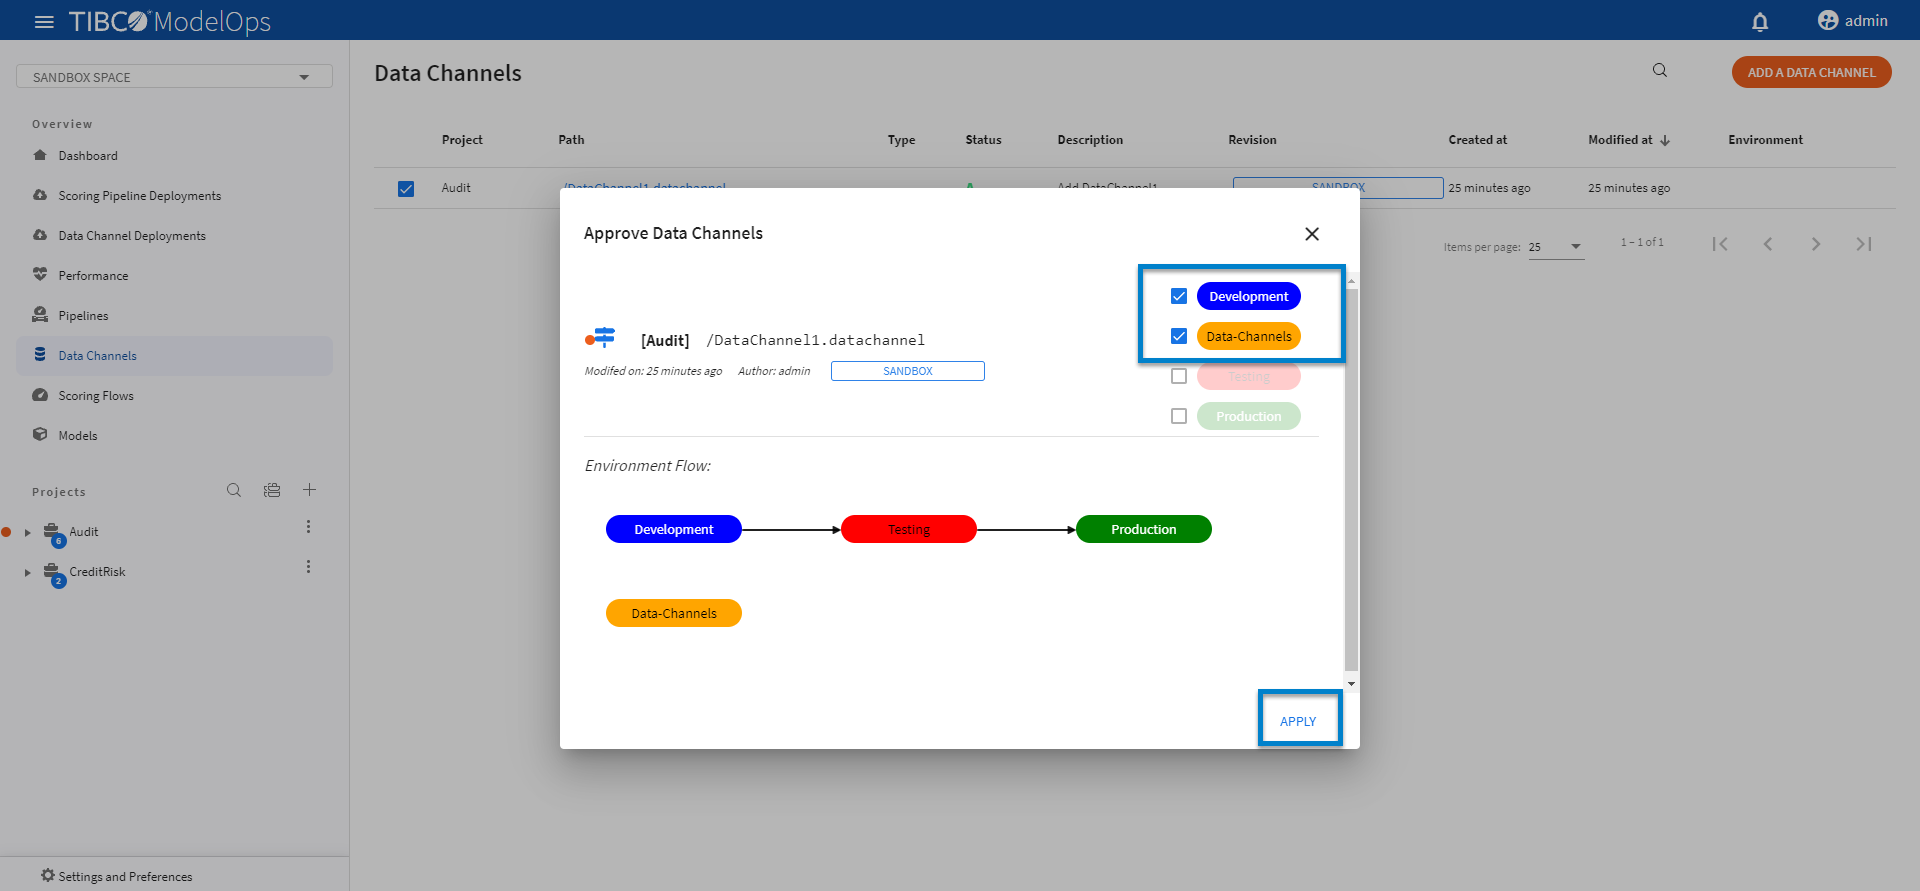
Approving a Data Channels
- In the Project Explorer pane, under Overview section, select Data Channels.
- Select the data channel that needs to be promoted by clicking the check box next to the project name.
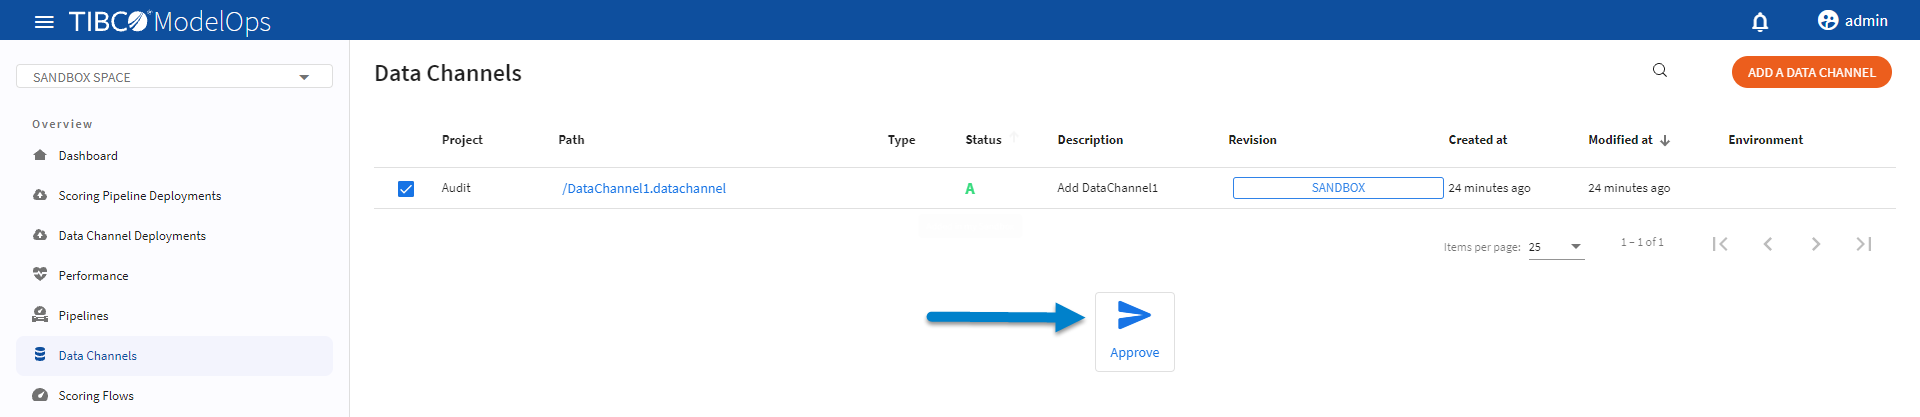
-
Click Approve present at the bottom of the list of data channels.
- Select the desired environments and click APPLY.
Deploying Data Channels
- In the Project Explorer pane, under Overview section, select Data Channel Deployment.
- Select the DEPLOY A DATA CHANNEL option.
- Add deployment name and description in the respective field.
- Select Data-Channels environment from the drop-down list.
- Select when you need to schedule the job from the given options (Immediate, Future, or Periodic).
- Select the duration for which you need to run the job. You can run the job forever or add the duration as per your needs.
- Click DEPLOY.
Note: You might see failure in pipeline deployment if the data channel is not accessible from the environment in which the scoring pipeline is being deployed.
- Consider a scenario where a Data channel is deployed to Data-Channels environment with Test and Production as external environments.
- Now, when you attempt to deploy pipeline to the Development environment, you might encounter a Pipeline deployment failure, since its data channel is not accessible from the Development environment (only Data-Channels, Test, and Production)
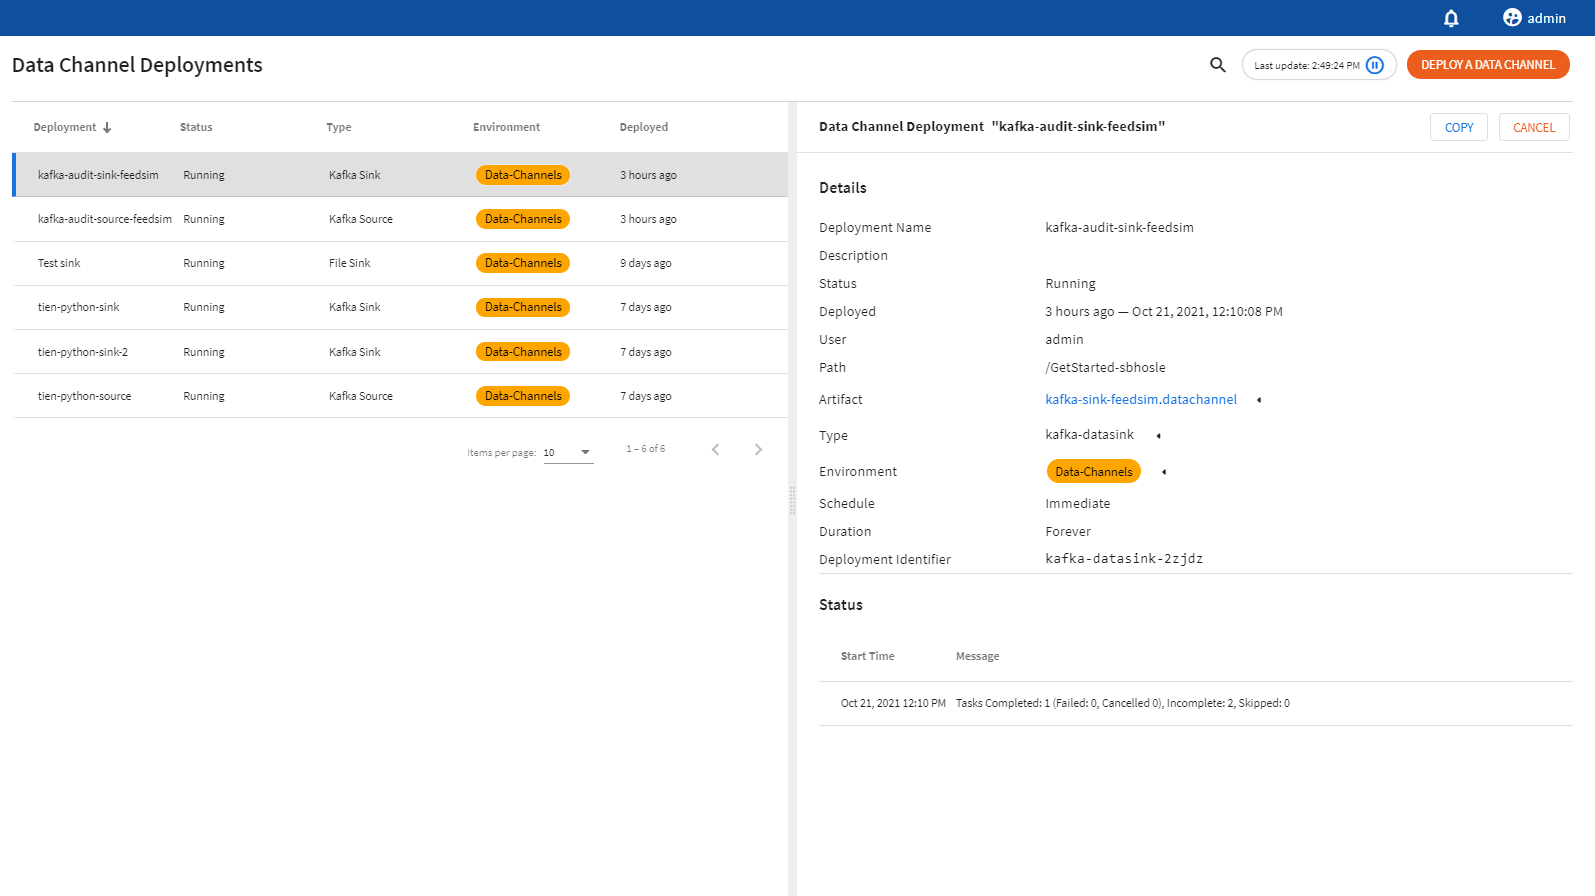
Viewing Data Channels
You can view status for deployed data channels by:
- In the Project Explorer pane, under Overview section, select Data Channel Deployment.
- A list of deployed data channels appears here.
- The list is sorted based on the deployed time in ascending order.
- The list shows information such as Deployment name, status of the deployed data channel, type of data channel, environment, and time of deployment.
- Additional information is displayed on the right pane after clicking the individual pipeline instance.