
Working with Scoring Flows and Pipelines
This page explains how you can create Scoring Pipelines and Scoring Flows.
Contents
Overview
- Scoring Pipeline: A scoring pipeline is a design-time artifact that defines a scoring pipeline. A scoring pipeline defines a data source, a data sink, one or more scoring flows, and zero or more models used in the scoring flow.
- Scoring Flow: A scoring flow is an ordered sequence of processing steps that operate on data received from a data source and sent to a data sink. The data flowing through a scoring flow can be transformed and augmented by processing steps.
Working with Scoring Flows and Scoring Pipelines
Creating a Scoring Flow
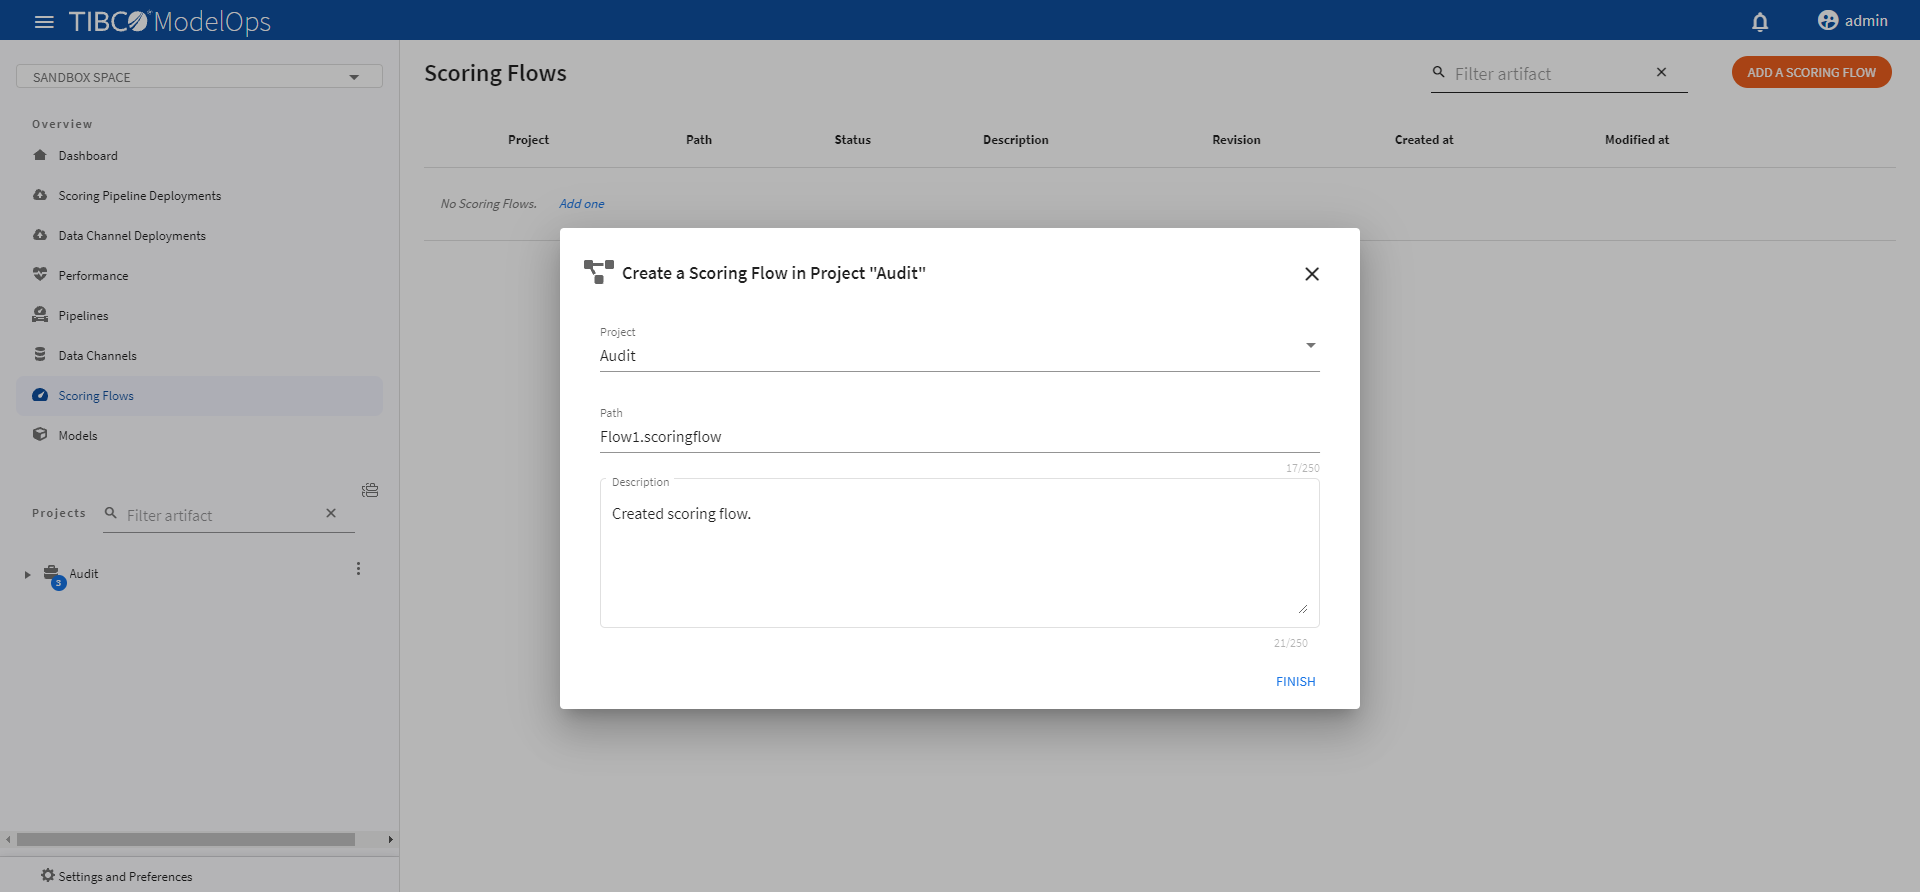
- In the Project Explorer pane, under Overview section, click Scoring Flows.
- Click ADD A SCORING FLOW to create a new scoring flow. You can also click Add one to add a new scoring flow if there are none present.
- Select the project name from the list.
- Add the flow name. The extension is added automatically.
-
Click FINISH.
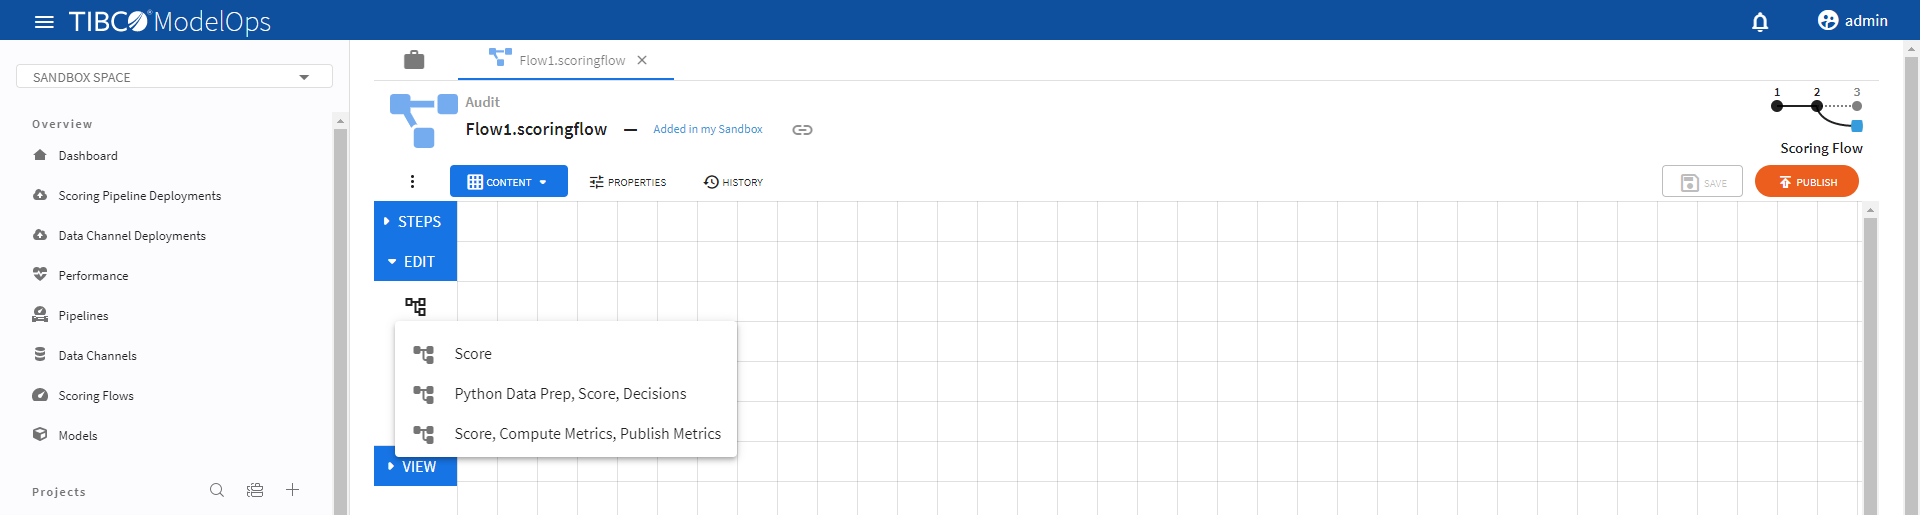
Authoring a Scoring Flow
- In the Project Explorer pane, under Overview section, click Scoring Flows.
- Select the scoring flow.
- Select a scoring flow template by clicking the Load template flows option under Edit section.
-
The Score template can be configured by following these steps:
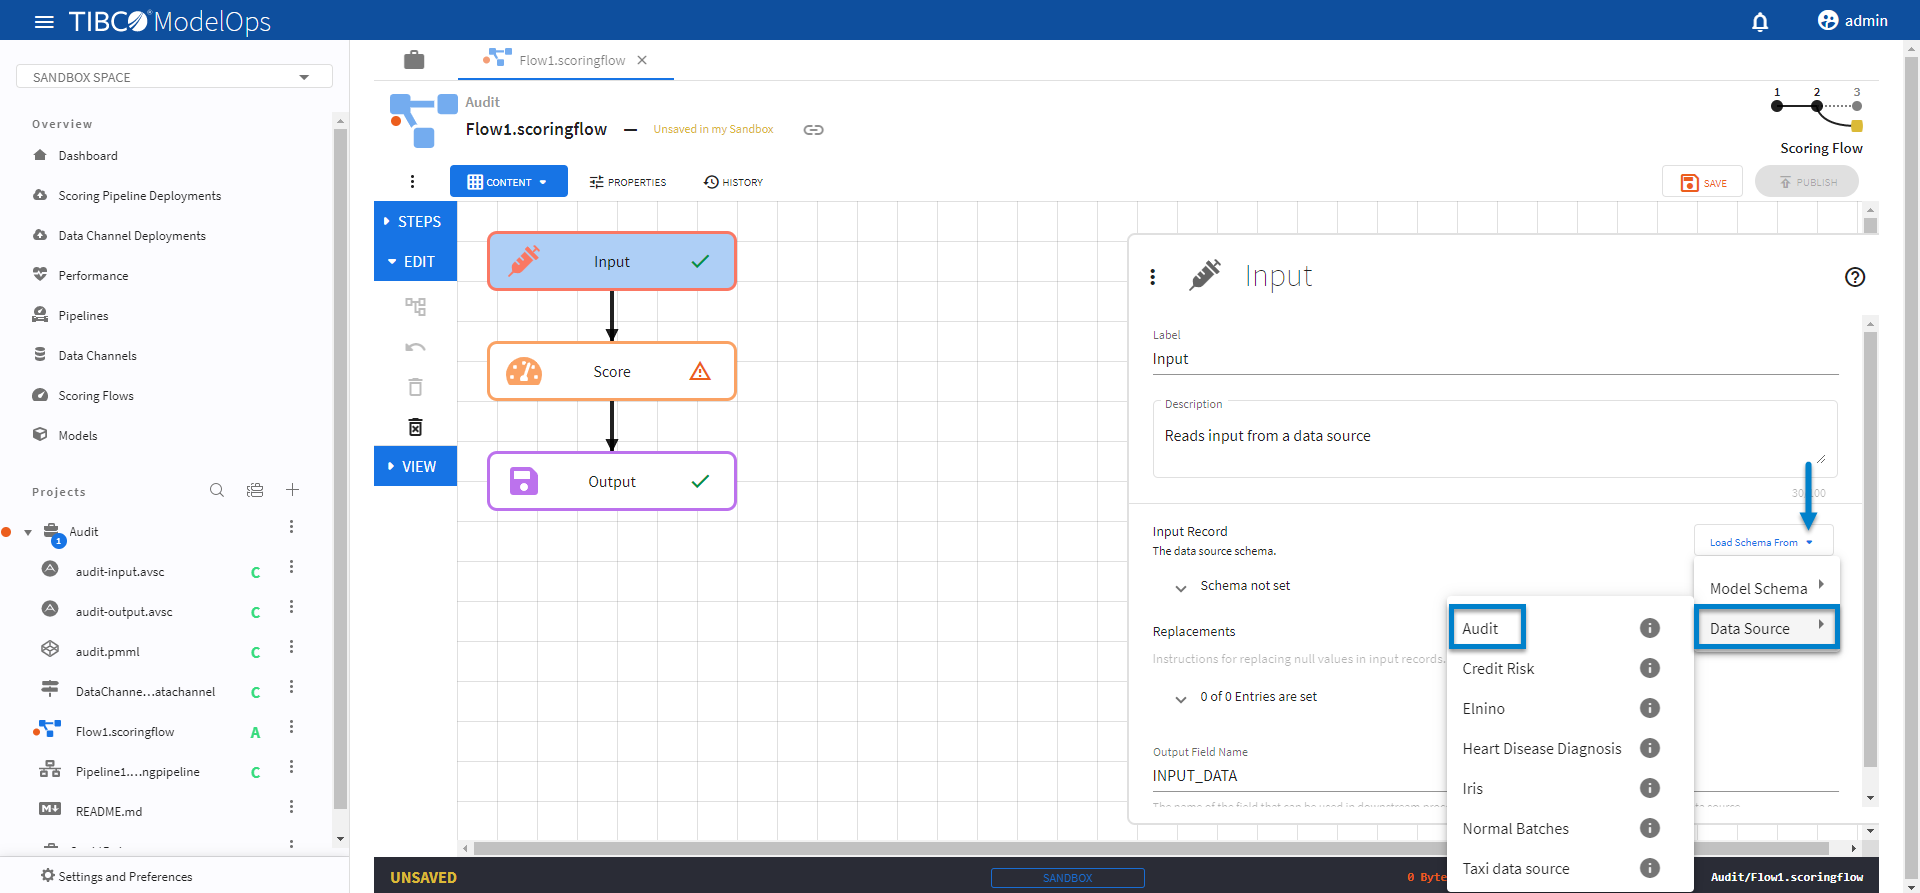
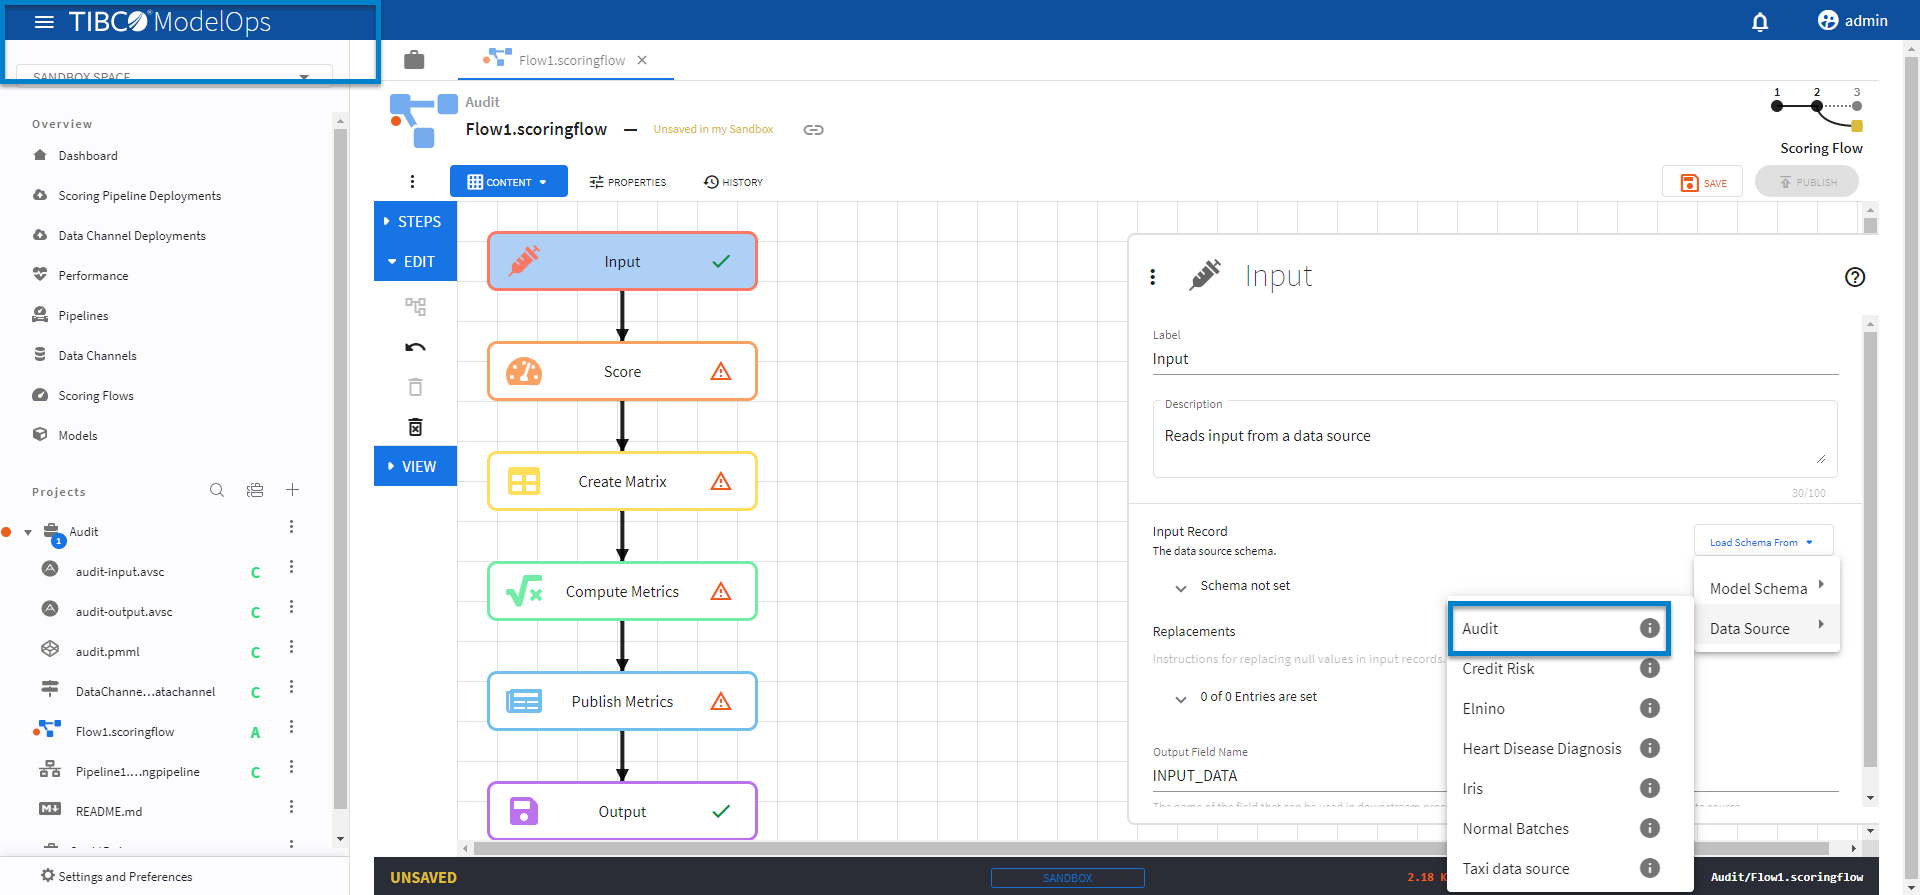
- Configure the Input block.
- Click Input block to open the Input processing step’s configuration form.
- Click the drop-down menu on the Load Schema From option.
- Next, click Data Source and select the appropriate data source.
-
Doing this automatically populates the input data source schema fields.
- Click SAVE.
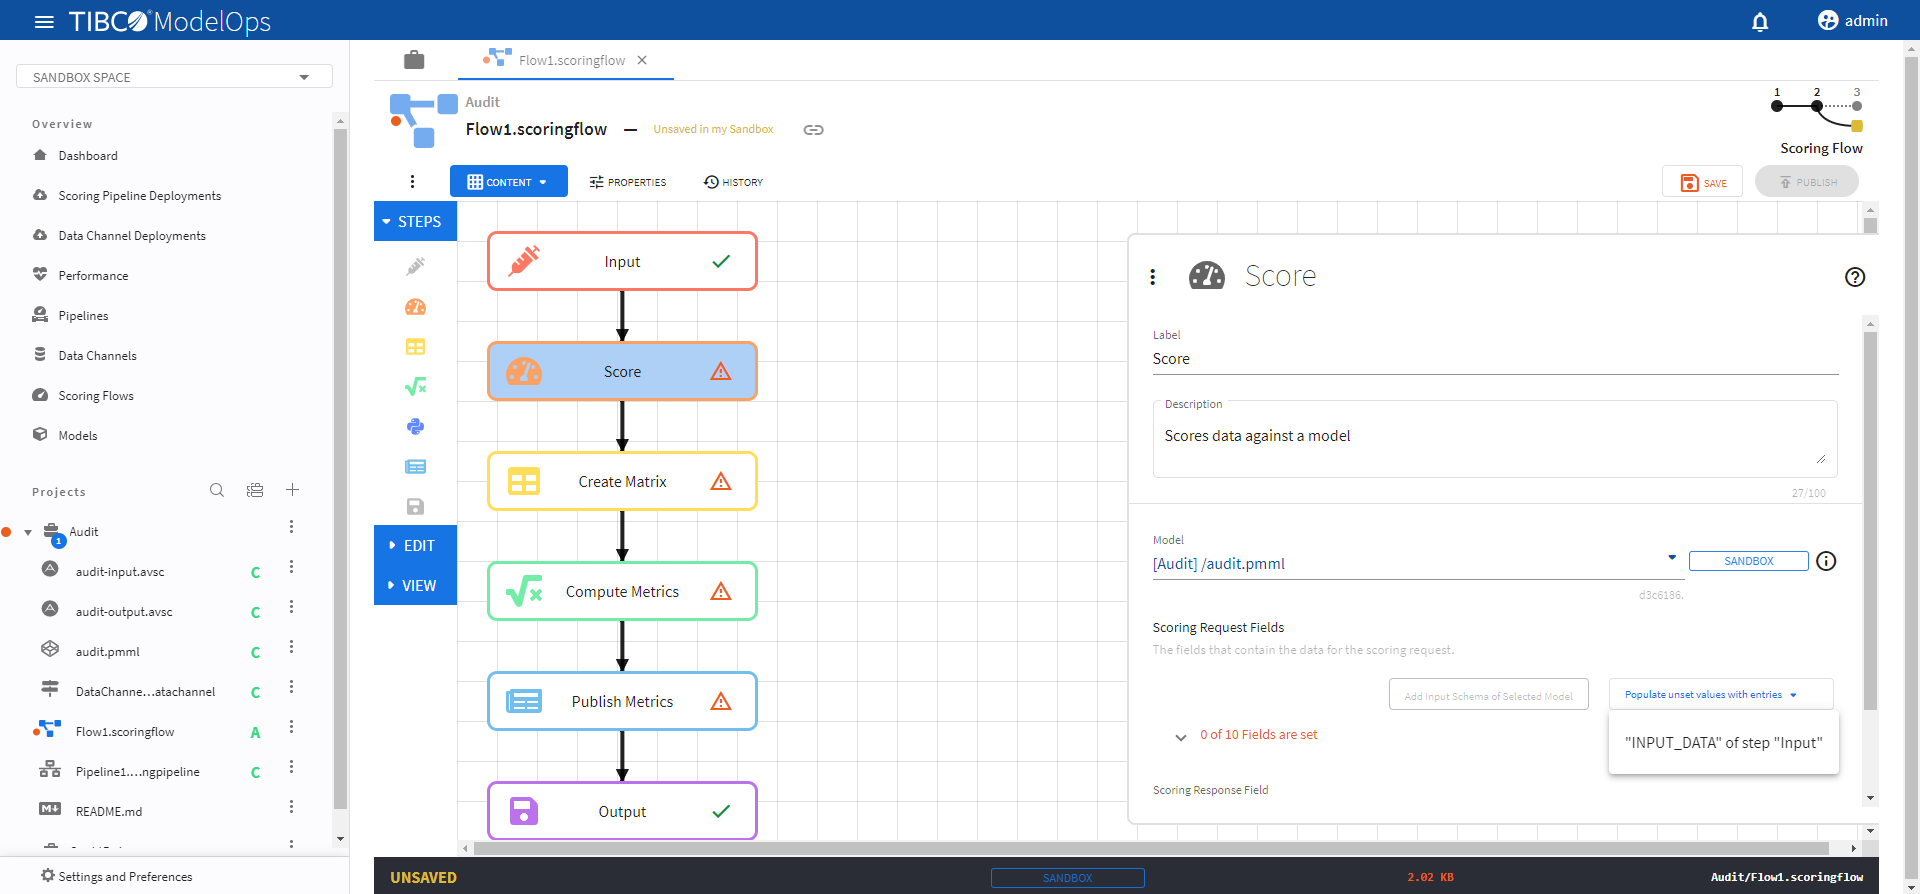
- Configure the Score block.
- Click Score block to open the Score processing step’s configuration form.
- Under the Model section, select audit.pmml model from the drop-down list.
- Under the Scoring Request Fields section, click the Add Input Schema of Selected Model option.
- Next, from Populate unset values with entries list, select “INPUT_DATA” of step “Input”.

-
Doing so populates all the scoring request fields.
- Click SAVE.
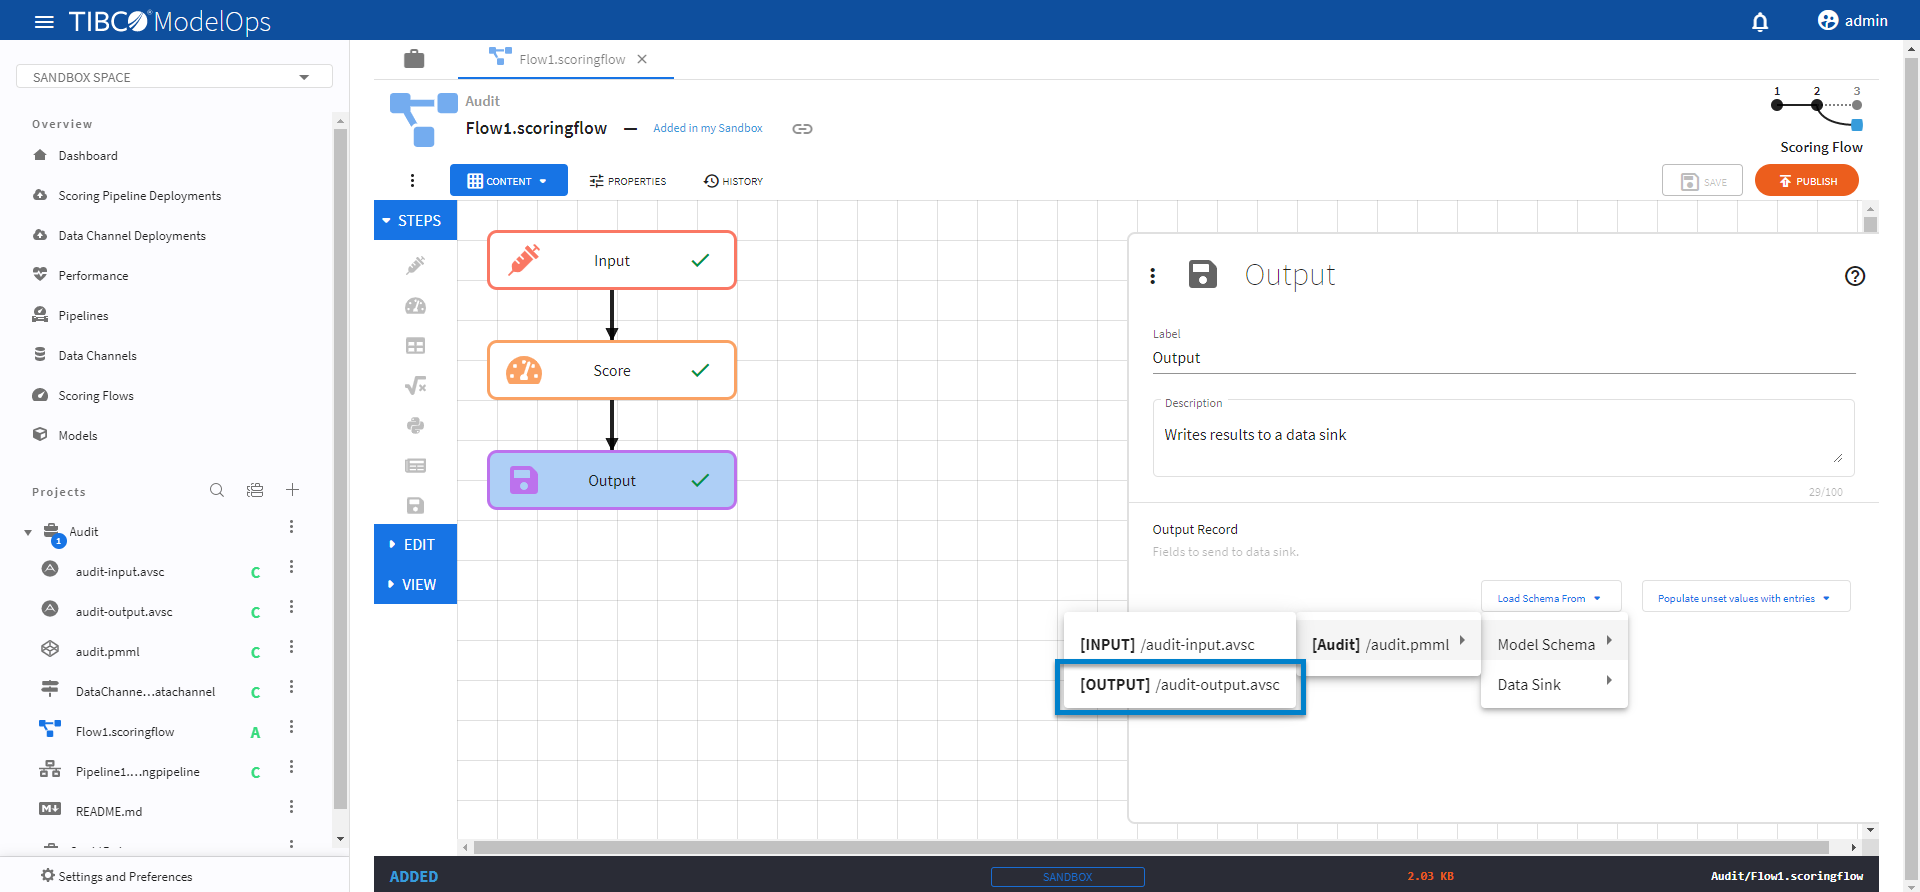
- Configure the Output block.
- Click Output block to open the Output processing step’s configuration form.
- Click the drop-down menu for the Load Schema from option
- Select Model Schema > audit.pmml > audit-output.avsc schema.
-
Next, from Populate unset values with entries list, select the input from the Score step.
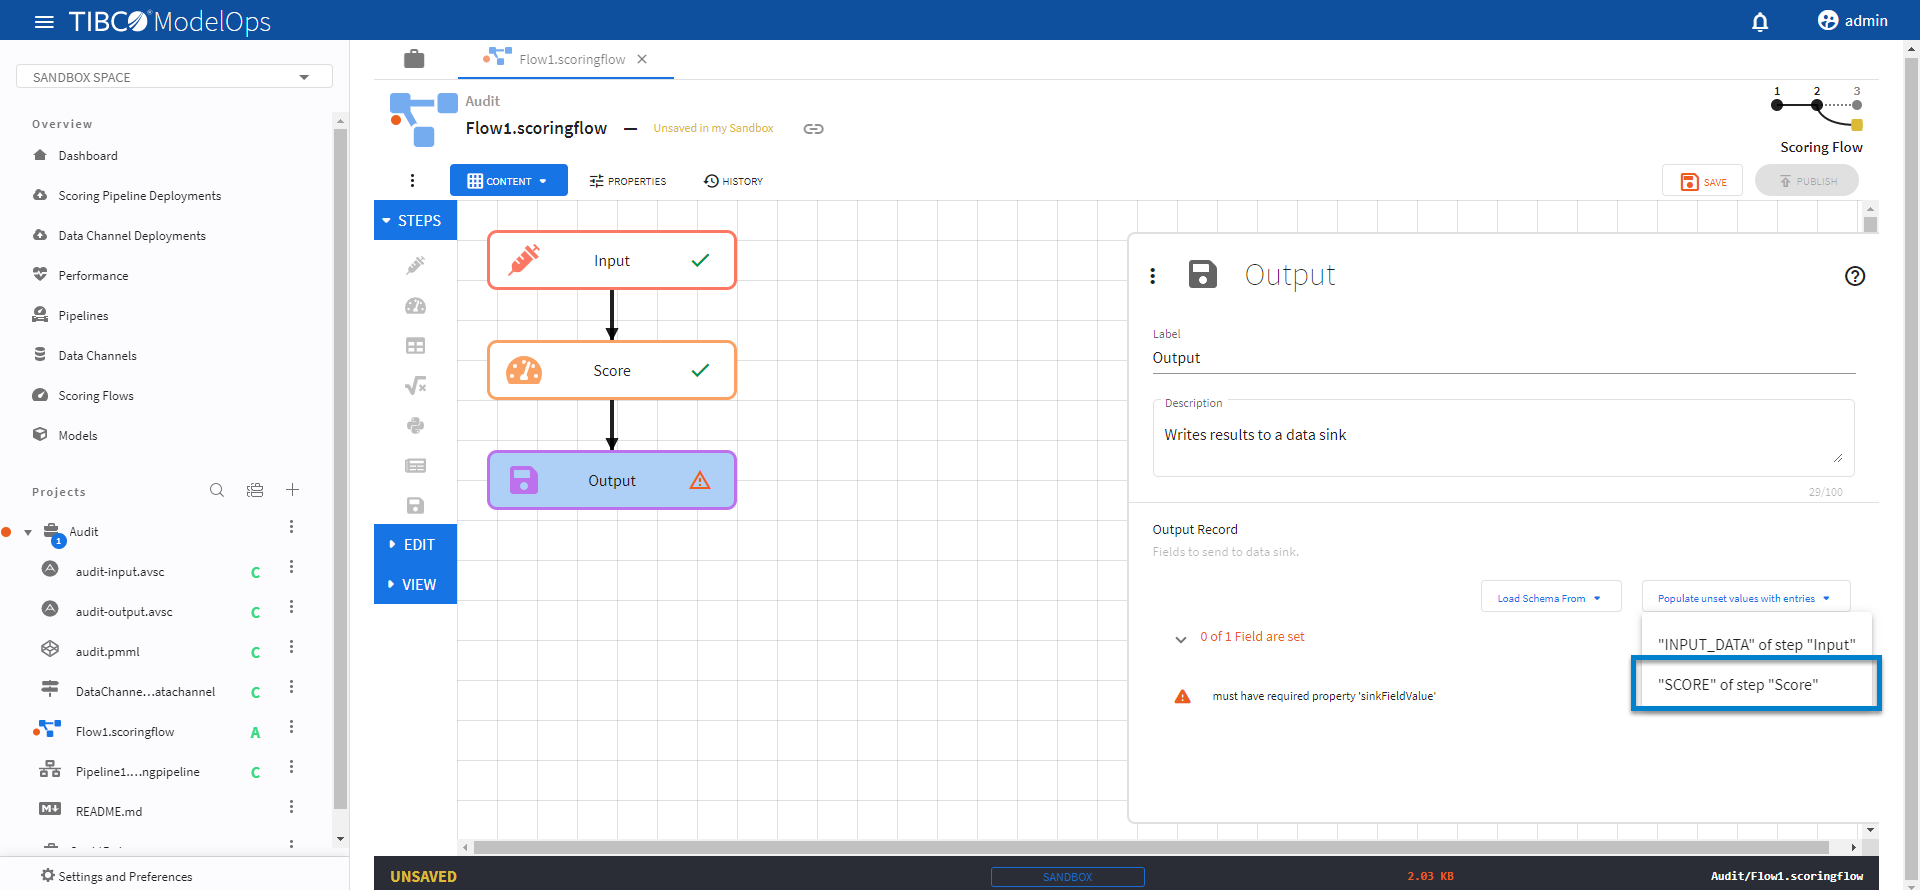
-
Click SAVE.
Once every block is configured and saved, you can publish the scoring flow to Published Space.
- Configure the Input block.
- The Python Data Prep, Score, Decisions template can be configured by following these steps:
- The CreditRisk project works well for this template. Make sure to select this project while creating the scoring flow.
- Configure the Input block.
- Click the Input processing step to open its configuration form.
- Click Load Schema From > Data Source > select the data channel whose schema matches with credit-risk-input.csv.
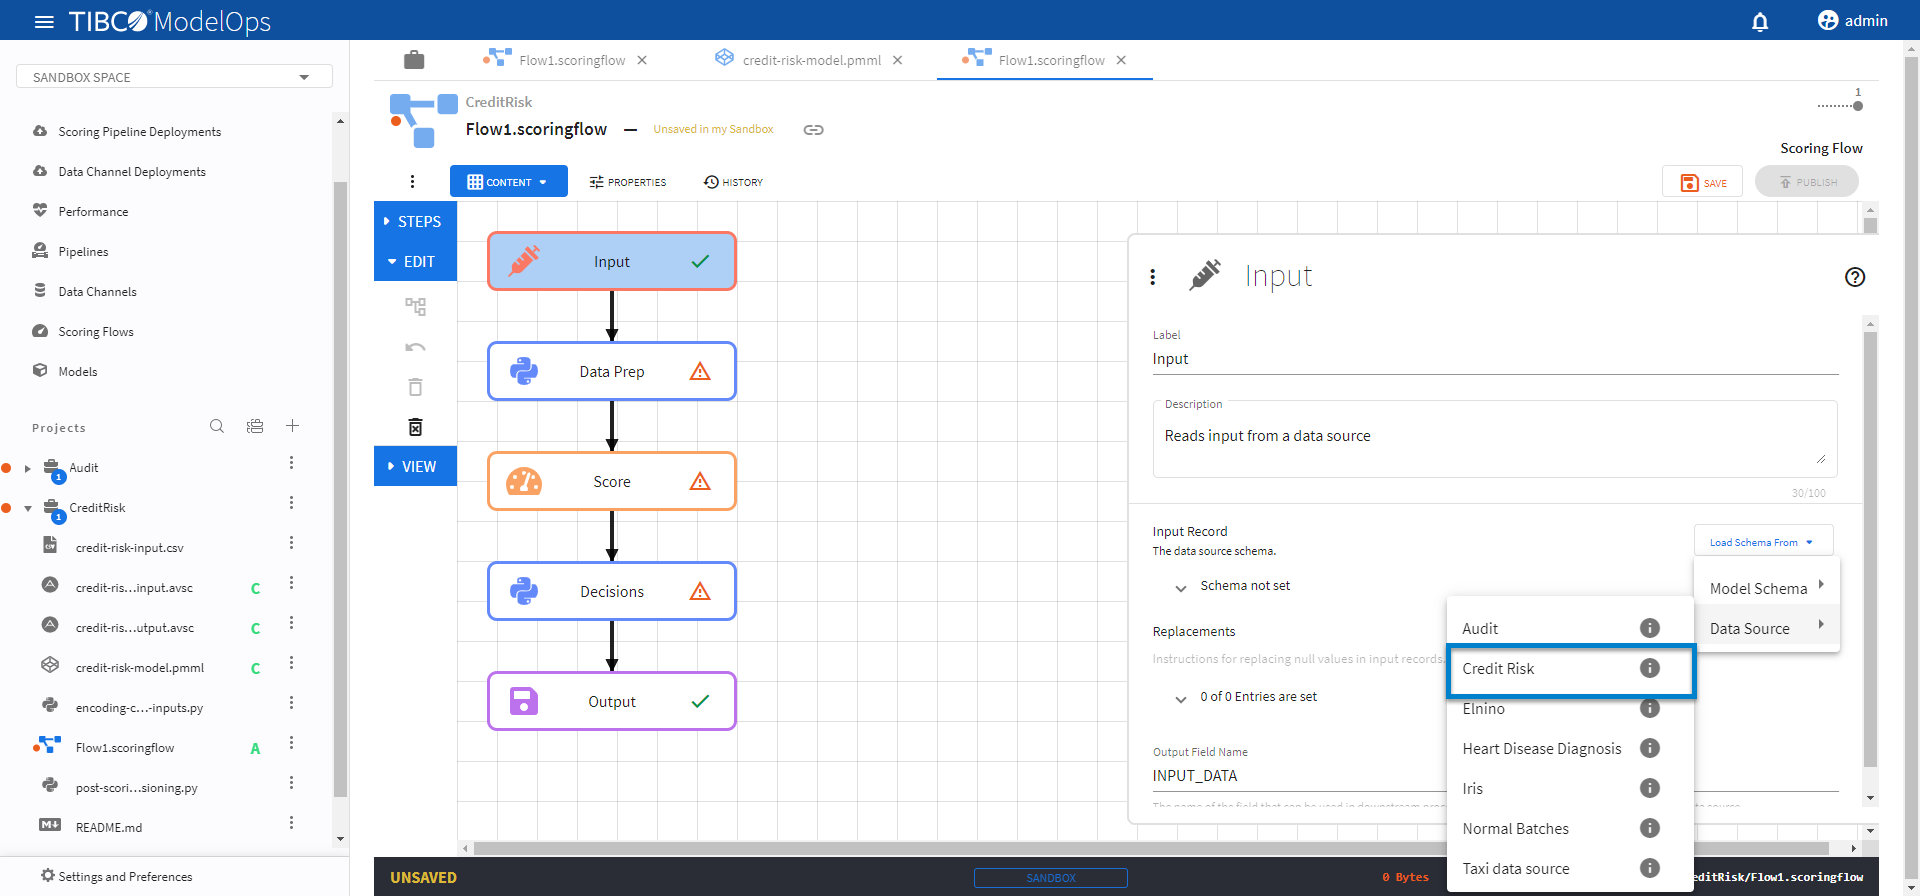
-
Click SAVE.
- Configure the Data Prep block.
- Click the Data Prep processing step to open its configuration form.
- Under Script, select encoding-categorical-inputs.py.
- Under Input Field Names, check INPUT_DATA (from “Input”).
- Under Package Dependencies, select requirements.txt.
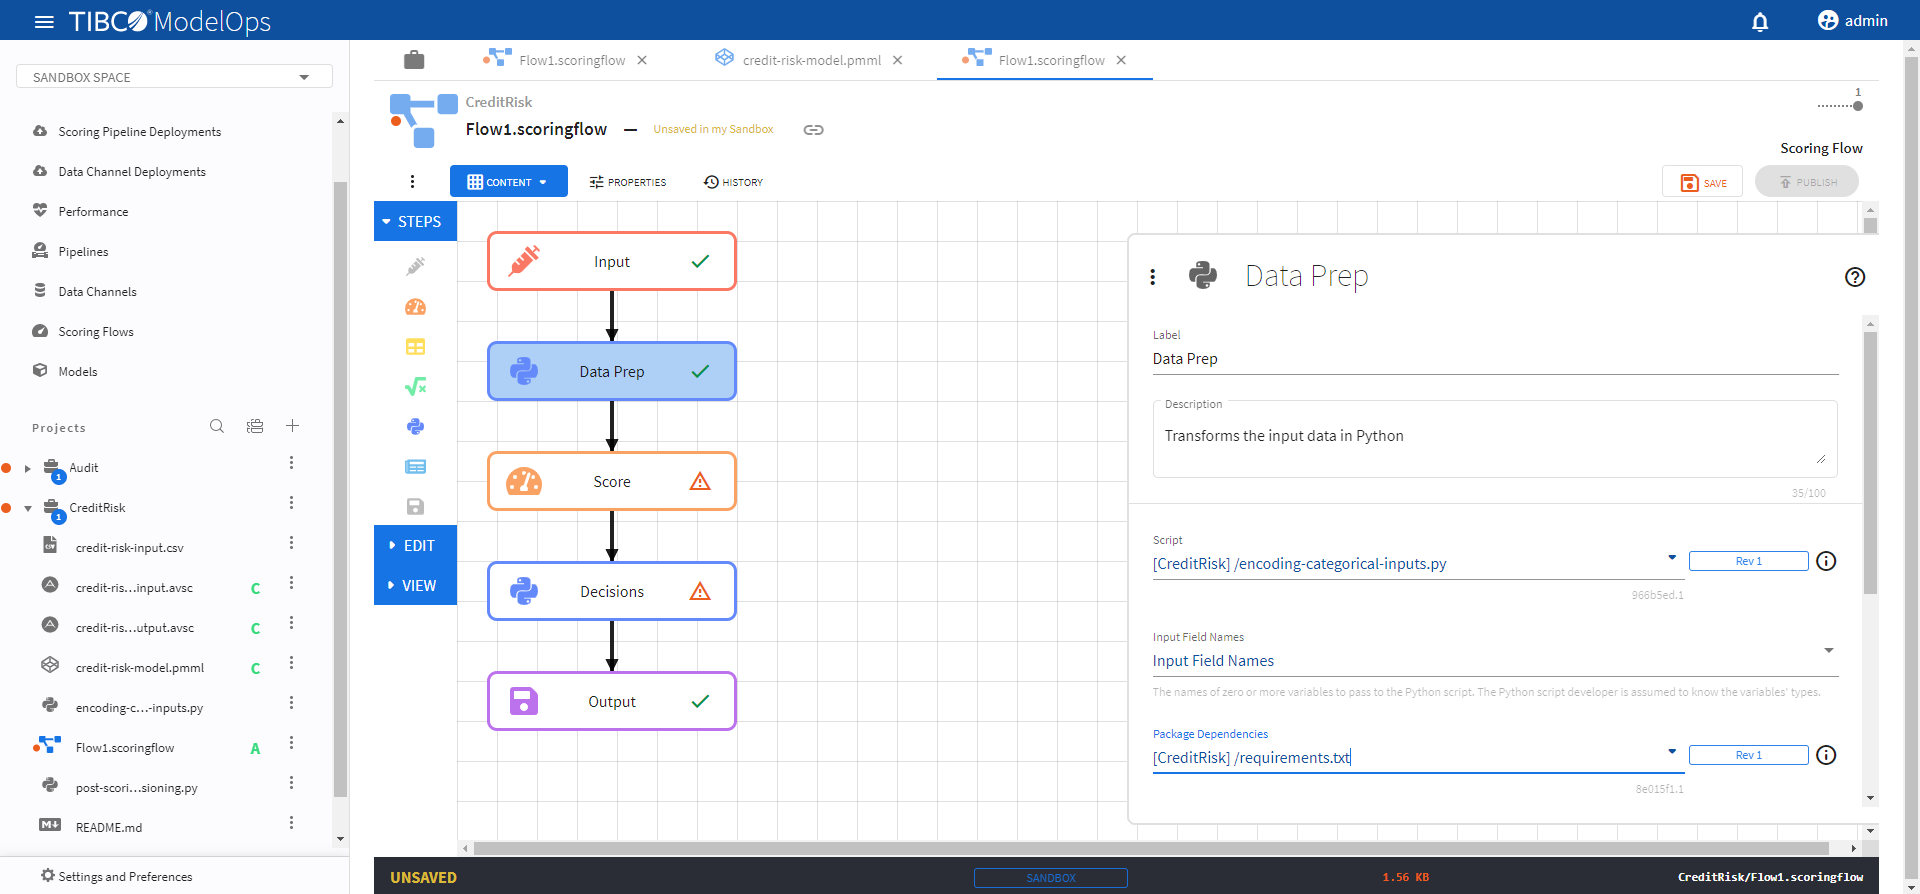
-
Under Output Field Names, click 0 of 0 Output Variables are set caret and click the plus sign (+).
- Add DATA_PREP_OUT variable as Schema name.
- Set the schema for DATA_PREP_OUT variable by clicking Load Schema From > Model Schema > credit-risk-model.pmml > credit-risk-model-input.avsc.
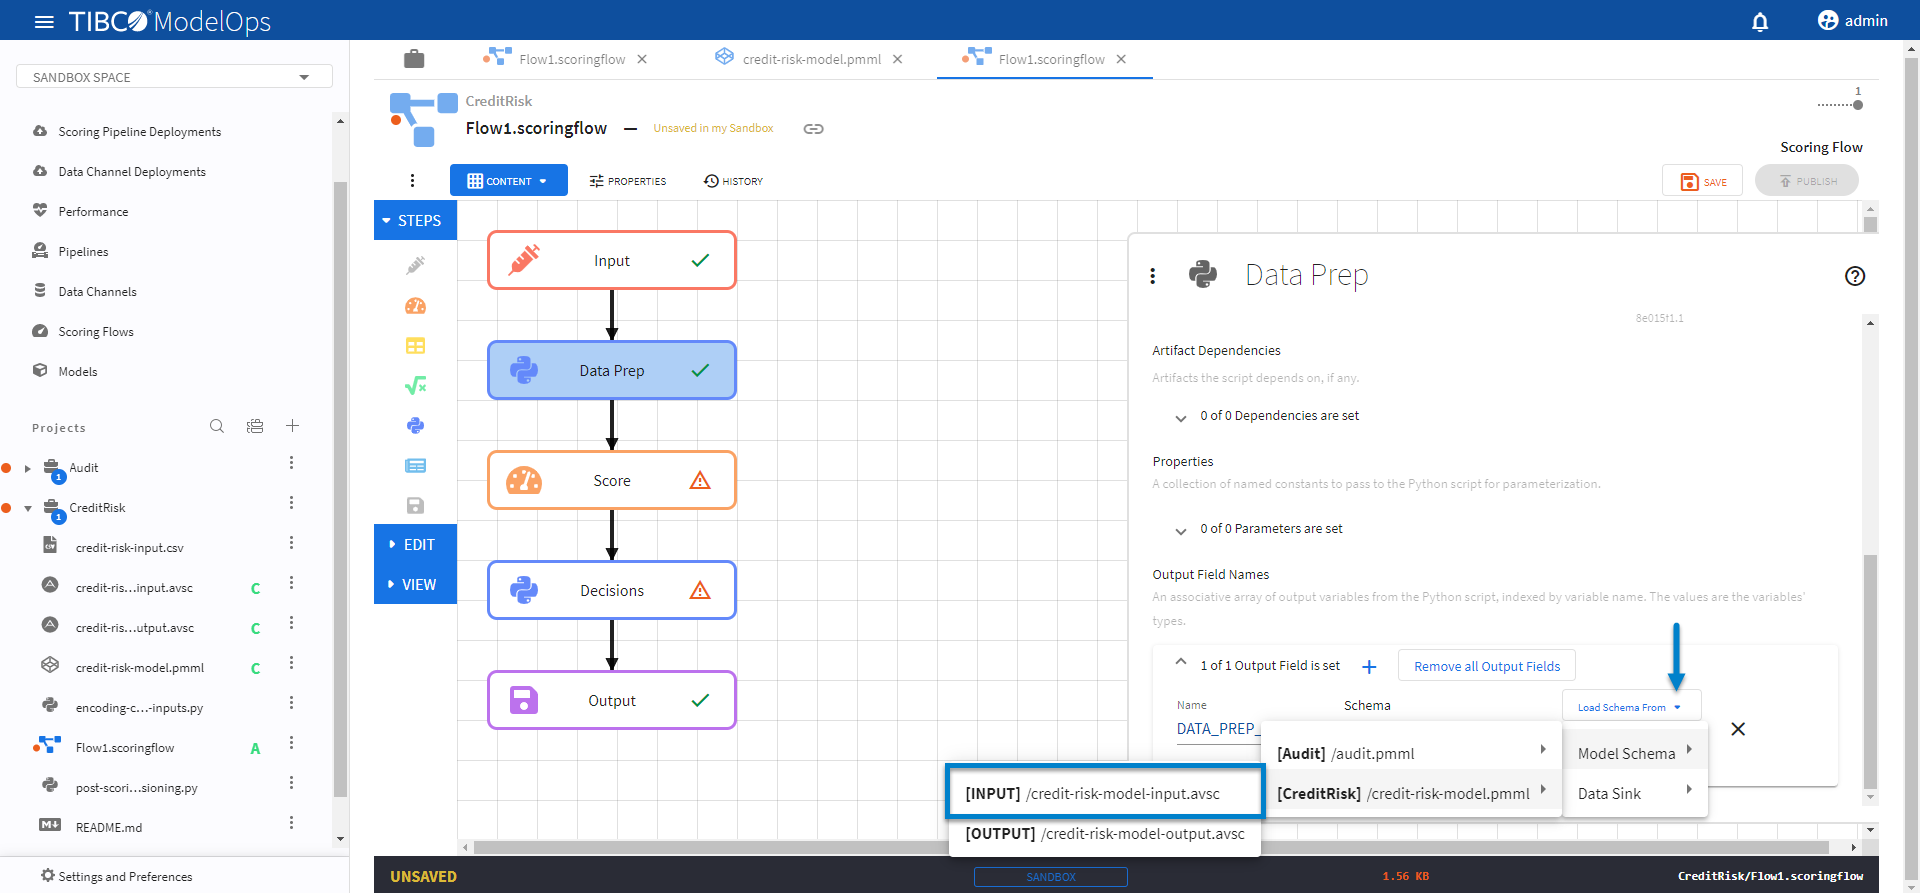
-
Click SAVE.
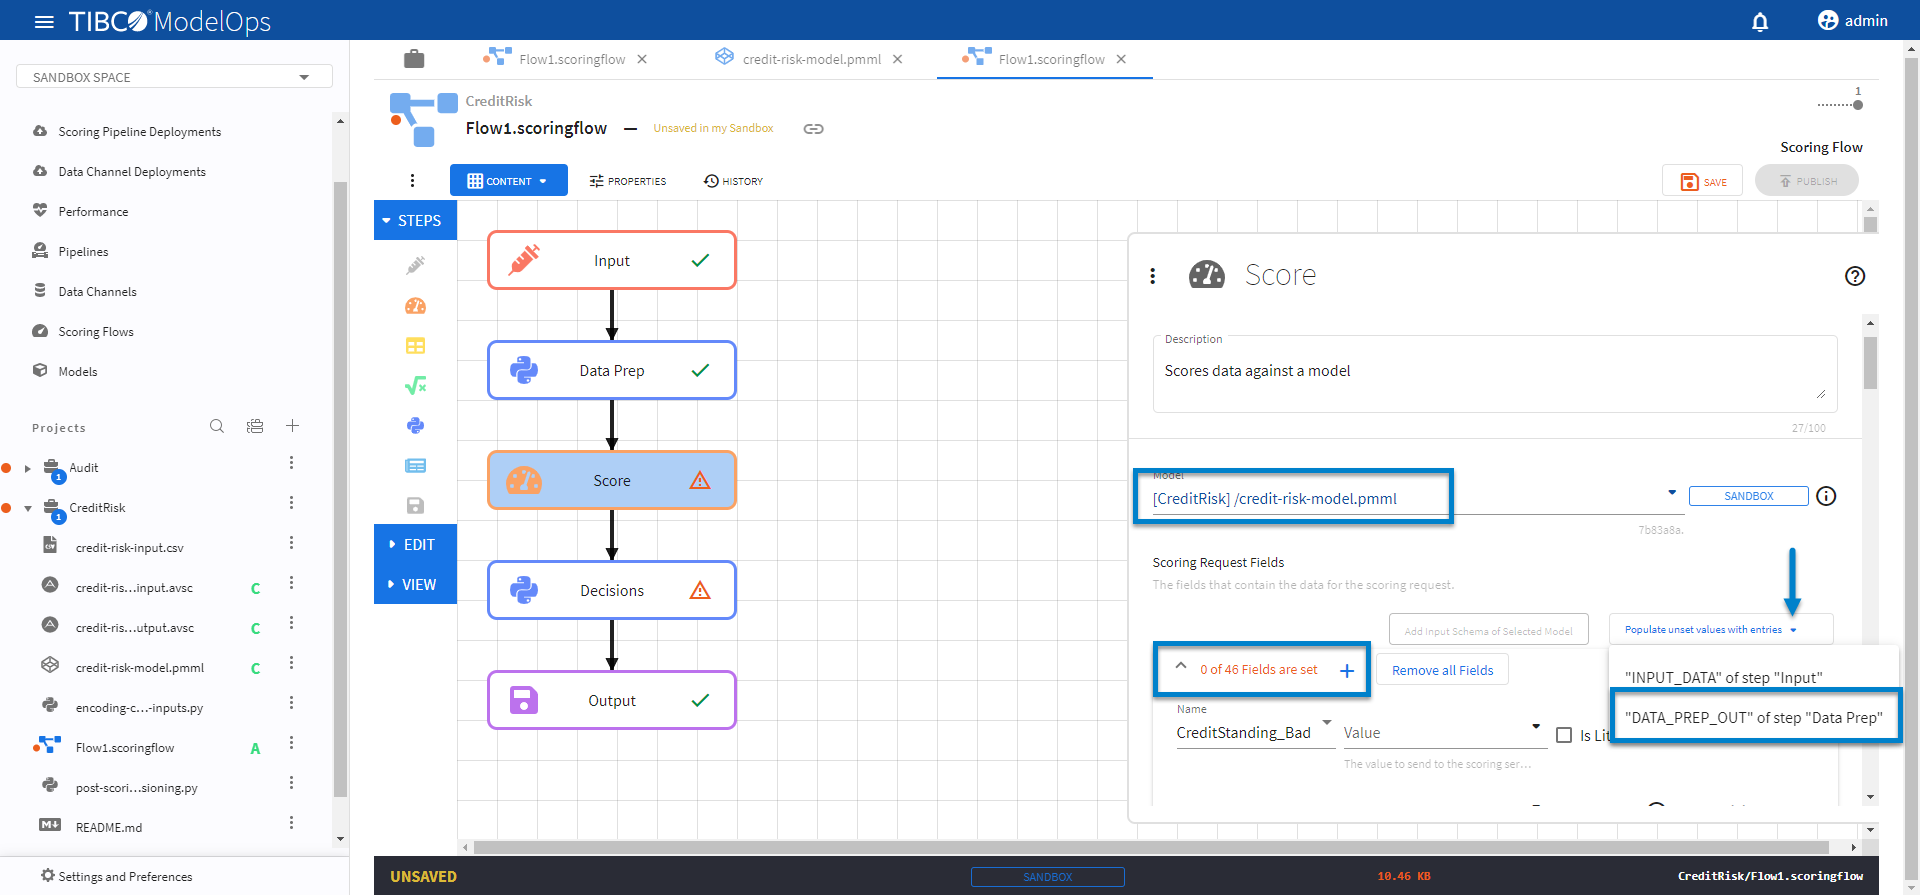
- Configure the Score block.
- Click the Score processing step to open its configuration form.
- Select the credit-risk-model.pmml model from the drop-down list.
- Click Add Input Schema of Selected Model and observe 0 of 46 Fields are set.
- From Populate unset values with entries list, select “DATA_PREP_OUT” of step “Data Prep”.
-
Click SAVE.
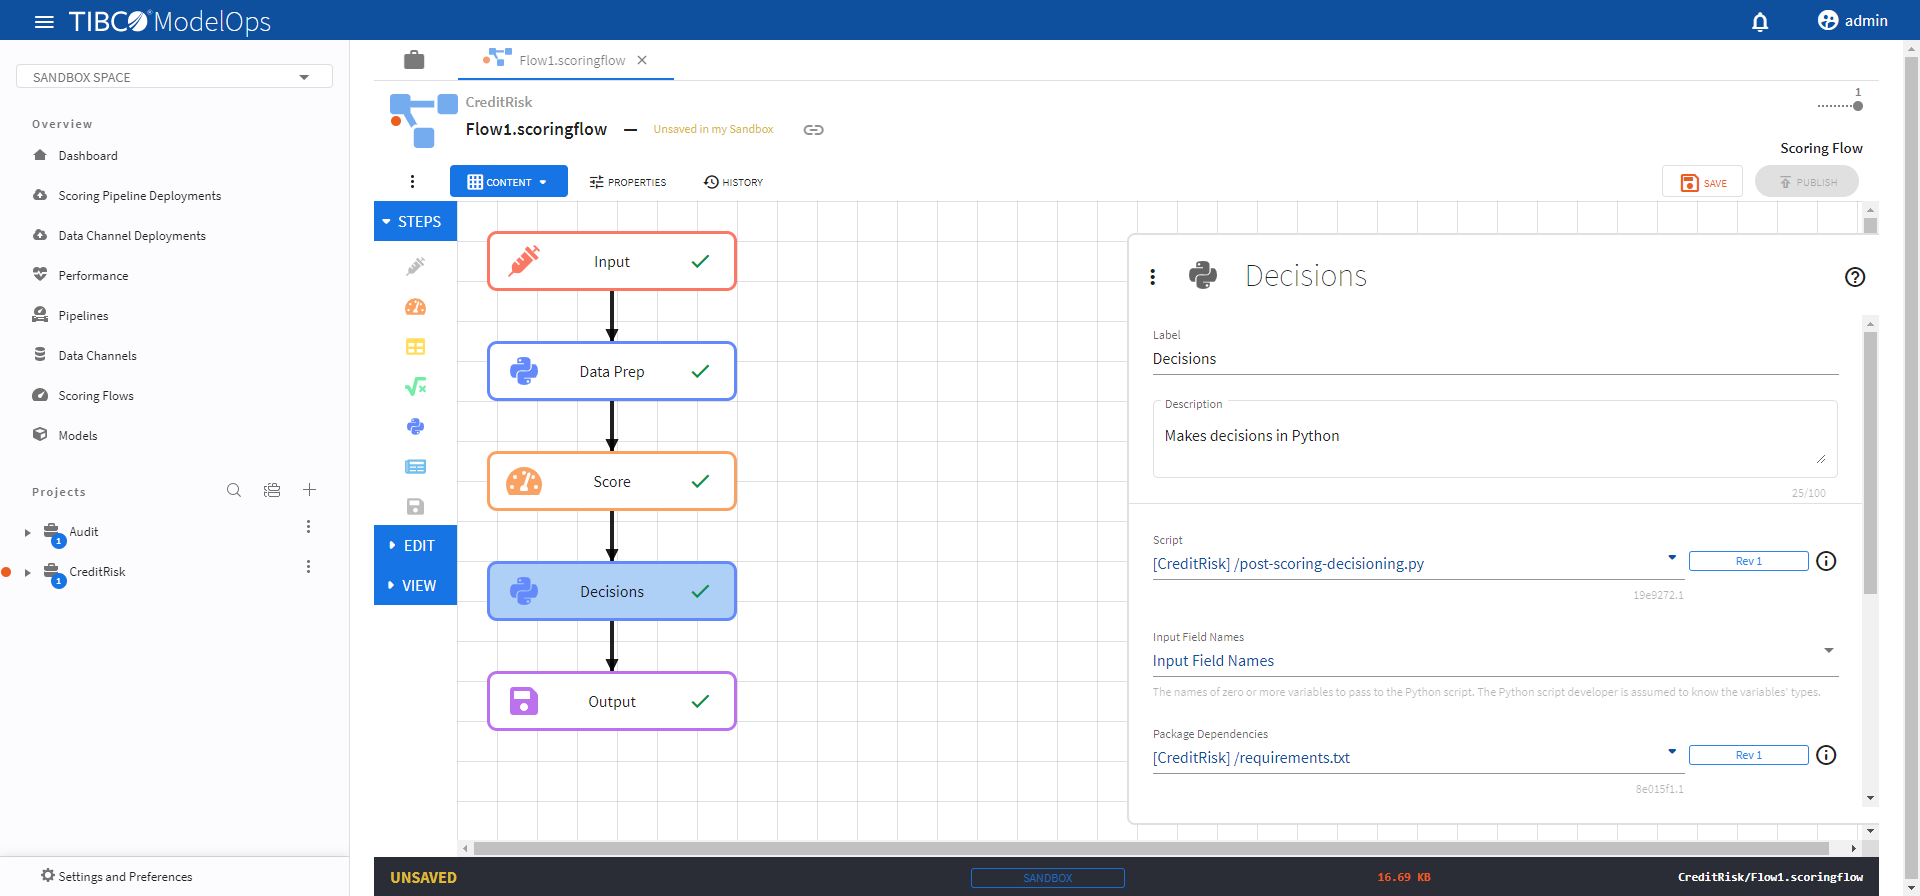
- Configure the Decisions block.
- Click the Decisions processing step to open its configuration form.
- Under Script, select post-scoring-decisioning.py.
- Under Input Field Names, check SCORE (from “Score”).
- Under Package Dependencies, select requirements.txt.
-
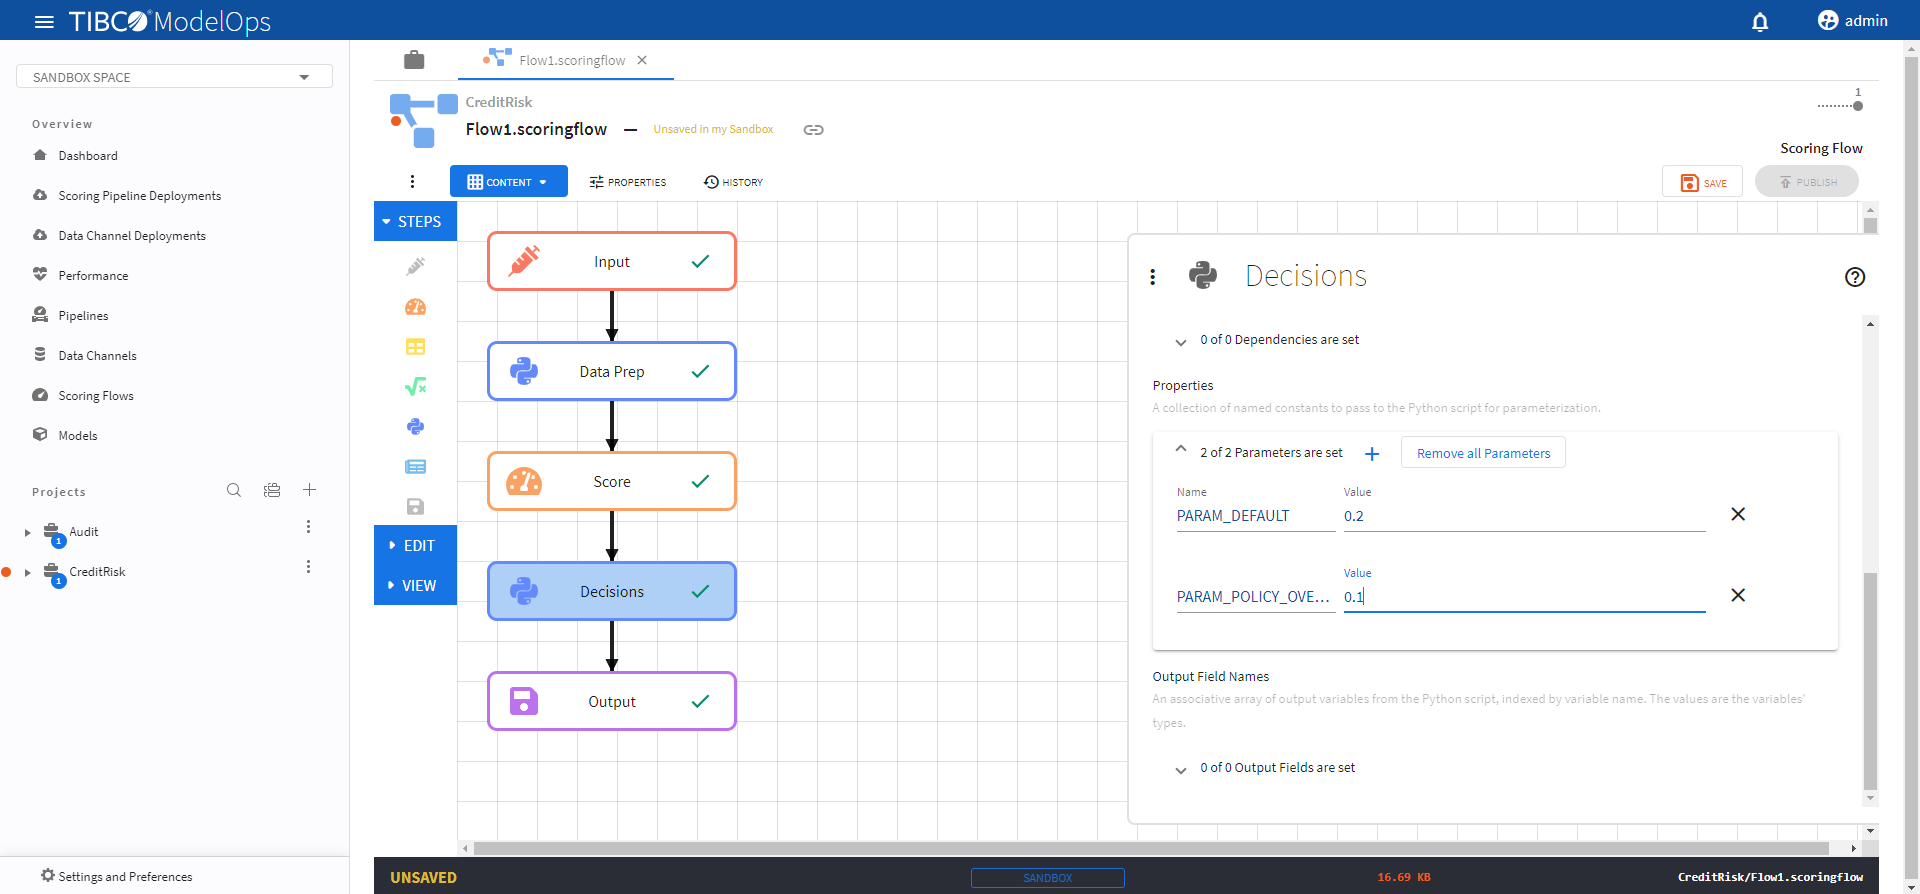
Under Properties, go to 0 of 0 Output Variables are set and add the following two parameters:
- Name: PARAM_DEFAULT, Value: 0.2
- Name: PARAM_POLICY_OVERRIDE, Value: 0.1
-
Under Output Field Names, click 0 of 0 Output Variables are set and click the plus sign (+) to add a new field.
- Add POST_SCORING_DECISION_OUT for the Name.
- Click Schemas not set and add the following two fields:
- Final_Credit_Approval_Decision (string)
- Policy_Followed (string)

-
Click SAVE.
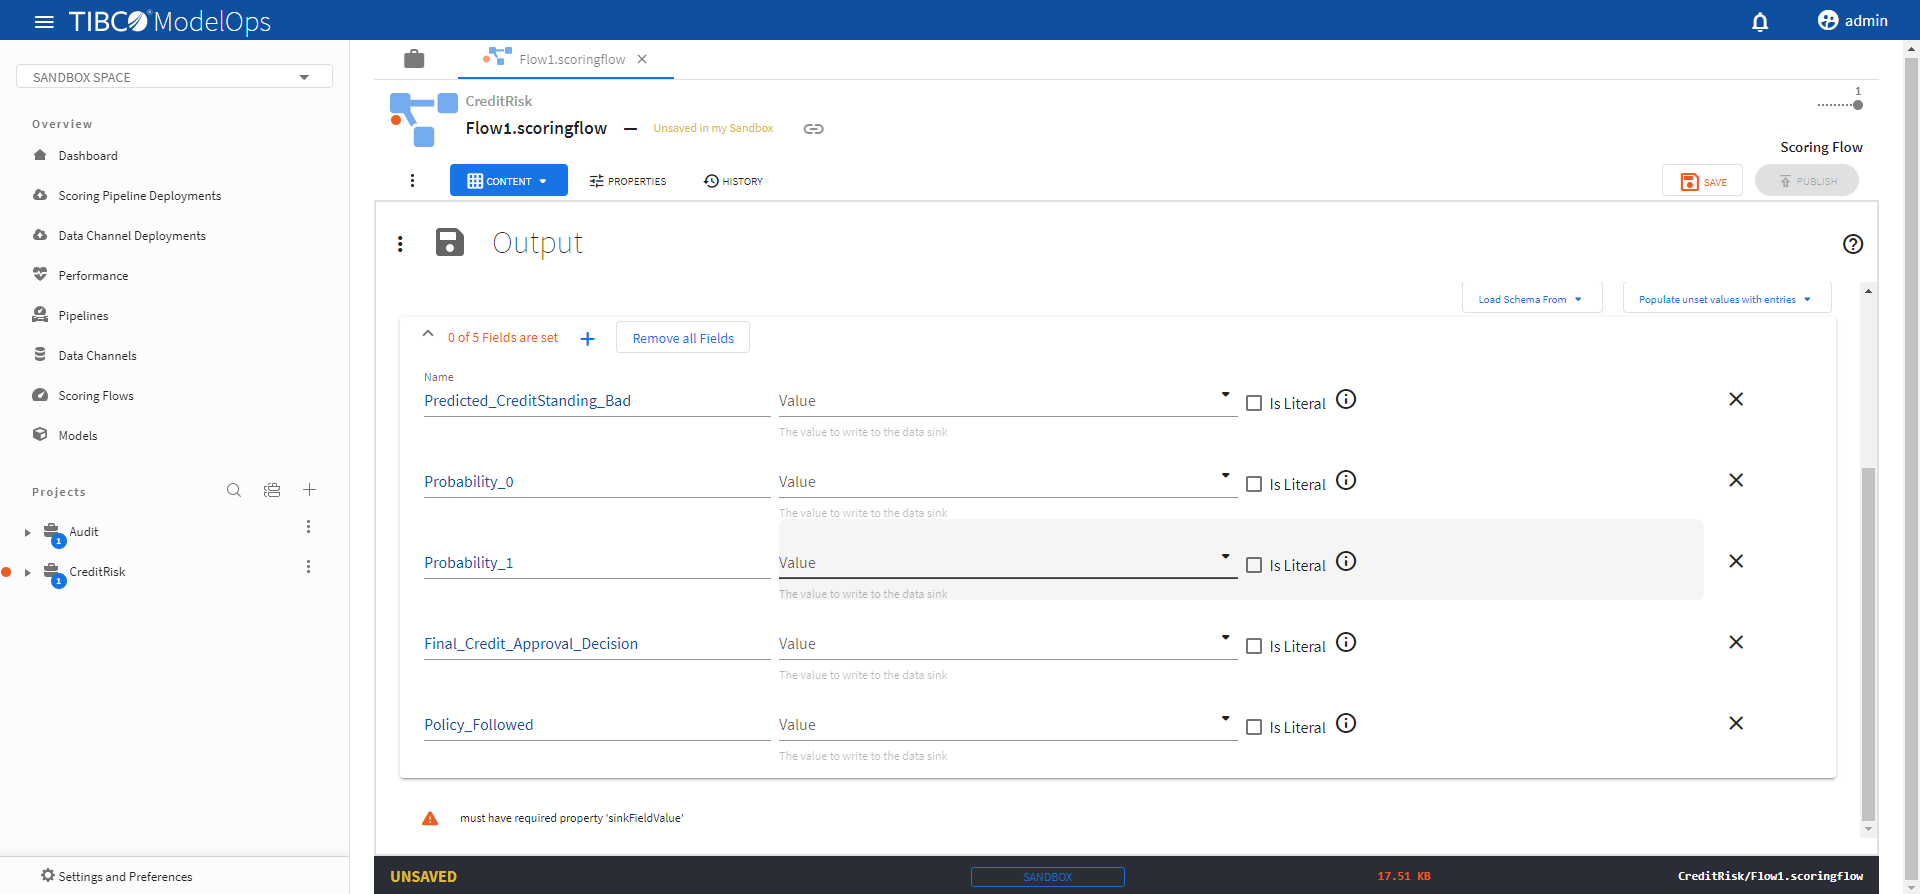
- Configure the Output block.
- Click the Output processing step to open its configuration form.
- Under Output Record, click the plus sign (+) next to 0 of 0 Fields are set and add these 5 fields:
- Name: Predicted_CreditStanding_Bad
- Name: Probability_0
- Name: Probability_1
- Name: Final_Credit_Approval_Decision
- Name: Policy_Followed
-
To populate the values for these fields, click Populate unset values with entries and select “SCORE” of step “Score”.
- Next, click Populate unset values with entries again and select “POST_SCORING_DECISION_OUT” of step “Decisions”.

-
Click SAVE.
- The Score, Compute Metrics, Publish Metrics template can be configured by following these steps:
- The Audit project works well for this template. Make sure to select this project while creating the scoring flow.
- Configure the Input block.
- Click Input block to open the Input processing step’s configuration form.
- Click the drop-down menu on the Load Schema From > Data Channel > and select the schema that matches with the model.
-
Click SAVE.
- Configure the Score block.
- Open the Score processing step’s configuration form: click the Score block.
- Under Model section, select audit.pmml model from the drop-down list.
- Under Scoring Request Fields section, click the Add Input Schema of Selected Model option.
- Next, from Populate unset values with entries list, select “INPUT_DATA” of step “Input”.
-
Click SAVE.
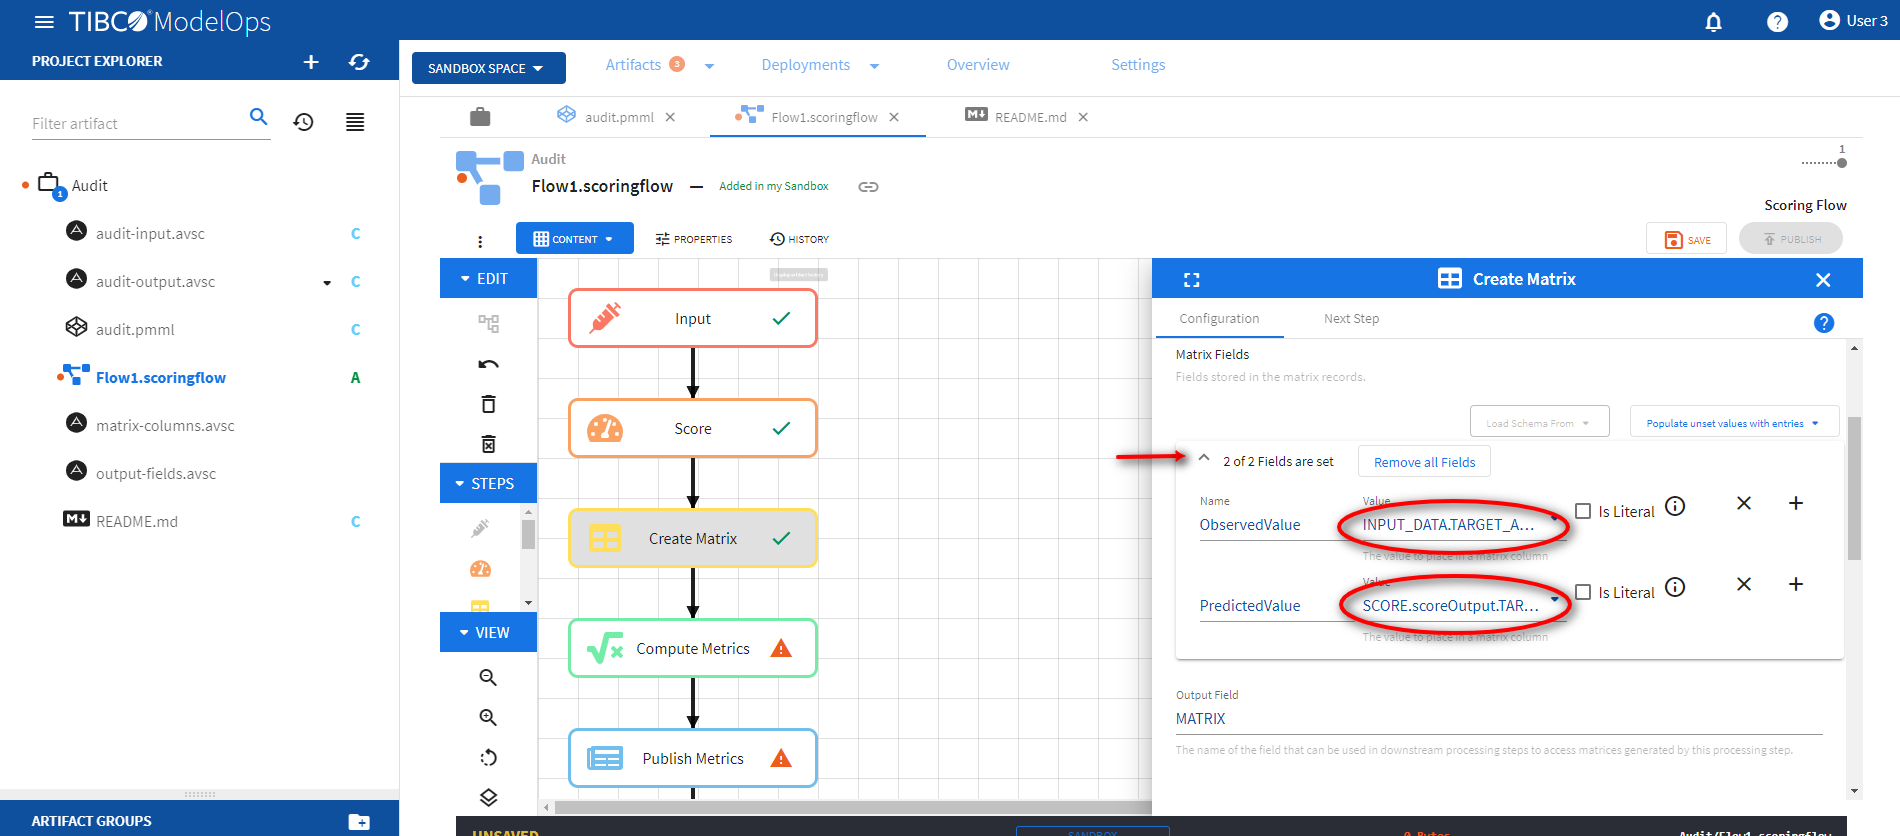
- Configure the Create Matrix block.
- Click Create Matrix block to open the configuration form.
- Under Matrix Fields, click 0 of 0 Fields are set and add the following fields:
- Name: ObservedValue; Column Value: INPUT_DATA.TARGET_Adjusted
- Name: PredictedValue; Column Value: SCORE.scoreOutput.TARGET_Adjusted
-
Click SAVE.
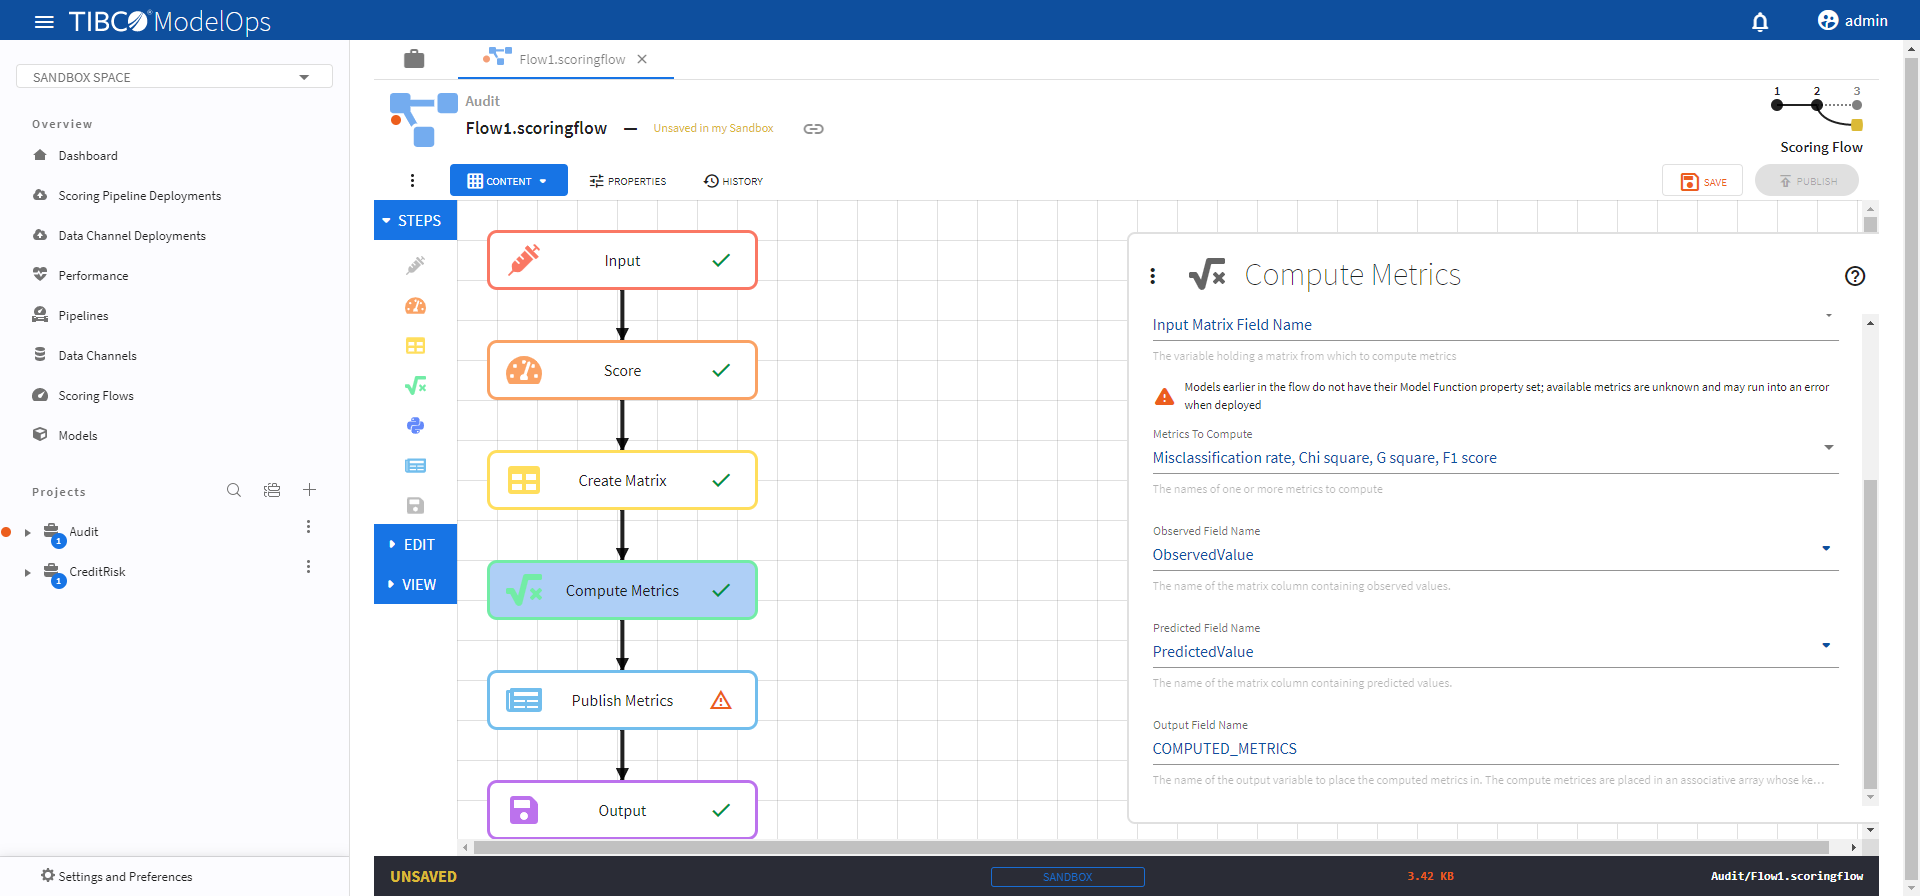
- Configure the Compute Matrix block.
- Click Compute Matrix block to open the configuration form.
- For Input Variable Field Name, select MATRIX (from “Create Matrix”) from the drop-down list.
- For Metrics to Compute section, select Misclassification rate, Chi square, G square, and F1 score from the drop-down list.
- Select Observed Column Name as ObservedValue
- Select Predicted Column Name as PredictedValue
-
Click SAVE.
- Configure the Publish Matrix block.
- Click Publish Matrix block to open the configuration form.
- For the Metrics to Publish, select Misclassification rate, Chi square, G square, and F1 score.
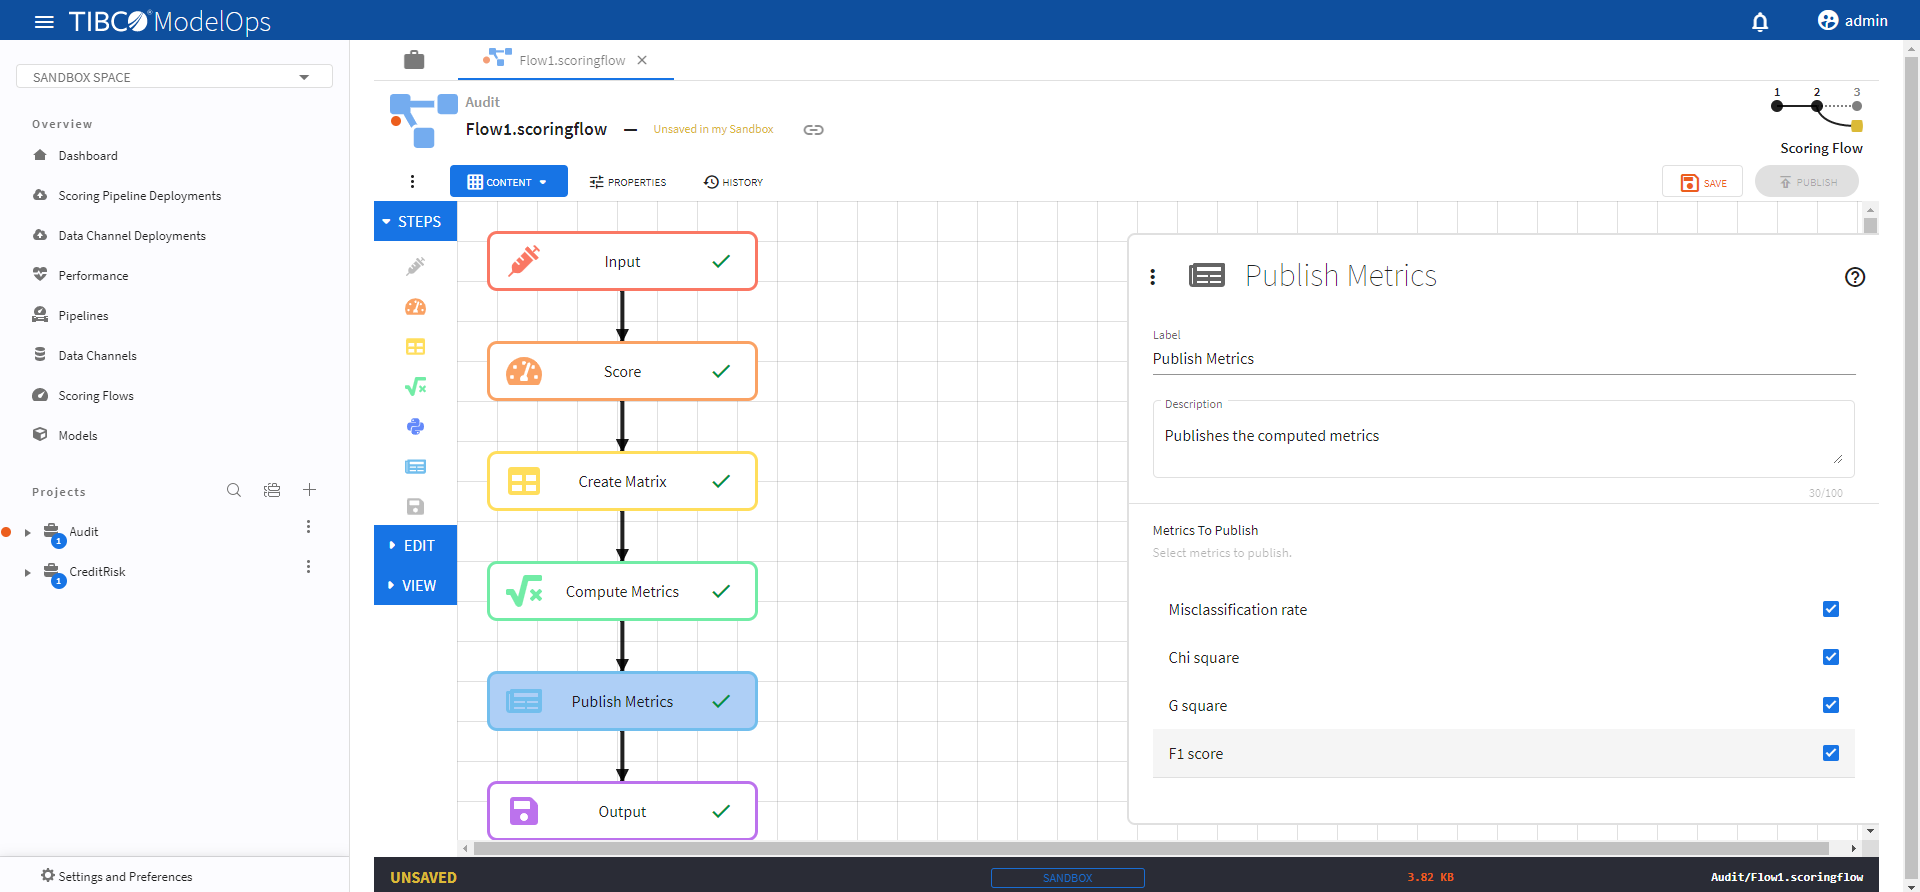
-
Click SAVE.
- Configure the Output block.
- Click Output block to open the Output processing step’s configuration form.
- Click 0 of 0 Fields are set under Output Record section and add the following 4 fields:
- Name: Chi_Square, Sink Field Value: COMPUTED_METRICS.modelops_model_quality_classification_chi_square
- Name: F1_Score, Sink Field Value: COMPUTED_METRICS.modelops_model_quality_classification_f1_score
- Name: G_Square, Sink Field Value: COMPUTED_METRICS.modelops_model_quality_classification_g_square
- Name: Misclassification_Rate, Sink Field Value: COMPUTED_METRICS.modelops_model_quality_classification_misclassification_rate
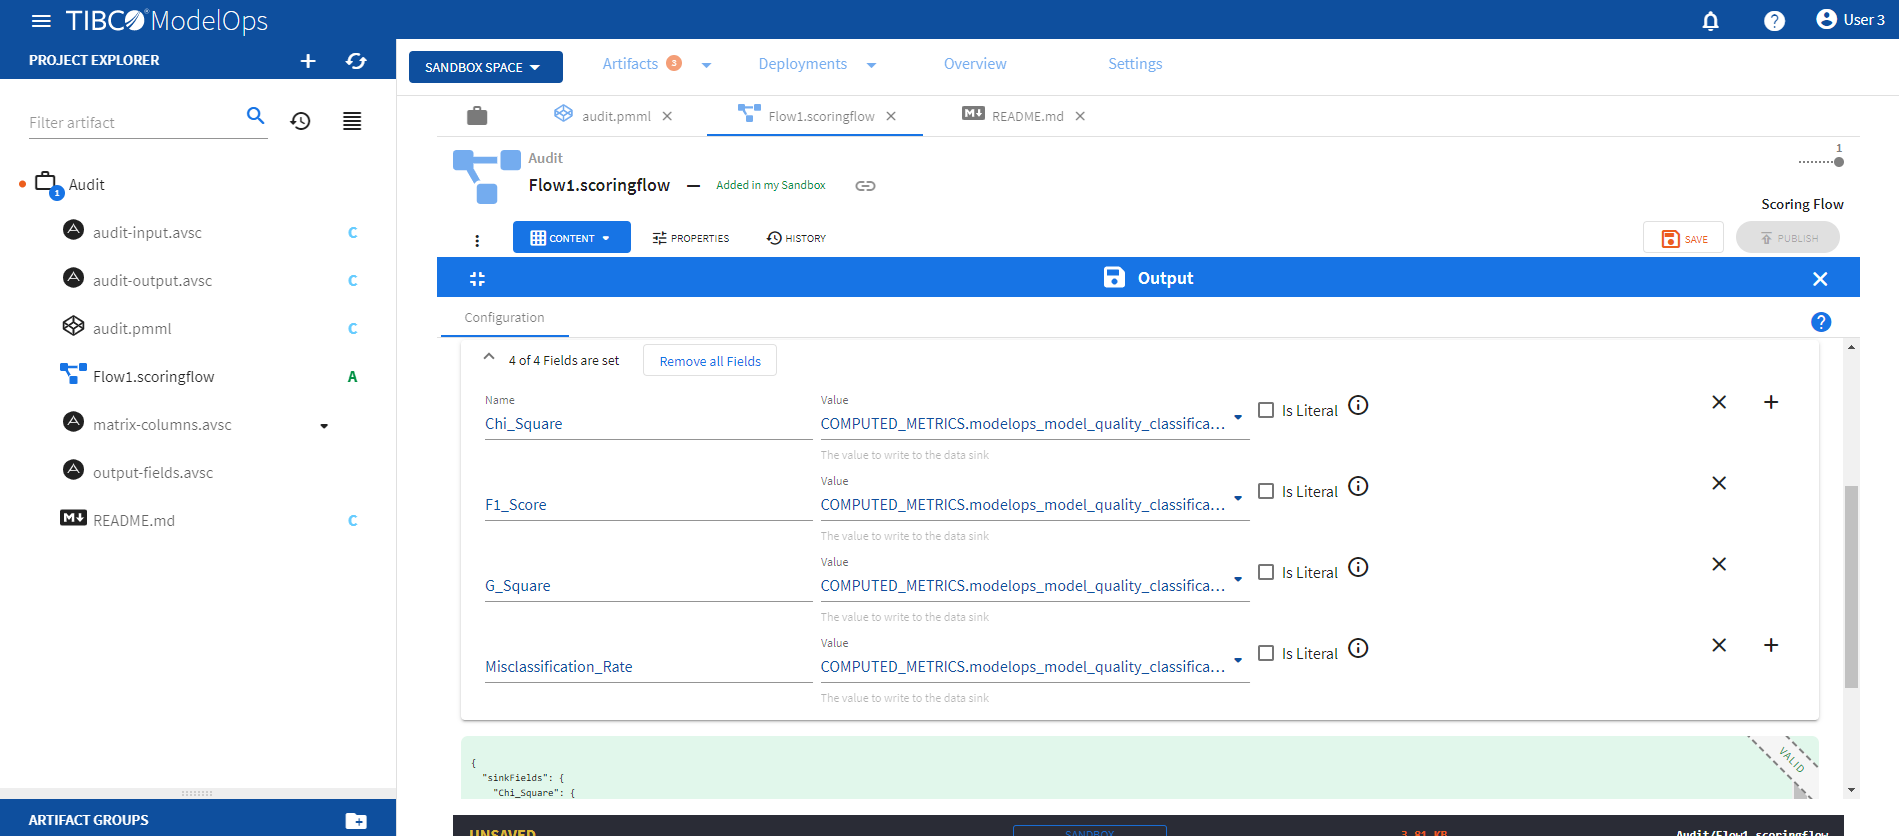
-
Click SAVE.
Creating a Scoring Pipeline
- In the Project Explorer pane, under Overview section, click Pipelines.
- Click ADD A SCORING PIPELINE to create a new scoring pipeline. You can also click Add one to add a new scoring pipeline if there are none present.
- Select the project name from the list.
- Add pipeline name. The extension is added automatically.
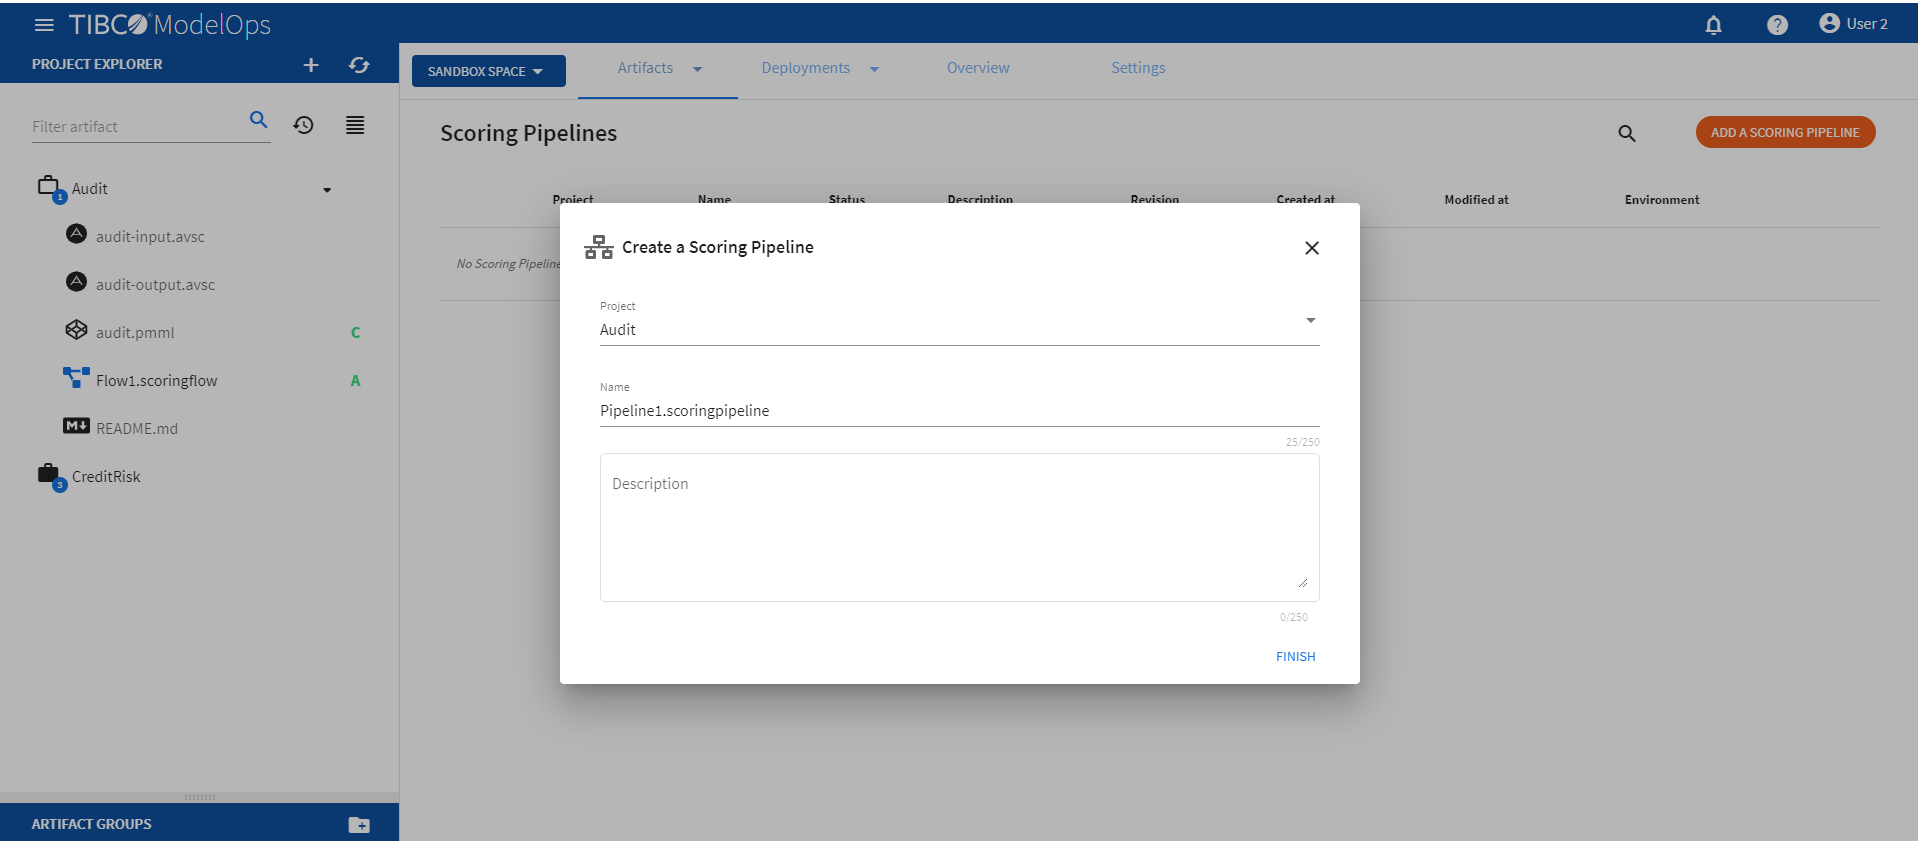
-
Click FINISH.
Authoring a Scoring Pipeline
- In the Project Explorer pane, under Overview section, click Pipelines.
- Select the scoring pipeline.
- If you are using Data Source and Data Sink as input and output, select the Connect to deployed Data Channels for input and output.
- Select the scoring flow from the drop-down list under Scoring Flows section.
- Add Data Source and Data Sink from the drop-down list under the Data Channels section.
A data source is used to supply data to a flow to process it. A data sink is a place where the data processed by the flow is sent.
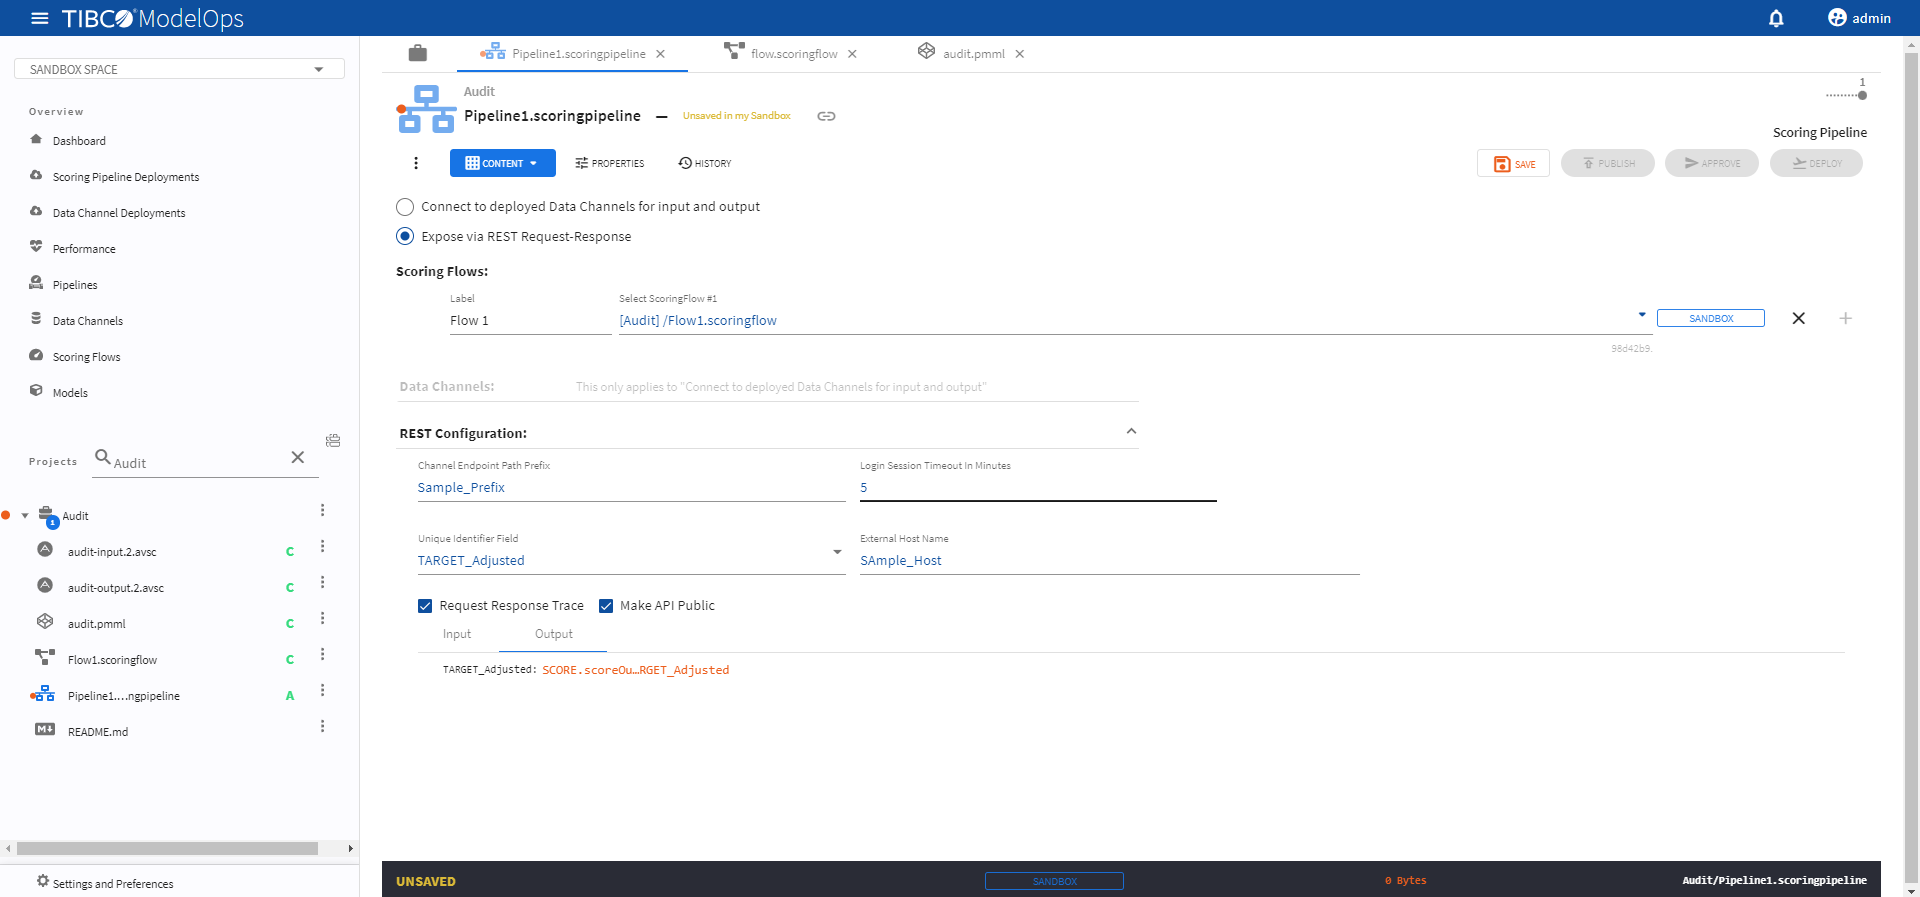
-
If you want to use REST Request-Respone, select the Expose via REST Request-Response.
- Select the scoring flow from the drop-down list under Scoring Flows section.
- Add channel endpoint path prefix, session timeout time, unique identifier, and external host name under their respective field.

-
Click SAVE to save the changes.
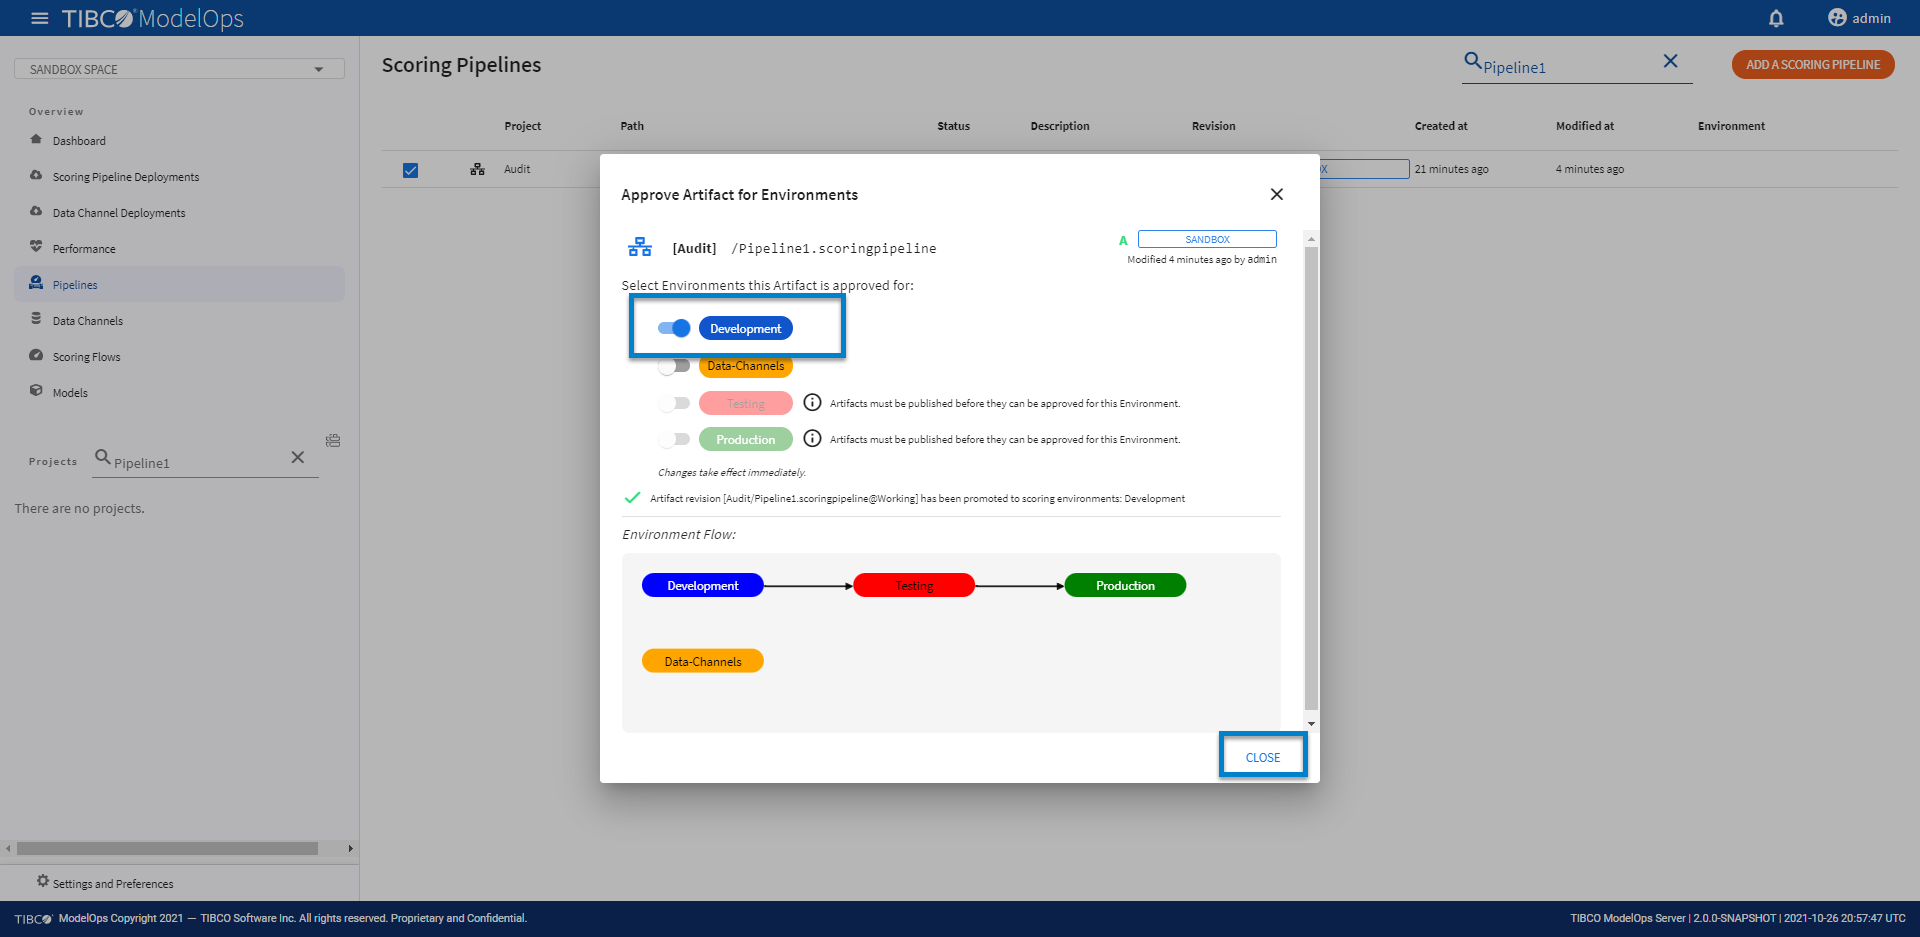
Promoting a Scoring Pipeline
- In the Project Explorer pane, click Pipelines.
- Select the pipeline that needs to be promoted by clicking the check box.
- Click Approve present at the bottom of the pipeline list.

-
Turn on the toggle for Development environment and click CLOSE.
Pipeline Deployment
- In the Project Explorer pane, click Scoring Pipeline Deployments.
- Select the DEPLOY A SCORING PIPELINE option.
- Add name and description in the respective field.
- Select scoring pipeline from the drop-down list.
- Select a scoring environment from the drop-down list.
- Select when you need to schedule the job from the given options (Immediate, Future, or Periodic).
- Select the duration for which you need to run the job. You can run the job forever or add the duration as per your needs.
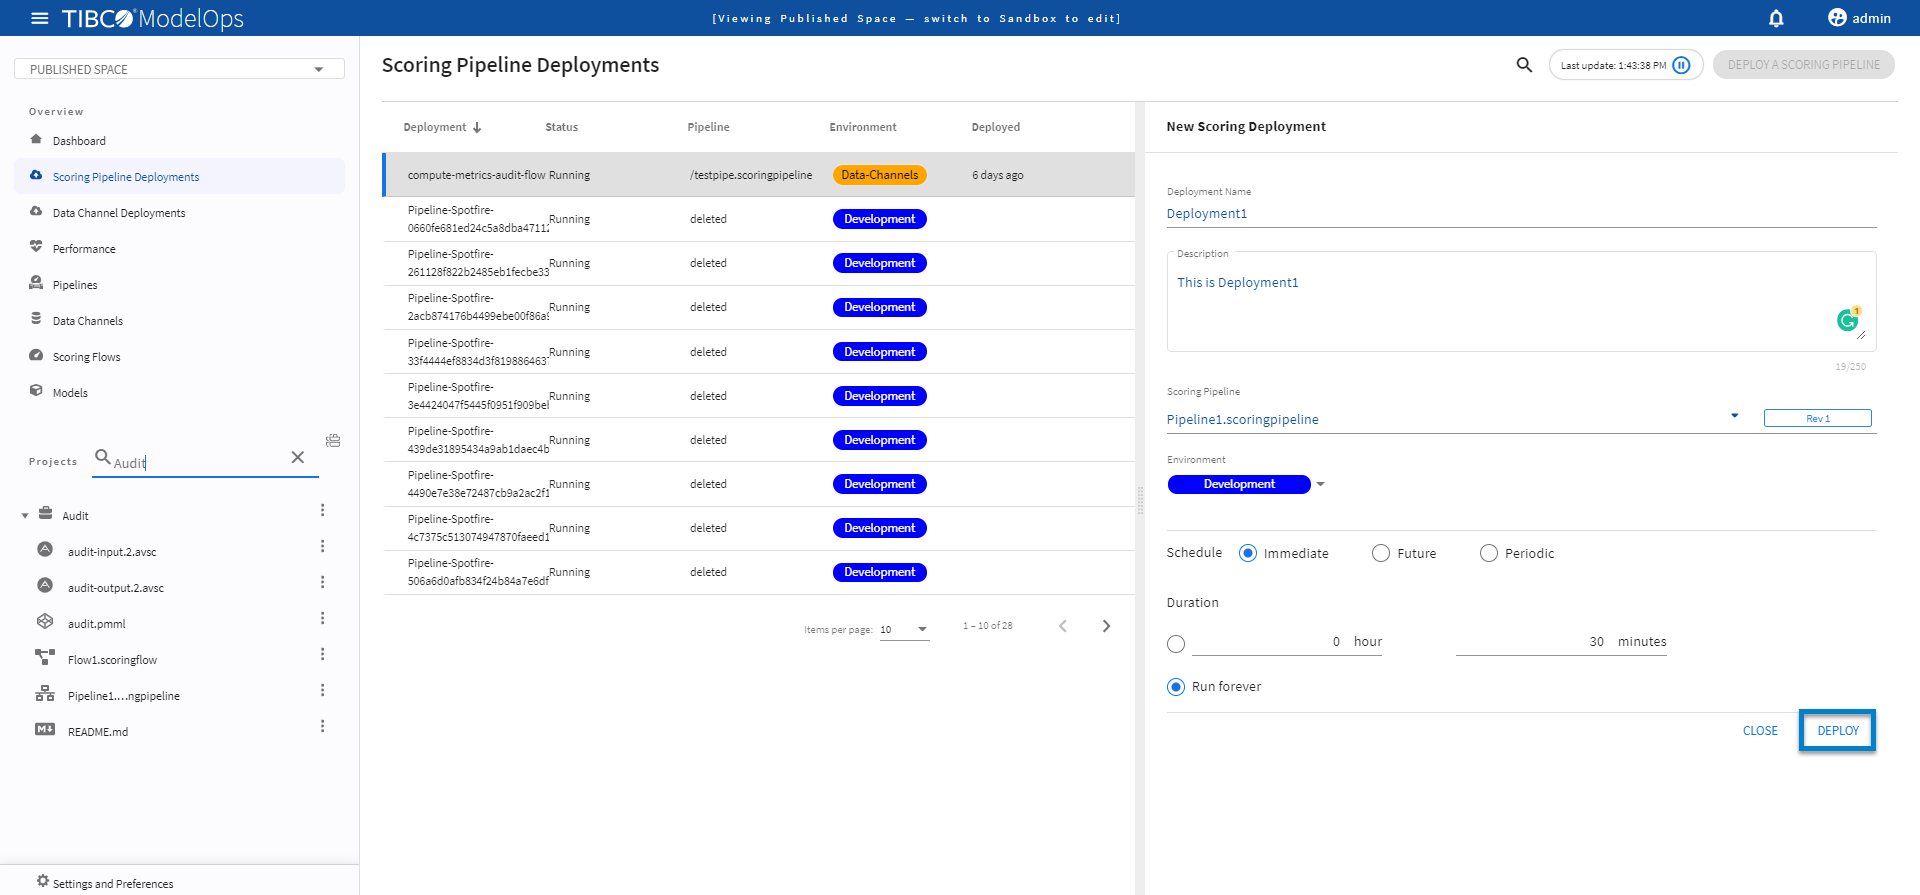
-
Click DEPLOY.
Note: The Scoring Pipeline Deployments section allows you to select the Run forever option. However, after a single file is processed by a File Data Source, the flow would be stopped and marked Complete and no longer accept new input.