This document uses the Hello LiveView sample explain how to use grid views in LiveView Desktop.
Load and run the Hello LiveView sample as delivered with LiveView. Follow these steps:
-
Start StreamBase Studio in the SB Authoring perspective.
-
Load the Hello LiveView sample.
-
Select → from Studio's top-level menu.
-
In the Load StreamBase Projects dialog, open the StreamBase LiveView category.
-
Select the sample whose description is
Shows a simple
                        Hello World application
and press .
The Hello LiveView sample loads into Studio with the project name
sample_lv-helloliveview. -
-
In the Package Explorer view, select the name of the project, right-click, and from the context menu, select → . The Console view shows several messages as the LiveView Server compiles the project and starts.
-
When you see message
All tables have been loadedin the Console view, start LiveView Desktop:-
On Windows, run → → → .
-
On Linux, run the following command:
/opt/streambase/liveview/desktop/liveview &
This opens the LiveView Desktop start dialog.
-
-
In the LiveView Desktop start dialog, select the radio button for Download and click .
-
Select the workspace named Hello LiveView and version Latest (1.0).
-
Click . This returns you to the LiveView Desktop start dialog. The Download field now contains Hello LiveView (Latest).
-
Click .
You open a view on a LiveView table by double-clicking the table name in the LiveView Tables view. When you double-click on a table name, you issue a query to LiveView Server that returns the entire contents of the table. By default, LiveView Desktop opens a grid view on the table.
The pre-loaded workspace has grid views of the ItemsSales and ItemsInventory tables that demonstrate the conditional formatting features available from LiveView Desktop.
This example demonstrates how to use these formatting features by starting from a new view of the Items table.
-
Right-click the Items table and select . The Conditional Formatting dialog opens with the Items table selected.
-
Select all the entries in the Conditional Formatting window. CTRL+Click allows you to select multiple entries; SHIFT+Click allows you to select a range of entries.
-
Click .
-
Click . The Items table now appears with no formatting.
Now you can configure conditional formatting for the Items table.
-
The lastSoldPrice field represents a price, but appears as a double with all digits present. You can format the field to round to two decimal places.
-
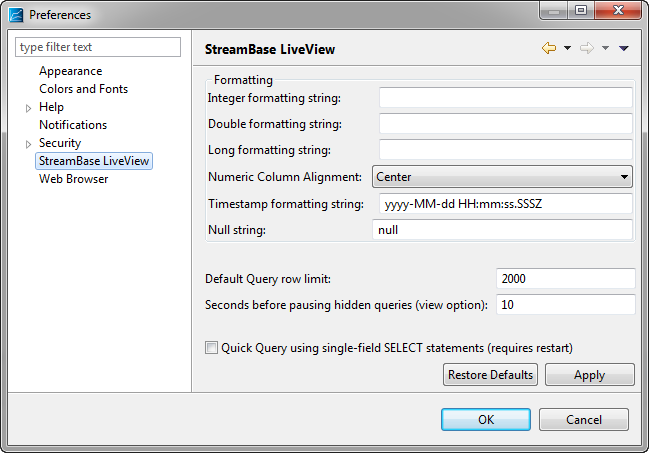
Select → from LiveView Desktop's top-level menu. The Preference dialog opens.
-
Enter
###.##in the Double formatting string field.
Alternatively, you can use the Conditional Formatting from the table's right-click menu.
-
Right-click the Items table in the Tables view and select Conditional Formatting.
-
Select the check box for Format string as and enter
###.##.
-
-
The color field displays the string name of the item color. You can format the column so that the cell background color changes to the color named in the cell.
-
Right-click the Items table in the Tables view and select . The Conditional Formatting dialog opens with the Items table selected.
-
Click . The Edit Conditional Formatting Rule dialog opens.
-
Select color from the top-left pull-down menu
-
Select equals from the top-center pull-down menu.
-
Enter red in the top-right field.
-
Select the check box for Set cell background color. The Color picker opens.
-
Select the desired color.
-
LiveView Desktop's grid view allows you to filter data from a query. A filter allows you to enter a specific string and limit results to rows that match that string. Use a filter when you have a set of results that is too large to show in one page and a single table column to filter by.
To open a table filter, click on a grid view and press CTRL+F
or click the button ( ) and select . This opens the Filter field for the selected table. Enter the filter string in the
field. For example, to show just rows that have green items, type 'green' into the
Filter field.
) and select . This opens the Filter field for the selected table. Enter the filter string in the
field. For example, to show just rows that have green items, type 'green' into the
Filter field.
The Filter field is not designed to be exhaustive in its query functionality. See Querying Your Data for how to perform queries against tables.
The row limit for query results enables a LiveView client to prevent the server from sending excessive data. The limit specifies the maximum number of rows that the server returns to the client. Without a row limit, an insufficiently restrictive query on a table that is large or is changing rapidly might overwhelm the client with more data than the client can process.
The row limit should be regarded as a mechanism to protect clients from extraordinary data load or from incorrectly defined queries. Because query results are not updated once the row limit is reached, we recommend that users not run queries that reach the row limit. (If a query does reach the row limit, you can use the option in LiveView Desktop to see recent updates.) You should set row limits to be low enough that client processing capacity is not exceeded, and you should define query predicates to be restrictive enough that the row limit is not reached.
- How to Change Row Limits in LiveView Desktop
-
You can change the row limit globally in LiveView Desktop. Select → and choose StreamBase LiveView from the left-hand navigation panel. The Query row limit field is set to the default value of 10,000. Preferences are saved in your LiveView workspace configuration and persist across LiveView Desktop sessions.
You can also change the row limit for queries against an individual table. To do this, right-click the table name in the Tables pane and choose → .