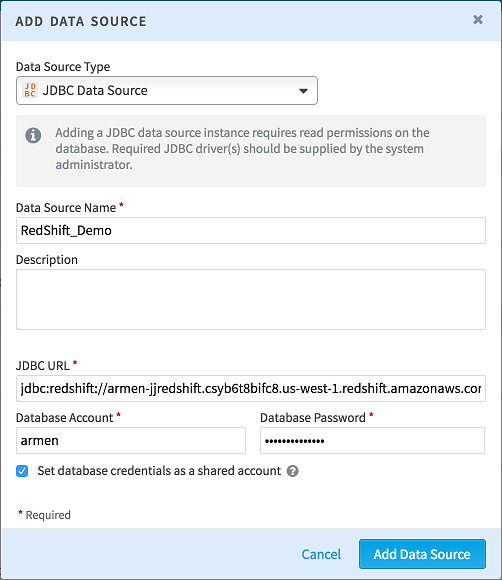
Connect to an Amazon RedShift Data Source

You can connect Team Studio to an Amazon RedShift data source.

Perform this task on the computer where Team Studio server is installed.

Prerequisites

You must have write access to the Team Studio server. You must also have access to the Amazon RedShift configuration files.

Procedure

  1. Copy the RedShift driver to the following directories. and then change the ownership of these copies to the user who runs Team Studio (usually user 'chorus').
    • $CHORUS_HOME/shared/ALPINE_DATA_REPOSITORY/jdbc_driver/Public
    • $CHORUS_HOME/shared/libraries
  2. Change the ownership of these copies to the user who runs Team Studio.

    Usually, that user name is 'chorus'.

  3. Create a new redshift directory named $CHORUS_HOME/shared/ALPINE_DATA_REPOSITORY/jdbc/redshift.
  4. Copy the file driver.properties from the directory $CHORUS_HOME/shared/ALPINE_DATA_REPOSITORY/jdbc/default to the newly created redshift directory.
  5. Edit the contents of the file $CHORUS_HOME/shared/ALPINE_DATA_REPOSITORY/jdbc/redshift/driver.properties as follows.
    # Specify the JDBC class driver for the desired database type.
    # Examples:
    # Oracle = oracle.jdbc.driver.OracleDriver
    # Greenplum = org.postgresql.Driver
    # DB2 = com.ibm.db2.jcc.DB2Driver
    # Netezza = org.netezza.Driver
    # PostgreSQL = org.postgresql.Driver
    # SQLServer = com.microsoft.sqlserver.jdbc.SQLServerDriver
    # MySQL = com.mysql.jdbc.Driver
    # Teradata = com.teradata.jdbc.TeraDriver
    # Vertica = com.vertica.jdbc.Driver
    # Sybase = com.sybase.jdbc2.jdbc.SybDriver
    # Informix = com.informix.jdbc.IfxDriver
    # SAPDB = com.sap.dbtech.jdbc.DriverSapDB
    # InterBase = interbase.interclient.Driver
    # HSqlDB = org.hsqldb.jdbcDriver
    # MariaDB = org.mariadb.jdbc.Driver
    # MySQL = com.mysql.jdbc.Driver
    driverClass=com.amazon.redshift.jdbc41.Driver
  6. Locate and open for editing the file additional_jdbc_drivers.rb.

    The path is similar to path similar to /data/chorus/install/releases/5.9.1.0.3973-5d95f7c97/components/core/app/mixins/sequel/extensions/additional_jdbc_drivers.rb

  7. Add a line for the redshift class so that the content resembles the following.
    module Sequel
      module AdditionalJdbcDrivers
        MAP =  {
            mariadb: ->(db) { org.mariadb.jdbc.Driver },
            teradata: ->(db) { com.teradata.jdbc.TeraDriver },
            vertica: ->(db) { com.vertica.jdbc.Driver },
            hive2: ->(db) { org.apache.hive.jdbc.HiveDriver },
            hive: ->(db) { org.apache.hadoop.hive.jdbc.HiveDriver },
            redshift: ->(db) { com.amazon.redshift.jdbc41.Driver }
            }
     
        MAP.each do |key, driver|
          ::Sequel::JDBC::DATABASE_SETUP[key] = driver
        end
      end
    end
    Important: You must apply this change to the file additional_jdbc_drivers.rb again after upgrading Team Studio.
  8. Restart Team Studio.
  9. Open the Add Data Source dialog box.

    Amazon Redshift dialog box

  10. Provide the Data Source Type, the Data Source Name, and (optionally), the Description.
  11. Set the data connection (JDBC URL) using a URL similar to the following.
    Tip: You can copy your RedShift URL from your AWS RedShift page
    jdbc:redshift://armen-jjredshift.csyb6t8bifc8.us-west-1.redshift.amazonaws.com:5439/armenjjdb
  12. Optional: Select Set database credentials as a shared account if you intend to allow all users to access the data source without using their own credentials.

    Users access the database with your credentials as the data source owner. If you do not select this check box, each user must provide credentials for that data source to access it. You can check the box later if you change your mind.