Building Rules for Decision Table Artifacts
Overview
Once a decision table artifact is available for editing, you build rules for the artifact with the Artifact Editor using business rules syntax.
The Artifact Editor supports the following rule building methods:
-
Adding action and action columns directly from the Artifact Editor
-
Using the button to manage the artifact's rules
-
Clicking the
 button the Text Editor to edit the artifacts properties
To build rules, you must select an artifact from the Workspace view and enable it for editing by checking it out. Once checked out, the artifact's state becomes working, which indicates it is available for editing.
-
If you created the artifact, it is checked out by default.
-
For non-checked out artifacts, right-click the artifact to invoke the menu, or click from the Artifact Editor if the artifact is displayed there.
 |
General Artifact Editor Buttons
| Button | Description |
|---|---|
| Content/Metadata | Toggles between the content editor and the metadata editor. |
| Save | Saves local changes. |
| Commit | Commit local changes. |
| Verify | Verifies the artifact |
| Undo/Redo | Undo and reapplies most recent changes. |
Artifact Editor Option Buttons
The ![]() button displays the following options.
button displays the following options.
| Button | Description |
|---|---|
| Switch to | Switch to text editor or metadata editor. |
| Delete | Deletes the artifact if it is not already in the repository. If the artifact is in the repository, you can recover it. However, your local changes are lost. |
| Discard Local Changes | Allows you to specify which artifacts you want to discard. Discard essentially "un-checks out" artifacts. Your changes are not saved. |
| Commit | Allows you to specify which artifacts you want to commit to the AMS repository. A user with reviewer privileges is notified of the pending commit. |
| Lock/Unlock | Artifacts can be in one of two states: locked or unlocked. Locked prevents other users from editing the artifact; unlocked (default) allows others users to edit the artifact. Admin users can force an unlock of any artifact. |
| Replace With |
|
| History | Displays the project history for the specified artifacts. |
| Deployment |
|
| More |
|
Building Rules Using the Artifact Editor
-
With your artifact displayed in the Artifact Editor, click , one column for each condition or action you want to build into your business rules.
-
Enter a column name.
-
Select a column type from the drop-down list. Choose from StreamBase or
standard(TIBCO BusinessEvents) syntax to build your condition and action rules. See Decision Table Syntax for Building Rules for syntax usage:-
Condition
-
Action
-
StreamBase Condition
-
StreamBase Action
-
-
Select a property type:
-
bool
-
double
-
int
-
list
-
long
-
string
-
timestamp
-
-
-
Click , once for each business rule that you want to build.
-
Enter your rule information into each cell as required, depending on the column's data type. See Decision Table Syntax for Building Rules for syntax guidance. If using the boolean data type, double-click in the cell to toggle between true and false.
-
Optionally, set the rule priority (the order in which rules fire) by double-clicking in the cell and selecting a priority level from the drop-down list {1 highest, 10 lowest. Default: blank, which equates to 5}.
-
-
Enter an optional date and time for when the artifact becomes effective (once it is ultimately loaded into a StreamBase decision table EventFlow module).
-
Enter an optional date and time for when the artifact expires, using one of the following formats:
-
YYYY-MM-DD hh:mm-hh:mm
-
YYYY-MM-DD HH:mm:ss.SSSZ
-
YYYY-MM-DD HH:mm:ss (time zone is set to local time zone)
-
YYYY-MM-DD HH:mm (seconds are set to 00, and timezone is set to local time zone)
-
YYYY-MM-DD (hours/minutes/seconds are all set to 00, and timezone is set to local time zone)
-
-
Select the artifact priority from the drop-down list {1 highest, 10 lowest. Default: 1}.
-
Enable single row rule execution as needed. When enabled, the first run rule that matches the input causes the TIBCO StreamBase Decision Table EventFlow module (when the artifact is deployed to the module) to emit its (StreamBase) output tuple. When disabled, all rules are run against each input tuple, prioritized in descending order by rule ID. For more information about the Decision Table operator, see the Decision Table operator documentation page in the StreamBase Authoring Guide, in the TIBCO Streaming® documentation.
-
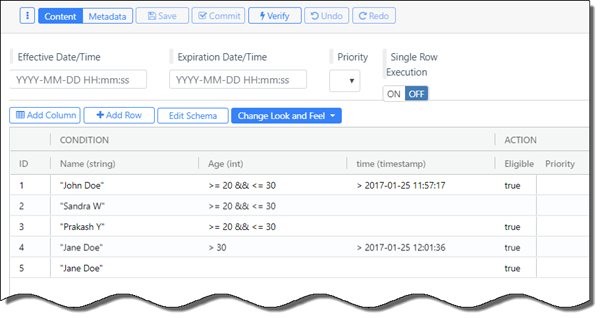
The following example shows a simple artifact containing five rules and four columns (two condition and two action columns):
-
Press Ctrl+S (Windows), command+S (Mac), or click . Changes are saved locally and are not yet visible to other users. If you click , AMS sends your artifact changes to the reviewer for approval. Changes remain pending until the reviewer accepts or rejects them. Once the reviewer acts upon the commit, you receive notification in the Notifications view.
Copying and Pasting Rules
In many cases it is simply easier and more convenient to copy, paste, and edit a rule than it is to build a new one. AMS supports copying and pasting as follows.
- Copy
-
Key combo: Ctrl+C or command+C (Mac) to copy the selected cell (or cells when multiple are selected) to the clipboard.
Right-click on a cell and select : copy the selected cell (or cells when multiple are selected) to the clipboard.
Right-click on a cell and select : copy the whole row on which the selected cell resides to the clipboard.
Right-click on a cell and select : copy the whole row on which the selected cell resides, plus the header of the table to the clipboard.
- Paste
-
Key combo: Ctrl+V (command+V on Mac) to paste from the clipboard to the selected cell.
Right-click on a cell and select : this prompts a dialog instructing you use Ctrl+V.
Paste multiple cells/rows: when multiple cells/rows are in the clipboard and were pasted, AMS tries to paste them all with the same layout of the original cells/rows, until it runs out of range.
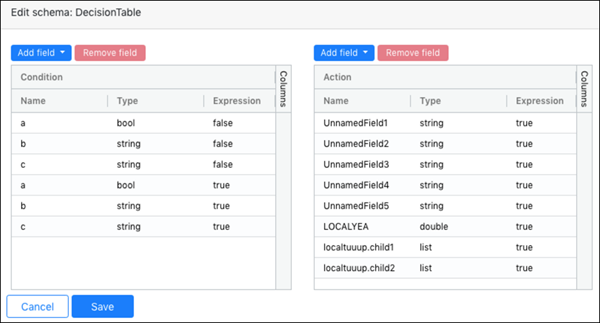
Managing Rules Using the Schema Editor
The schema editor offers a streamlined and often more efficient method for editing artifact rules. From the schema editor, you can manage fields (condition and action columns) and build rules using rules syntax as required.
Use the schema editor to manage StreamBase decision table artifacts. The editor does not currently support Decision table artifacts based on TIBCO BusinessEvents syntax.
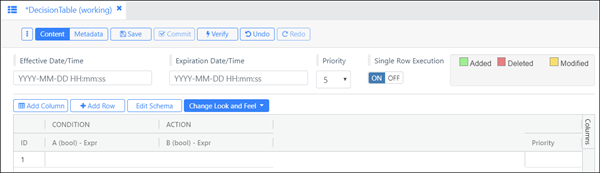
The following example shows an artifact named DecisionTable and containing one condition column and one action column.
 |
-
With your artifact displayed in the Artifact Editor, click .
-
Clicking will add a new condition or action column, depending on which side you click the button in the schema editor.
-
Choose Simple or Expression from the drop-down list.
-
Once you are done making changes in the schema editor, click . This action refreshes the artifact in the Artifact Editor but does not save the artifact itself.
-
From the Artifact Editor, press Ctrl+S (Windows), command+S (Mac), or click to save the artifact. Changes are saved locally and are not yet visible to other users. If you click , AMS sends your artifact changes to the reviewer for approval. Changes remain pending until the reviewer accepts or rejects them. Once the reviewer acts upon the commit, you receive notification in the Notifications view.
Changing the Artifact Editor's Appearance
You can set how the Artifact Editor displays business rules. Click the Change Look and Feel menu and select one of the display options.