Using the AMS Web Client
This topic explains how to navigate the user interface. The available options displayed in the web client vary based on your assigned user role and privileges.
Navigating AMS
The AMS web client contains the following views for working with artifacts:
-
Workspace view
-
Dashboard view
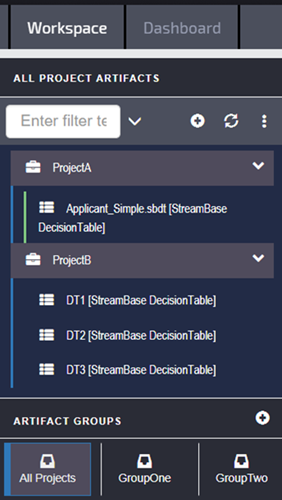
Workspace View
The Workspace view is where you manage projects and artifacts. By default, the Workspace view displays the projects to which you have access, including artifacts to which they are assigned. Depending on your User Settings, there may also be projects where their display is currently disabled. See the section called “Setting User Preferences”.
 |
The Workspace view presents multiple options for managing your projects, including:
-
Project and artifact creation
-
Artifact navigation and display
-
Artifact Groups for managing projects
The Workspace view includes:
- Top-level Tool bar
-
Filter: Enables project and artifact name searches.
Recent: Click the arrow to view recent opened files.
 Plus button:
-
Creates new projects
-
Create new artifact
-
Add artifacts to project
 Refresh button: Refreshes the Workspace view for changes to projects, groups, or artifacts
 Options button (navigation):
-
Show resource as a tree (default view)
-
Show resources as a flattened list. Displays all available artifacts in one list, regardless of project.
-
Show bread crumbs. Click the options button to the right of the project to view artifacts located in it.
-
Basic tree navigation. This view hides groups to resemble the pre-AMS 1.2.0 Workspace view.
-
- Resource display area
-
The area below the tool bar displays your projects and artifacts. The view varies depending on how you set your navigation via the
options button. - Artifact Groups
-
Groups are another method to logically display and manage projects and artifacts. By default, AMS provides the All Projects group, which displays all projects and their artifacts (this group cannot be edited). Groups allow you to:
-
Drag and drop artifacts into groups that you define
-
Share groups between users
You can either add individual artifacts to an Artifact Group, or you can define the group with a name or type filter. For example, a group can be defined for all
*.sbdtfiles, or all artifacts namedFinancial*. Selecting the artifact group will display only the artifacts that belong to the selected group, allowing you to logically group related artifacts together for quicker access. -
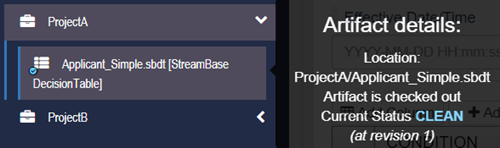
- Artifact Decoration
-
Artifact icons may include indicators to indicate their current state. Mousing over the artifact displays additional information, which includes the following states:
-
ADDED
-
MODIFIED
-
DELETED
-
CLEAN: The artifact was checked in (that is, it is not ADDED), and it is not modified or deleted.
-
 |
Dashboard View
The Dashboard view displays all pending and processed commits within the following subviews:
-
In Progress view
-
Resolved view
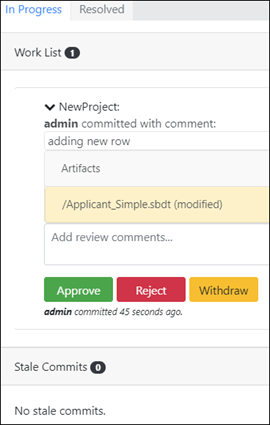
In Progress View
The In Progress view displays a list of projects containing recent artifact commits, appended by respective commit messages.
- Work List
-
If your role is
reviewer, the Work List field displays projects whose artifacts have pending commits and are awaiting approval. Committed artifacts can be from any user, including the reviewer.Click the chevron to display the changed artifact(s) and approve or reject committed artifact changes. After clicking , clicking displays the artifact's rules and highlights any changes.
- Commits Awaiting Approval
-
For business users, this field displays committed artifacts whose state is pending action by a reviewer.
Click the blue Details arrow to display the changed artifact and optionally withdraw your changes.
- Stale Commits
-
Displays your committed artifacts, if stale. For a commit to be stale, the same artifact must have been committed by another user and approved after your commit was made. Meaning, your artifact is out-of-date. Stale commits can be rejected or withdrawn but not approved.
 |
Clicking the blue Details arrow reveals the artifact's recent changes. Clicking the artifact in the details dialog displays artifact changes.
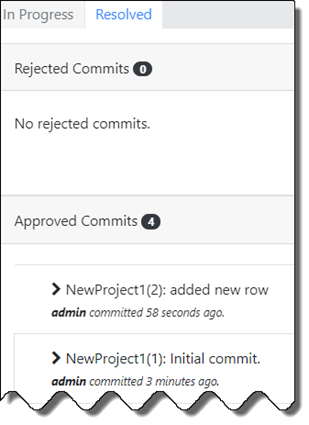
Resolved View
The Resolved view displays approved or rejected changes to artifacts. Clicking displays the changes you made to your local working copy.
 |
Artifact Editor
The Artifact Editor is where you build and edit decision table artifacts. By default the Artifact Editor is located on the right side of the web client. Working with artifacts using the Artifact Editor is described in Building Rules for Decision Table Artifacts.
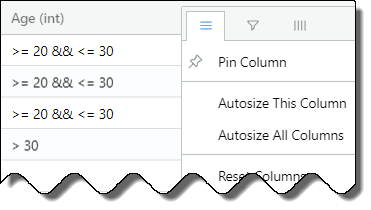
Tool Panel
The Tool Panel provides various artifact display options based on the item selected (such as a row or column). Different menu combinations are also possible depending on whether the artifact is checked out.
Hover your mouse to the right of the column or ID to invoke the selection button.
 |
-
 Filter: Provides column display options
 -
 View/Hide items: Displays or hides row or column
 -
 Filter: Provides search field for the selected column
Viewing Messages and Errors
By default, the Artifact Editor color-codes operations you perform on artifacts, depending on the operational context. Operations include editing artifacts or comparing artifacts during a synchronization operation.
Status messages, such as successfully completed operations, are also displayed in the web client, depending on your activity.
Refer to the following color decorations:
-
Green: the operation initiated by the user is completed correctly by the server.
-
Yellow: the operation initiated by the user is NOT completed by the server for some reason.
-
Blue: the web client has initiated some state check and updated some state successfully.
-
Red: an unexpected error occurred in either the web client or the server.
Setting User Preferences
To set user preferences for working in the web client, click the selection button ![]() in the upper-right corner and click Settings. Changed settings take effect immediately and are preserved across user sessions.
in the upper-right corner and click Settings. Changed settings take effect immediately and are preserved across user sessions.
- Personal Preferences
-
Toggle the button to choose whether to:
-
Only display checked-out artifacts in the Project Explorer (Workspace view). This setting does not affect artifacts displayed in Artifact Groups (Default: Off).
-
Always highlight differences in the Artifact Editor (Default: On).
-
Automatically validate when changes to the artifact are added, saved, or loaded (Default: Off). Setting to On ensures validation is only performed when requested.
-
Show empty folders when filtering artifacts (Default: Off).
-
Display notifications when work list items have changed status (Default: On).
-
- Projects Configuration
-
Per project shown, set the following as needed:
-
Toggle the button to show or hide the selected project in the Workspace view.
-
Click to permanently remove the project from the AMS repository. You must enter the project name in the confirmation dialog to complete the commit operation.
![[Note]](images/note_826758100.png)
Note When deleting an AMS SCM project using this dialog, the directories and files that were imported into AMS in creating the project are NOT deleted in the repository.
-
- Account Settings
-
Account settings displays any bindings between OpenID Connect identities and the currently logged-in user, as well as the option to change your password.
-
Click to delete the binding between the Provider ID and AMS, but not the account itself.
-
Click to change your password. Changes take effect the next time you sign onto AMS.
-
Workspace View Menus
The following section describes the available menu items when right-clicking projects and artifacts in the Workspace view.
Project Menu
| Menu | Description |
|---|---|
| New Artifact | Creates a new artifact as a child object under the parent project folder. |
| Commit | Allows you to specify which artifacts you want to commit to the AMS repository. A user with reviewer privileges is notified of the pending commit. |
| Force Pull | Pulls in latest changes to artifacts stored in an enabled SCM. |
| Synchronize | Retrieves another user's committed and approved changes. Allows the option to apply the changes to your local working copy of the artifacts. |
| Discard Checkout | Allows you to specify which artifacts you want to discard. Discard essentially "un-checks out" artifacts. Your changes are not saved. |
| History | Displays the project history for the specified artifacts. |
| More |
|
Artifact Groups Menu
Users with group privileges can create groups by clicking the Artifact Groups ![]() plus sign. To manage user-created groups, the following menu options apply:
plus sign. To manage user-created groups, the following menu options apply:
| Menu | Description |
|---|---|
| Edit | Supports group name changes. Use filtering to include display of artifacts by full or partial name, or to include all artifacts that were dragged into the group by leaving the filter blank. |
| Share | Enables a locally created group to be shared with any user who has permission to access the shared group. |
| Delete | Deletes the group locally and also for any user sharing this group. Artifacts and projects contained within groups are not deleted. |
Selection Menu
The ![]() selection menu, located in the upper-right corner of the web client, presents the following options:
selection menu, located in the upper-right corner of the web client, presents the following options:
| Menu | Description |
|---|---|
| Settings | Sets user preferences, as described above. |
| Management | If your role is admin, the Management menu is displayed. See User Management Settings. |
| Log Out | Logs you out of the web client. |
| Help | Links to a Web version of the AMS User Guide. |
| API Documentation | Links to the AMS API. See AMS API. |