Defining the Primary Source Using an LDAP Query
Each LDAP container must contain a primary LDAP source. If you are using an LDAP query source in the LDAP container definition, all resources in the primary LDAP source that satisfy the LDAP query are included in the list of candidate resources in the container.
Procedure
-
Open the Organization Browser (see
Access to the Organization Browser), then select
LDAP Containers.
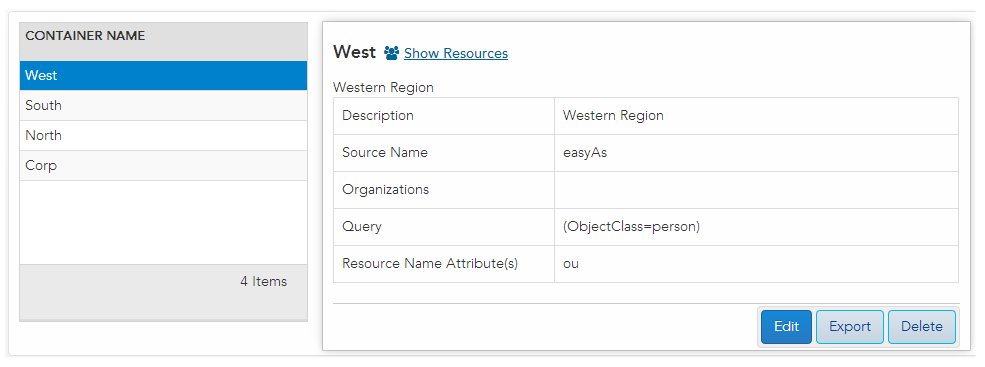
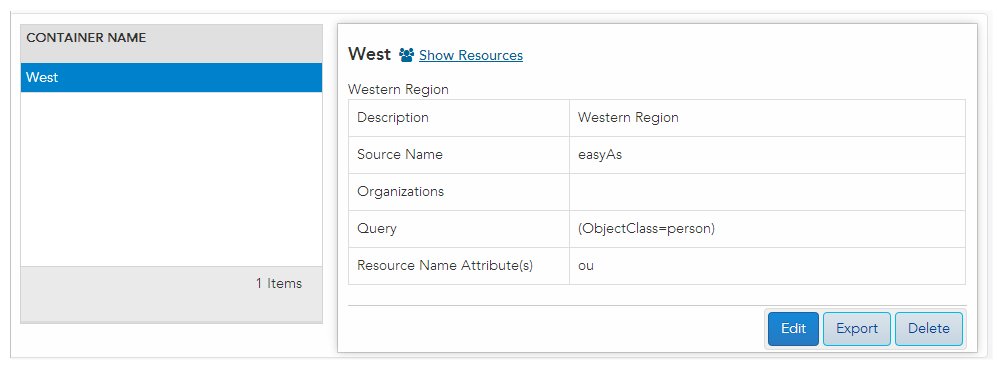
If any LDAP containers had previously been defined, they are shown in the left pane of the dialog, and the details of the selected container are shown in the right pane:
The first time you display the Organization Browser, there will not be any containers listed.
Note: After you’ve defined a container, you can edit it by selecting the container in the list, then clicking the Edit link in the lower-right part of the dialog. You can generally follow the same steps in this procedure to edit an existing LDAP container.However, if the existing LDAP container contains resources, the LDAP sources for that container are fixed; you cannot delete or change the primary or secondary LDAP sources, nor add additional secondary LDAP sources.
Also note that if an LDAP source defined in an LDAP container is currently offline, you cannot edit the container until the LDAP source is back online.
-
Click the
Add a new LDAP container
button.
- On the Add a new LDAP Container dialog, enter a name and description for the new container.
-
If desired, you can now specify organization relationships for the new container (note that this is applicable only if there are multiple organizations in your organization model).
If the container has a relationship with an organization, resources in the container will be able to see that organization in the Organization Browser, as well as organizations that do not have an explicit relationship with a container. Resources can be mapped to positions in organizations that the user can see in the Organization Browser.
For more information about organization relationships, see Container Organization Relationships.
If you are not specifying organization relationships for this container, proceed to Step 5. (You can specify organization relationships for this container at a later time.)
To specify organization relationships:
- Click the Edit button to the right of the Organization field.
-
On the
Define relationships to containers dialog, select the appropriate boxes for the organizations to which you want the new container to have a relationship.
Selecting a box causes the Relate this container to the following organizations option to automatically be selected.
Selecting the Do not relate this container to specific organizations option causes all check boxes to become unchecked.
-
Click
Save.
The organization(s) you specified is now shown in the Organization field.
-
Click the
Add Query Source
button, which displays the
Add new LDAP Source
dialog.
The Add new LDAP Source dialog is used to select the primary LDAP source from which resources will be obtained, as well as to provide query information so that you can limit the number of resources returned from the LDAP Server.
-
In the
Alias field, select the LDAP source from which you want to obtain resources.
The names in the Alias list are user-readable names that an administrator has assigned to each of the LDAP Servers available in the enterprise.
- Optional:
In the
Base DN field, enter the branch (e.g., an organization unit) in which you would like to limit the search in the LDAP directory structure. This increases the efficiency of the search if the LDAP contains a large number of branches.
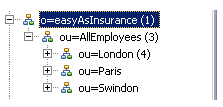
The search base must provide the complete path to the desired branch in the LDAP directory structure. For example (this illustration is from an external application that shows the LDAP source), if you want to limit the search to the “London” organization unit in the following LDAP source ...
... you would enter the following in the Base DN field:
ou=London, ou=AllEmployees
You can also leave the Base DN field blank.
-
In the
Query field, enter a filter string.
The filter string is used to determine which of the resources to return from the LDAP source. This allows you to limit the resources returned. For example, you may only be interested in considering resources from a specific department or region.
Query strings must be enclosed in parentheses. This allows you to specify multiple strings, each one enclosed in its own parentheses.
For information about special characters that can be used in LDAP query strings, plus some examples of query strings, see LDAP Query String Characters and Examples.
- Using the Search Scope options, specify the depth to perform the search in the LDAP directory structure, as follows:
-
Click one of the
Show sample of LDAP Entities buttons.
You can choose to display 10, 50, or 100 sample entities by clicking the appropriate button. This allows you to see the attributes that are in your chosen LDAP source. The number of sample entities returned has no bearing on the number of resources that will be in the LDAP container; it only determines how many are shown in the sample data.
-
In the
Resource Name Attribute(s)
field, enter one or more LDAP attributes by which you want the resources to be displayed in the list of candidate resources.
You can use the list of attributes returned by the Show sample of LDAP Entities button to determine the attributes to use from the resource name attribute(s). The resource name attribute is significant from the following reasons:
- These are the names by which the user must log into the BPM application.
- These are the names by which the resources will be listed when mapping resources to groups and/or positions in the organization model. That is, they must be names that the user doing the mapping can use to uniquely identify the resources. For example, you probably wouldn’t want to use only “sn” (surname), as that may not be unique among all of the resources.
The default resource attribute is “cn”, which typically contains a full name. But depending on the data in the LDAP source, there may be more suitable attributes for this use.
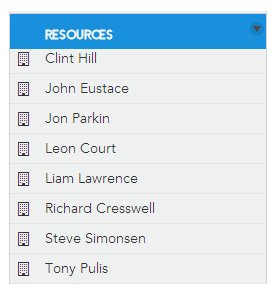
You can specify multiple attributes in the Resource Name Attribute(s) field. For instance, you could enter “givenname sn” to display the resource’s first name and last name (again, depending on what is stored in those attributes on the chosen LDAP source).
Once you save the LDAP Container you will be able to view the list of resources for the container. For the LDAP entities you see in that list that have not yet been “created”, the resource name will be constructed based on the Resource Name Attribute(s).
When a resource is created (either using the Create function or by mapping the user to a group or position), you are given the opportunity to edit the constructed resource name.
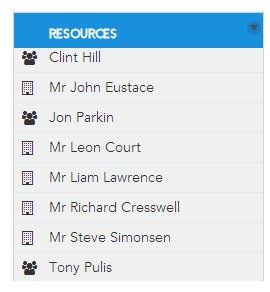
It is possible to change the Resource Name Attribute(s) setting for the container, but that will not affect the resource name of resources that have already been created. It will, however, change the name that is constructed for the remaining LDAP entries that have not yet been created. For instance, using the example shown above, if you change the value in Resource Name Attribute(s) field to “cn” (which contains "Mr" or "Mrs" with the resource's full name), the Resource Names now appear as shown below in the list of candidate resources.
Notice that the resources that had been previously created (those that have the
 ), are shown with the resource names they had when they were created; the resources that have not been created yet (those that have the
 icon), are shown with the new resource names.
-
Click
Save to save the primary LDAP source you have defined, then click
Save again to save the LDAP container definition.
The newly created LDAP container now appears in the Container Name list.
- Select the new container to see its definition details in the right pane.
-
You can now do one of the following:
- add one or more secondary LDAP sources to your container - see Defining a Secondary Source Using an LDAP Query.
- map resources to groups/positions - see Mapping Resources.
- map resource attributes - see Mapping Resource Attributes.
- create BPM resources - see Creating BPM Resources.

