Statistica Workspace
- Ribbon bar: Select the Home tab. Click the New arrow. On the menu, select Workspace to display the Create New Document dialog box - Workspace tab.
- Classic menus: On the
File menu select
New, or click the
New Document
 toolbar button, to display the
Create New Document dialog box. Select the
Workspace tab, select the desired workspace configuration, and click the
OK button to display the Statistica workspace. Alternatively, on the
Data Mining menu,
Data Mining - Workspaces submenu, choose one of the commands to display the desired workspace configuration.
toolbar button, to display the
Create New Document dialog box. Select the
Workspace tab, select the desired workspace configuration, and click the
OK button to display the Statistica workspace. Alternatively, on the
Data Mining menu,
Data Mining - Workspaces submenu, choose one of the commands to display the desired workspace configuration.
Workspace Concepts
- Visual - The project is laid out visually to show the workflow from input data to the results.
- Repeatable - Run the workspace multiple times as data update or even on new data sets.
- Reproducible - The visual project steps can be explored to see exactly what was done to obtain the results.
- Flexible - The same analysis options are available in the workspace that you have in the original interactive analyses.
- Customizable - Custom nodes can be created for the workspace and shared with colleagues.
Nodes are flexible and easy to use together in a single workspace project. Workspace nodes can be accessed from the Node Browser, and from the tab/menu structure. When a workspace is active, the Statistics, Data Mining, and Graphs, tabs change to the Workspace node tabs. Additional tabs become available. Select an analysis or tool from the tabs to add that node to the workspace. Visually, Statistica indicates this by highlighting the tabs as seen here.

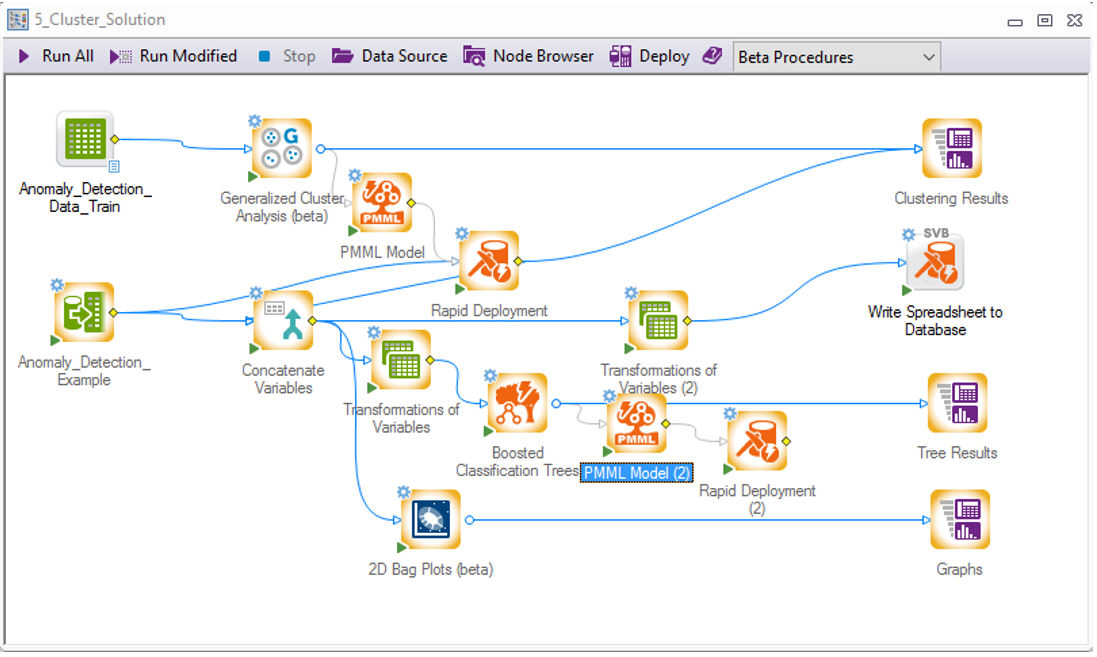
The group of nodes available is governed by the selected configuration from the drop-down menu found at the upper-right corner of the workspace.
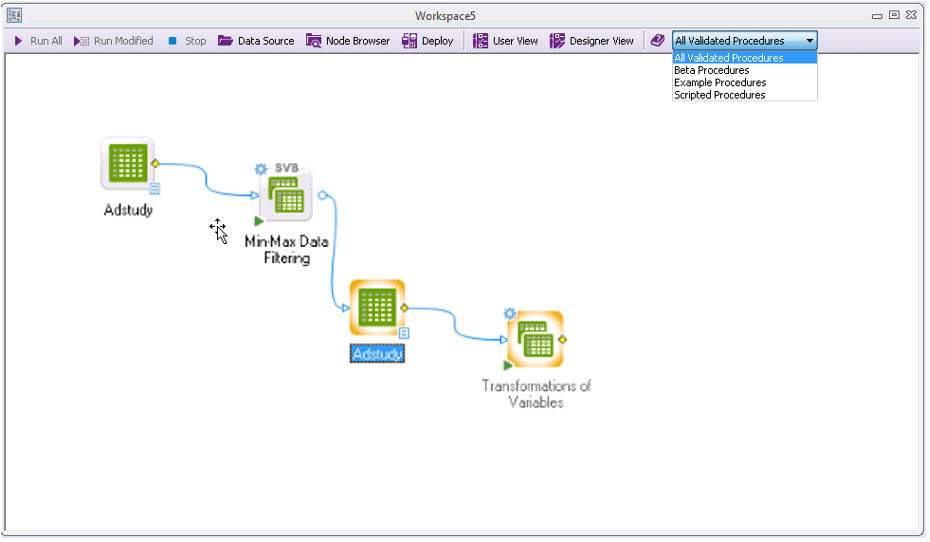
The configuration can be changed at any time, and both the available nodes on the tabs and in the Node Browser are updated accordingly.
Output management within the workspace is more flexible. On the Workspace tab of the global Options dialog box, options are available to route output. By default, all results will be sent to one workbook node to organize all output together.
Opening a Workspace: Templates
Templates, which are new in 13.2, are predesigned workspaces that you can use much the same way you use other templates with which you are familiar. Some are included with the program and you can create your own or modify the included templates and save them for reuse.
Choosing Templates:
You can open a document from a template three ways. The first two options display available templates in the listbox below the Templates group.
- Click a template name.
- Click the
OK button, or double-click a template to create a new document from that template.
The Workspace Template group contains the three options listed below:
- Local radio button: Select this option to display a list of existing templates stored in the Workspace templates directory.
- Browse button: Use the Browse button with the Local option to navigate to locations on your local system and load Workspaces on which to build a template.
- Enterprise radio button: Select this option to display a list of templates available in Enterprise. An Enterprise installation and license is necessary to access Enterprise functionality.
- Browse button: Use the Browse button with the Enterprise option to browse the Enterprise system for Workspaces to use as a starting templates for a new Workspaces.
Using Templates:
The new Workspace will have a new name of r;WorkspaceN, where N indicates the number of new Workspaces created during the current user session.
Like other templates you are familiar with, the new documents you create will not save over the templates themselves. When you save or close, you will be prompted to save as and use another name. You can edit the templates and create modified template or save it in another directory as a workspace.
Creating New Templates
Any non-published SDM document (workspace file) opened from the Create New Document dialog box, whether selected from a list or browsed to, will act like a template. It will open a new workspace file identical to the template, and when saved or closed, whether modified or not, prompt for location and new name. A document created from the blank template, however, can be closed without a prompt if it has not been modified. Blank is not the actual name of a real Workspace, but is a placeholder that creates an empty Workspace.
Working with the Workspace
The Statistica Workspace contains the symbolic representation of the flow of the input data through the data filtering or cleaning and analytic nodes to the results nodes. The Node Browser contains more than 260 individual nodes that can be connected to one or more data sources and moved (dragged-and-dropped) from one workspace to another. These nodes can be viewed as individual analysis objects that encapsulate the complete functionality of the Statistica analysis and data management routines.
Scripted Nodes
The scripted nodes are available for use in all workspace projects. They are located on the DataMining tab/Workspaces menu/All Validate Procedures/Publish tab/Create Node group.

Working with Nodes
The new nodes (as well as those still in Beta) work differently from scripted nodes. They are more flexible and have more options.
Selecting variables
Each new node for data preparation, analysis, and graphing contains options for variable selection, case selection conditions, weighting, etc., all available in the node dialog box. In scripted nodes, variable selection is performed at the node prior to the analysis node. The new functionality gives you greater flexibility within each individual analysis to easily control the settings. Different variable selections, weights, selection conditions, etc., can be used for each analysis. Alternatively, the Select variables and predictors node accessed on the Data tab in the Transformations group offers variable selection one time where downstream analyses will inherit the same variable selection. The option that works best for your analysis is easily available to you.
The Select Variables node may be necessary when using a combination of new nodes and scripted nodes in one workspace. In the following example, the Data Health Check Summary node output is used as input for the scripted regression node, Best-Subset and Stepwise Regression. To use this new node output as input, variable selections must be made before the scripted node as shown below.
Selecting options and output
The available options for the new nodes are the same as what you are accustomed to in the original interactive analyses. The new node dialog boxes have a similar appearance and are easier to navigate than the previous scripted nodes. Both the set up for the analysis and the results options are located in one dialog box. Use the tree pane on the left to navigate through the tabs, and make all desired selections before running the node. Select the check box for each desired result item you want to be included in the output. Some nodes offer spreadsheets for downstream analysis that can be selected and customized as well.
Helpful Hints
- Highlighting the input data node to be used for input before selecting the analysis node will automatically connect the input data node to the analysis node.
- Options such as Run to node and Run modified nodes make it possible for you to execute only portions of the workspace at a time.
- Right-click on a connection and select Disable to temporarily avoid an analysis connection and everything downstream from it.
- A workspace node can have up to five icons on it:

| View the reporting documents (upper-right corner) | |
| Show that the node is available for a new connection for downstream analysis (center-right side) | |
| View the output spreadsheet for downstream analyses (lower-right corner) | |
| Run the workspace (lower-left corner) | |
| Edit parameters, (display the node's dialog box [upper-left corner]) |
Workspace Toolbar
Refer to Statistica Workspace Toolbar for details. You can turn off the display of the toolbar at the top of the workspace by clearing the Show fixed toolbar at the top of Workspace windows check box on the Workspaces tab of the Options dialog box.
If You Need to Reset Your Node Browser
When running an updated version of Statistica, if you don’t see the same node configurations as in this article, you likely need to restore the default settings of the Node Browser.
Statistica saves option changes and customizations to your software and transfers them when you upgrade, if you so choose. If in a previous version of the software, you customized the workspace Node Browser, Statistica will not automatically override those customizations. So your former configurations, that don’t include Beta Procedures, will be used.
To add the Beta Procedures:
- On the workspace toolbar, click Node Browser.
- On the
Node Browser toolbar, click
 Options .
- In the Browser Options dialog box, click the Restore Defaults button to remove the customizations and show the Beta Procedures and other standard lists.
- Node Browser
- New Browser
- Browser Options
- Select Spreadsheet or In-Place DB Document
- Select Dependent Variables and Predictors
- Large Variable List for Input
- Add New Parameters
- Edit Parameters
Double-click on a data cleaning/filtering or analysis node to display the Edit Parameters dialog box, which features interactive help accessible in the dialog box itself. - Edit Text
- Enter a Name for the New Node
- Connect Embedded Data to a Disk File
- Warning: Ensure Consistent Coding for Deployment