Task 3: Setting up matching
Task 3: Overview
A matching operation compares data from two or more records to find potential duplicates. You create a Matching policy to tell the add-on:
when to execute a matching operation. You can require users to manually execute a matching operation. Alternatively, a matching operation can run automatically when users create or update records.
how to execute a matching operation. You use a decision tree to provide the add-on with criteria that determines whether records are duplicates. You can also apply a merge policy that takes action based on the results of the record evaluation. Please note that creation of a merge policy is covered in Task 4: Configuring a merge policy.
What's next? Follow the instructions in Task 3a to configure a matching policy.
Task 3a: Creating a matching policy
You create a matching policy under and apply it to a table registered with the add-on. When creating the matching policy you tell the add-on when to execute. Users can run matching manually from a table menu, or you can specify that matching executes inline during record creation or update. When matching executes inline, a matching policy automatically executes after creating or modifying the record. If the matching operation finds potentially duplicate (suspect) records, users are notified and can review and make changes to the record.
To create a matching policy (skip to step 2 if picking up from Task 1):
From the main menu bar, select the Administration panel and open Data Quality & Analytics > TIBCO EBX® Match and Merge Add-on and open the table settings you want to edit.
Select the Matching policies tab.
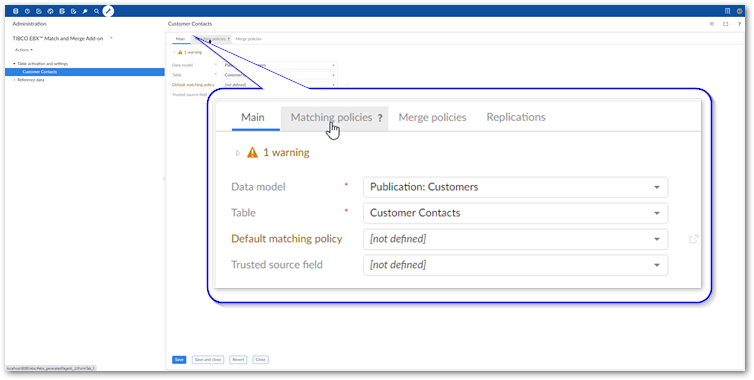
Select the '+' icon to create a new matching policy and fill in the required fields on the page that displays. The image below highlights required options:
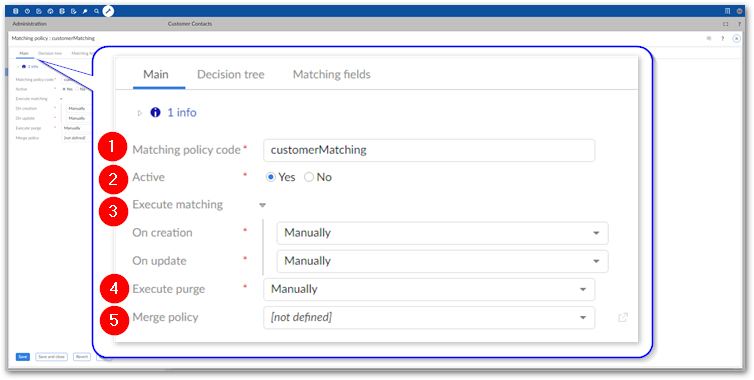
Matching policy code
The unique code used to identify this matching policy.
Active
Sets whether this matching policy is active.
Execute matching group
The Execute matching group determines how matching executes during creation or update of records. If set to:
Manually the add-on does nothing and users must initiate matching operations. They can do this from a table's Actions menu.
After submission the add-on automatically executes matching after creating or updating the record. You can apply this setting when you want to perform bulk creation of records using the EBX® API. There are limitations to this functionality. Please check the Known issues section in the release notes for additional details.
Before creation users can search for potential duplicates before creating the record.
Inline the add-on automatically executes matching during the creation/update process. The user must review any potential duplicate records before continuing. When specifying that matching execute inline, the add-on also displays the following menus to select a workflow for record creation or update: Workflow on creation and Workflow on update. The selected workflows are launched when a user takes the corresponding action. Note that depending on the assignments in the workflow, the user who created the record that trigged inline matching might not see the screen requiring that the records be reviewed before continuing.
Note
If you set matching execution to After submission, Before creation or Inline, you must set this matching policy as the table's Default matching policy. This option is available on the configuration's Main tab. Additionally, when a user creates or updates a record, the add-on will only execute automatically if a field configured for matching is modified.
Execute purge
Determines whether the add-on automatically removes old matching results. If set to Automatically the add-on executes this policy each time matching executes. As this process can be time consuming, you can set it to Manually and allow users to execute as needed. They can access this functionality from a table's Actions menu by selecting: Match and Merge > Purge old results.
Merge policy
Tells the add-on which merge policy to link to this matching policy. After creating a merge policy, you must specify it here in order to activate the automatic merge feature. See Task 4: Configuring a merge policy for instructions on creating a merge policy.
Show match type
Sets display of the Match type column when users manage groups of matched records. This column indicates whether each record was included in the group through a direct match, or via transitive logic. The group's survivor record is identified with an N/A label. When this option is enabled, a built-in filter in the Manage group screen also allows users to display only records that are transitive matches.
Transitive matching refers to the inclusion of records based on indirect relationships. For example, if Record A matches Record B, and Record B matches Record C, then Record A and C are grouped together due to their transitive connection through B.
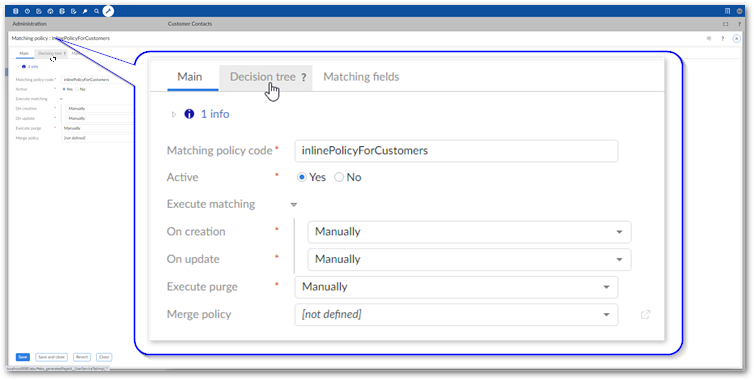
After saving, the following tabs display:
Decision tree: Contains settings that determine how the add-on compares data values.
Matching fields: Contains configuration settings for each field used in a matching policy.
What's Next? Use the instructions in Task 3b: Creating a decision tree to create a matching decision tree to specify how this matching policy compares data values.
Task 3b: Creating a decision tree
You create a matching decision tree to tell the add-on which data values to compare and how to compare them. Based on the comparison result you can specify that the add-on set a record's relationship status, or perform additional tests to ensure accurate results. A relationship status identifies records as positive or negative matches, or as suspected of being a match. The add-on creates groups of records identified as positive matches.
To create a decision tree:
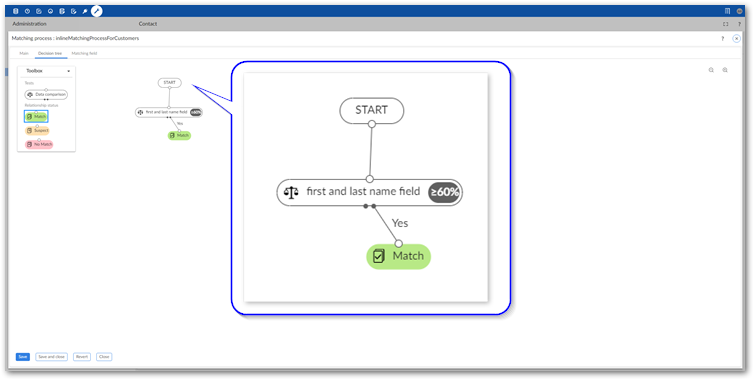
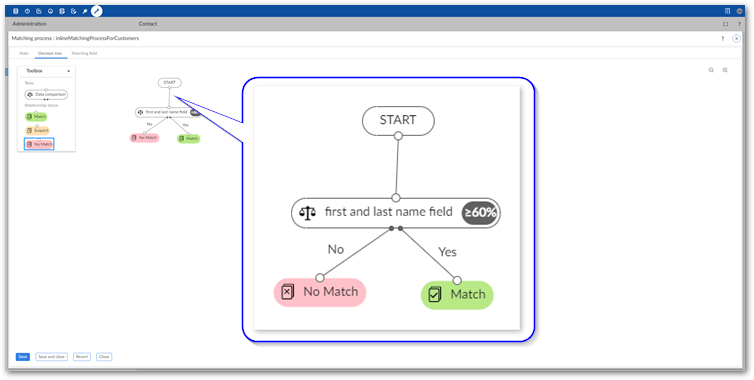
Select the Decision tree tab.
As shown below, 1) drag a Data comparison test from the Toolbox and 2) drag the bottom connection point from the Start node and link it with the test.
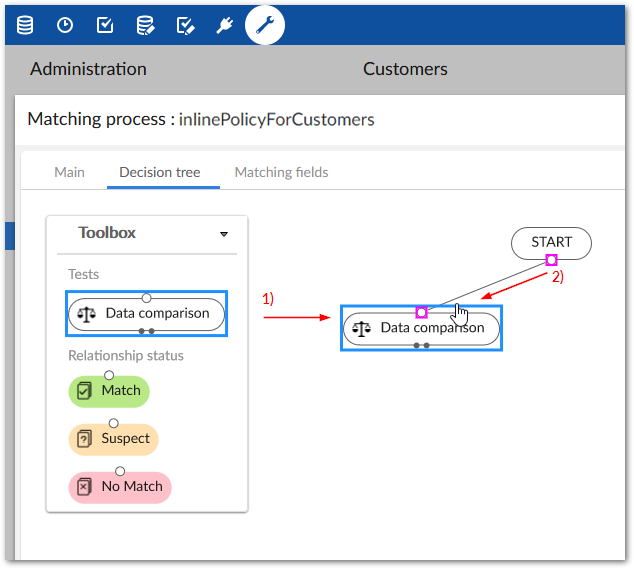
Double-click the test to edit its functions:
The Name property sets a name for this test that displays on the tree.
Evaluation method: the add-on uses the selected method to compare the fields you add. When you choose an option from the menu, you can select the preview icon to view a detailed description. The following comparison methods are available:
All fields match: For this data comparison to evaluate as true, each included field must meet or exceed its minimum score setting. See the definition of Minimum score in step 3 for more information.
At least N fields match: This option allows you to specify that a certain number of included fields must meet or exceed their minimum score setting for this data comparison to evaluate as true. When you select this option, the Minimum number of matches property displays and allows you specify how many fields must match.
Average: An average score is computed from the score of each included field. If this score meets or exceeds the value set in Minimum score, this data comparison evaluates to true. This function also allows you to assign a weight to each field. When using multiple fields as part of one data comparison, the Weight property is used to compute a weighted average and assign a weight to each field. Acceptable values are between 0 and 100. The higher the value, the more weight the field carries.
Predicate: This option is deprecated. Instead, in the Compare using field, select Operator and the Equals option.
Fields (One or more fields used in the comparison):
The Use relationships menu allows you to specify whether this field is: a regular field, a relationship through a link table, or a foreign key relationship. Before a related field is available to select, you must configure it in the Matching fields tab. See Matching with relationships for more information.
The Compare using option allows you to choose whether to use an algorithm or an operator when comparing the selected field's values. When you select:
Algorithm: Use the Algorithm menu to select the algorithm used to compute a score for this field. The list of available algorithms is filtered depending on the search strategy specified for this field in the data model. In some cases, an algorithm might be available but not recommended for use with a particular search strategy. These algorithms display in a lighter color font at the bottom of the list. If you select an algorithm that is not compatible with the defined search strategy, a warning icon displays. When configuring the algorithm for an added field using the Matching fields tab (see Task 3c: Configuring field specific settings), a link displays to allow you to change the search strategy defined for this field. After changing the strategy, the list of available algorithms automatically updates.
When you select the:
Exact algorithm, you can to specify whether to use case sensitivity on fields with String and Text data types.
Note
If you select a foreign key field, you should only select the Exact algorithm.
Hybrid fuzzy algorithm, you can adjust parameters related to several of the criteria used in the algorithm. The higher you set the value for a particular criterion, the more it will count when calculating the final similarity score. See Matching algorithms for a more in-depth description of this algorithm.
The Advanced settings group allows you to configure how a field's null values are managed in this comparison node. Since the same field can be used in other comparison nodes, you can apply different behavior to the field in other parts of the decision tree. For example, one node can require an exact match, where both records must contain a value—use No match for both null value settings. Another node can use a "not mismatched" strategy, which considers records matching unless their values are explicitly different. In this case, set one or both settings to Match.
Please note that these null value settings pertain to decision tree evaluation during processing only. Whereas, the null value management options on Matching fields are applied in pre-processing during clustering.
Operator: Use the Operator menu to select the operator used to compare values in the selected field. If you select Equals, a field displays that allows you to enter a value that must be present in the field to consider it a match.
The operators available to select depend on the data type of the chosen field. If the data type is:
date,time,dateTime,decimal,text,string,integer,boolean, oremail; the available options are: Equals, Either null, Both null, and Both not null.any other data type, the available options are: Either null, Both null, and Both not null.
Attention
If you use any operator that checks for null values, set the weight for the matching field to 0 in the Matching fields tab.
Minimum score: Sets the minimum percentage score required to consider data values from this field as matching. Acceptable values are between 1 and 100. The higher you set this value, the more similar the data values must be to match.
Note
You cannot select computed, multi-value, or linked fields in the Fields menu.
Specify the relationship status if the test evaluates to true by dragging one of the following from the Toolbox and connecting it with the test's right output point:
Match: the records will be considered a match.
Suspect: the records are suspected of matching, but require human review.
No Match: the records do not match.
Specify the relationship status if the test evaluates to false by connecting the desired status to the test's left output point. Note that if you want the result to trigger a new test, add another Data comparison node and connect it to desired output.
Use the process shown in the previous steps to build out your matching tree. Once finished, select Save and close.
The following example shows using three comparisons. If the first comparison evaluates to true, the records are considered suspects from that point on. If the second and third comparisons also evaluate to true, the records are marked as matches.

If required, set the configuration's default matching policy:
From the Matching policies tab:
Select the policy you want to set as the default.
From the Actions menu, select Set as default.
Save your changes.
From the Main tab:
In the Default matching policy menu select the policy you just created.
Save your changes.
What's next? Optionally, configure field specific settings. Or, see Task 4: Configuring a merge policy for instructions on setting up the add-on to merge data.
Task 3c: Configuring field specific settings
Use the matching policy's Matching fields tab to access additional functionality related to fields, including:
Use of relationships in matching.
Exclusion of records from a matching operation. When configured correctly, record exclusion can improve overall performance. See Excluding records for more information.
Pre-processing settings for field:
Search strategies: The search strategy is used to group similar records during the pre-clustering process. The list only includes search strategies defined in the data model containing the selected field. See the EBX® Reference Manual for more information about search strategies.
Weight: The weight is assigned to this field during pre-processing by EBX®. When a matching operation includes multiple fields, the weight sets the relative importance of each field's score in determining whether records are similar. Note that this weight does not affect the weighted average in the decision tree comparison nodes. You might set a higher weight on a field that could determine the output earlier in the decision tree. If you set the weight to 0, this field is excluded from the matching pre-processing phase.
Note
To improve matching performance, set the weight to 0 for fields that have a limited number of options. For example, fields that are boolean or enumerations. However, at least one or more fields should have a weight above 0 defined. If all fields are set to 0, matching results are not reliable.
By default, during the pre-processing phase of matching, field weights are automatically balanced so that each field equally affects the final score. This means that fields that contain multiple values have the same impact on the final matching score as fields with single values. To disable this behavior, set the
ebx.clustering.balanceproperty tofalsein theebx.propertiesfile. See Understanding matching operation processing for more information.
Null value management determines the behavior when comparing two records and one or both of them has a Null value in this field. When enabling matching of null values, adjust the weight for the field so that it is lower as compared to other fields. Otherwise, it might not get included during pre-processing with other similar records.
What's next? See Task 4: Configuring a merge policy for instructions on setting up the add-on to merge data.