
TIBCO ModelOps Integration with JupyterLab
Contents
Overview
This section explains how Notebooks containing Python code can be deployed to TIBCO ModelOps to score data. By using two custom JupyterLab extensions, you can deploy Python code contained in Jupyter Notebooks and Python script files to score data without having to manually author scoring flows and pipelines.
Requirements
TIBCO ModelOps extensions for JupyterLab are supported with the following:
- JupyterLab 3.3.0 or higher
- TIBCO ModelOps 1.2.0 or higher
You can use a front-end extension to access the JupyterLab interface to conduct deployment and monitoring operations. A server extension communicates with a given TIBCO ModelOps server to conduct the specified operations.
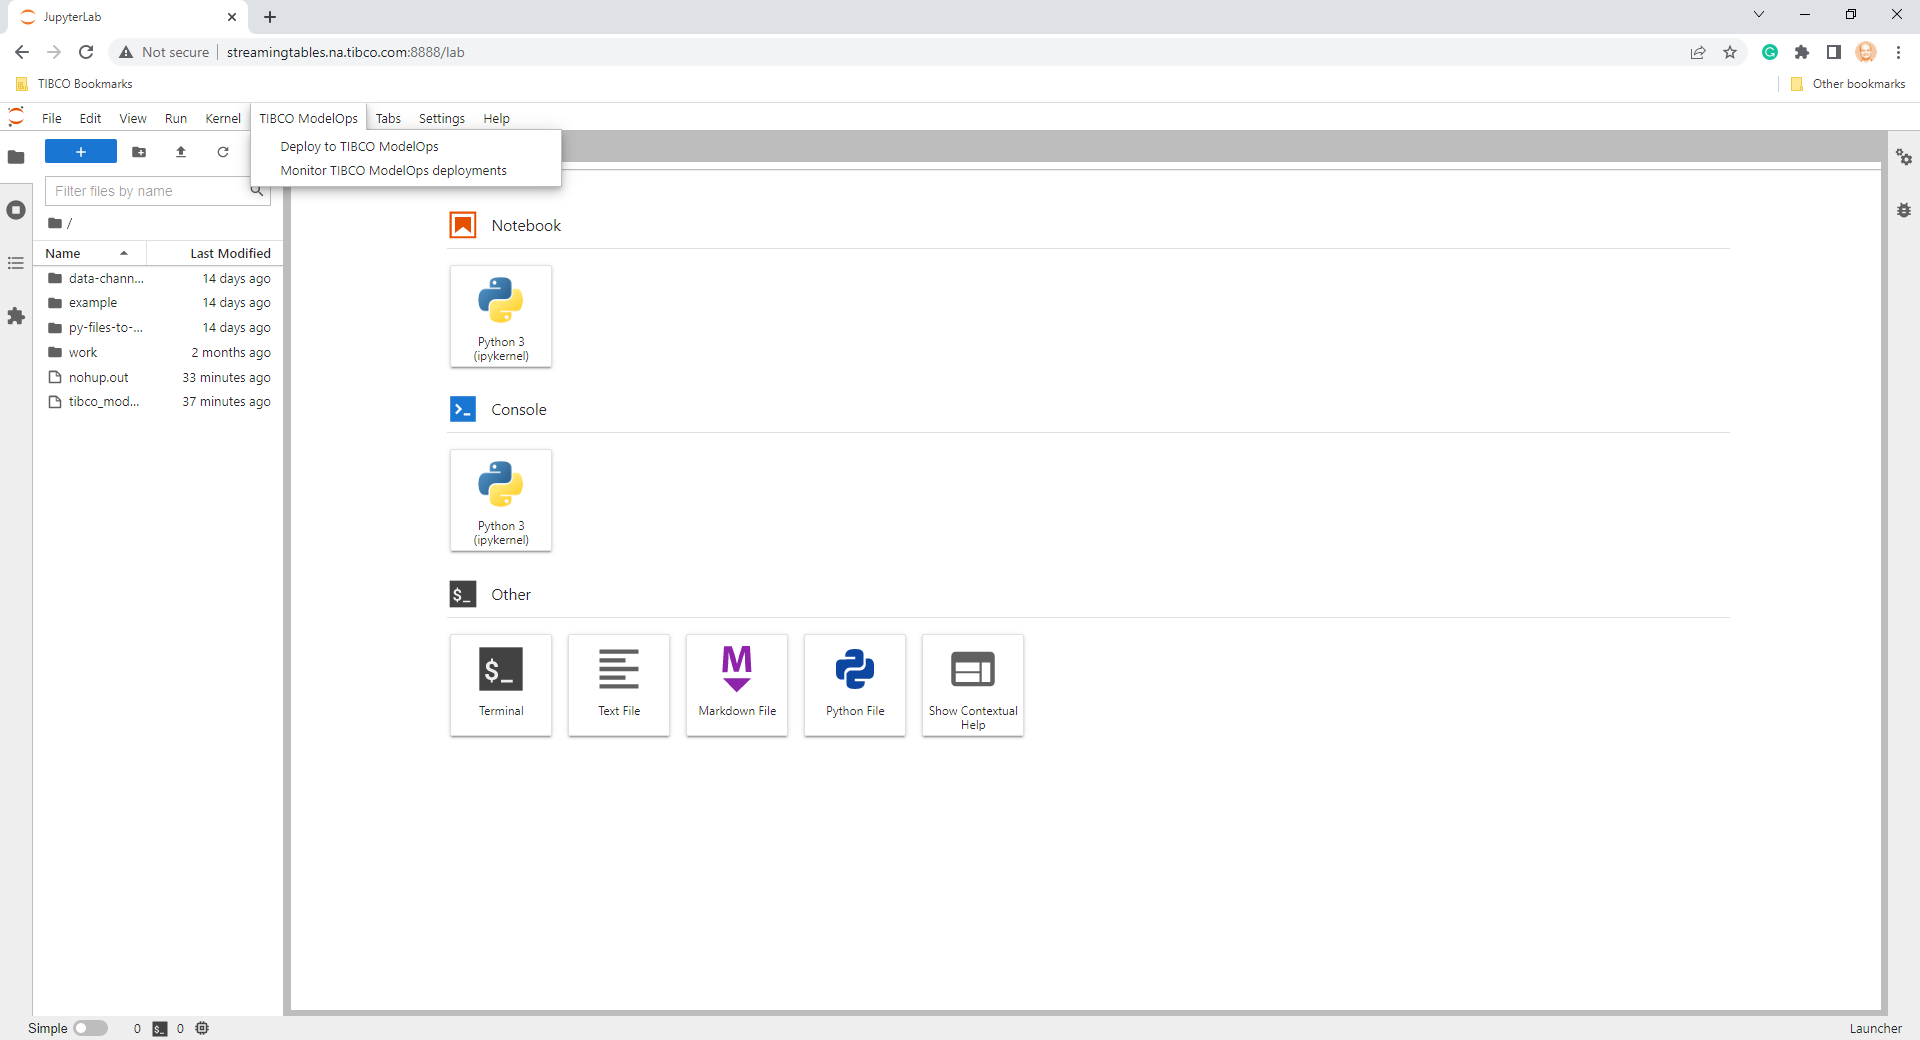
When the extensions are installed, a new top-level menu TIBCO ModelOps becomes available in the JupyterLab interface. This menu offers two options:
- Deploy to TIBCO ModelOps
- Monitor TIBCO ModelOps deployments
The first option brings up a custom panel that guides you through a wizard-like interface to deploy a Notebook to TIBCO ModelOps. The second option brings up a custom panel that you can use to monitor Notebook deployments in TIBCO ModelOps.
Procedure to Deploy Jupyter Notebook
Python code in a given Notebook is automatically deployed to TIBCO ModelOps:
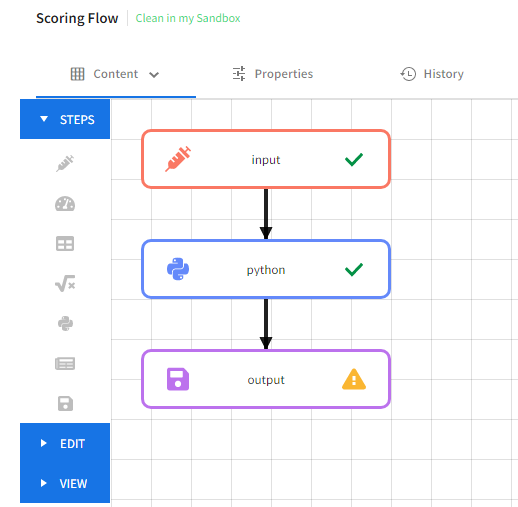
- Create scoring flow; the scoring flow consists of: a. an Input Step with schema matching a specified input data channel b. a Python Step that uses Python code from the Notebook c. an Output Step with schema matching a specified output data channel
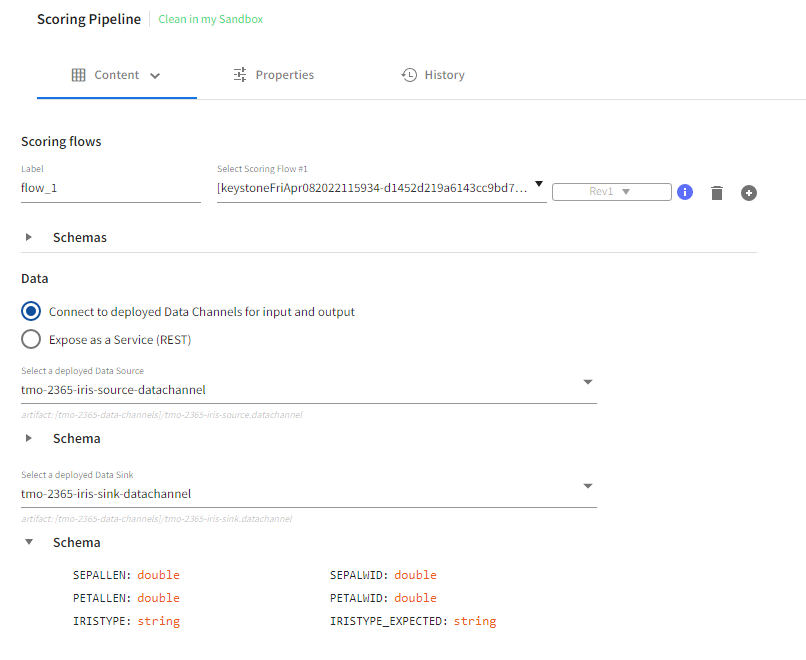
- Create a scoring pipeline that uses the scoring flow
- Deploye the scoring pipeline by using data channels you selected. You must run the data channel for the piepline deployment to succeed.
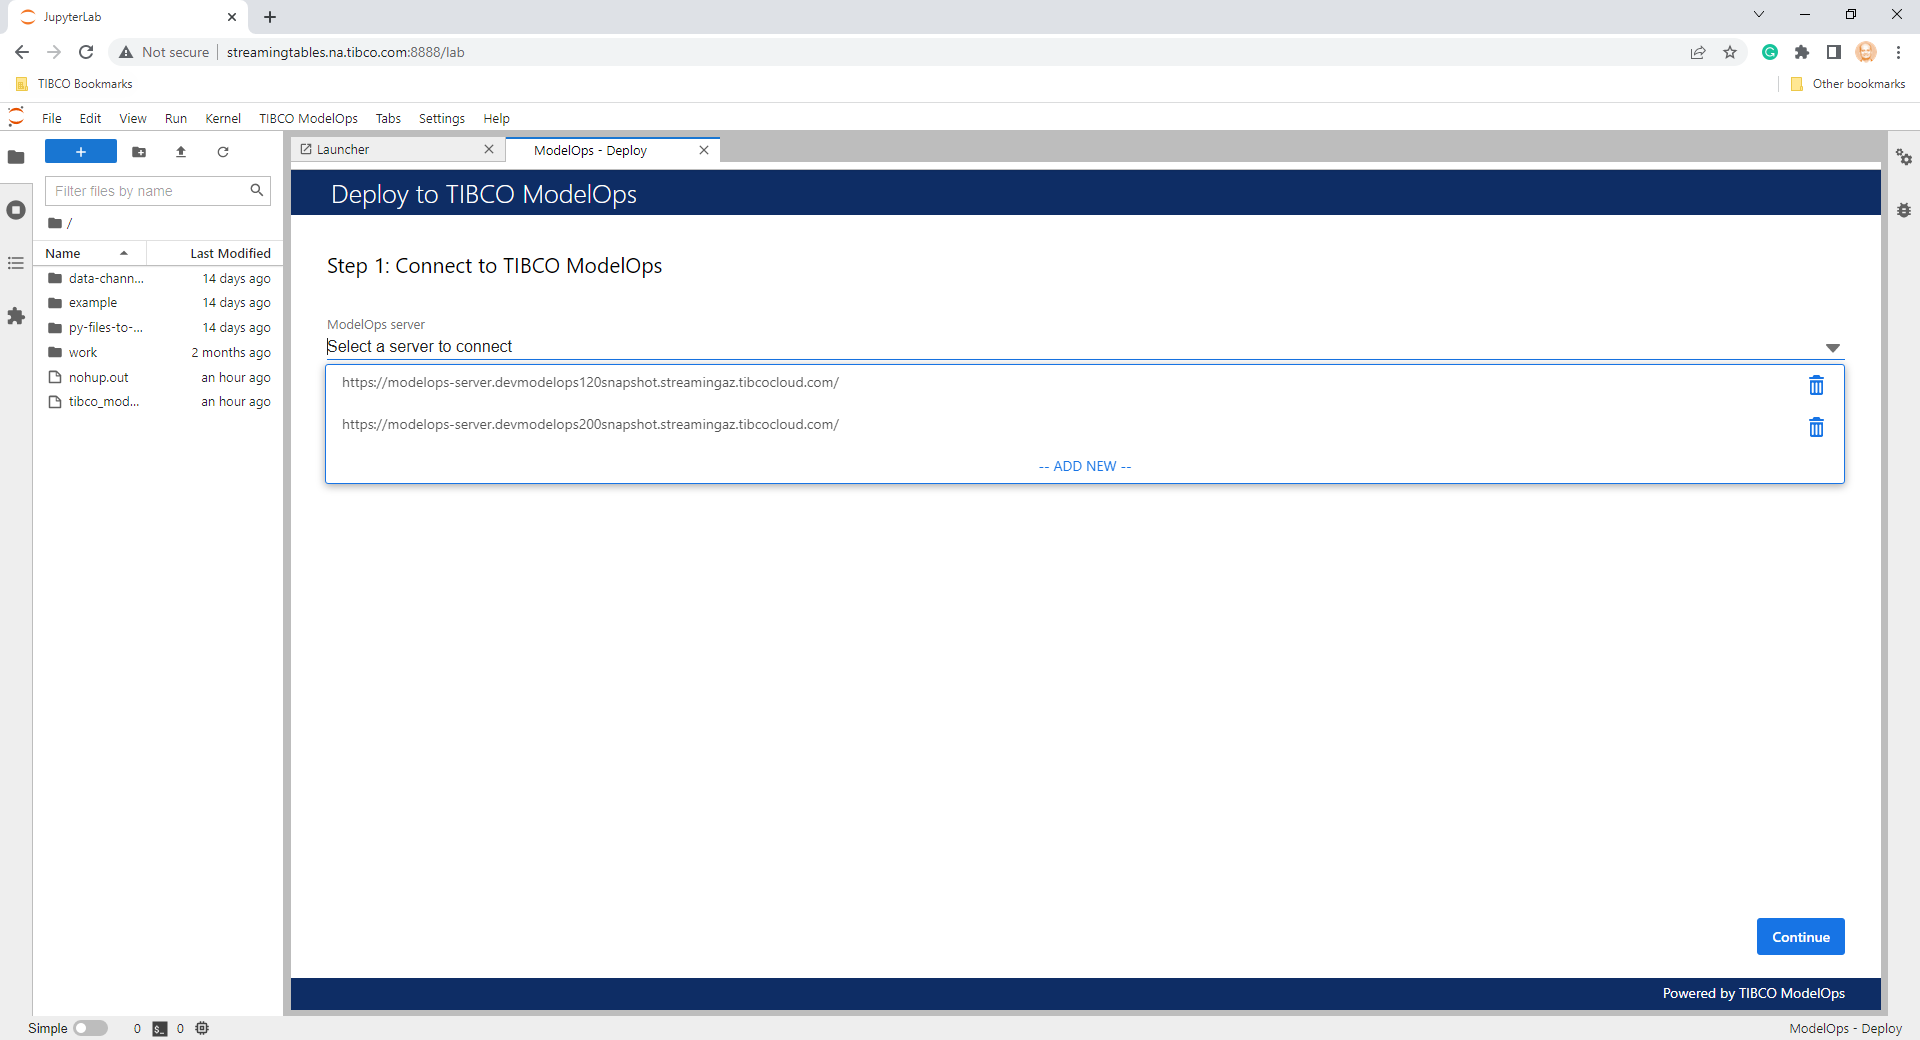
To deploy a Notebook to TIBCO ModelOps from the TIBCO ModelOps menu, click Deploy to TIBCO ModelOps. A ModelOps - Deploy panel is displayed that guides you through several deployment steps.
- The first step in deployment is choosing a TIBCO ModelOps server for the deployment. The user can either choose from a previously entered server or add a new server. The user is be prompted for credentials when needed (for new servers and in the case of expired connections for existing servers).
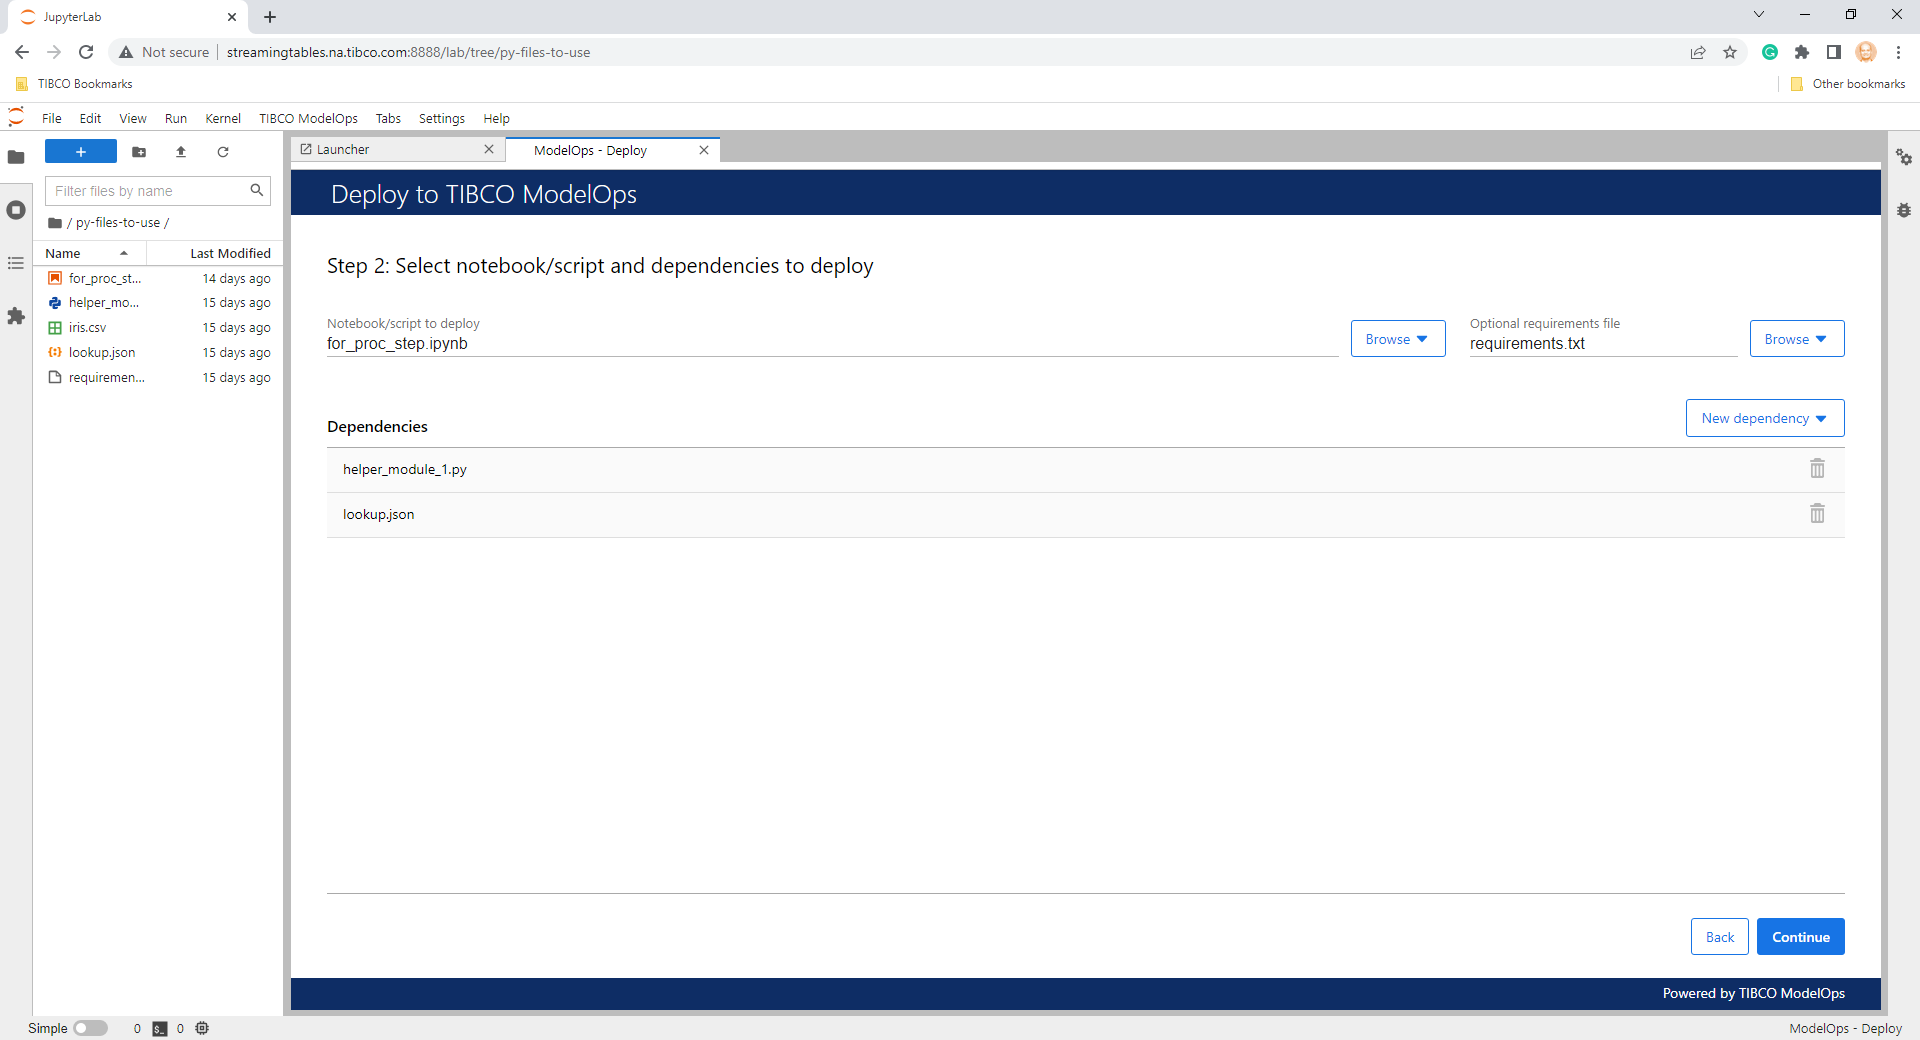
- The next step is to select Python Notebooks or scripts for deployment. Notebook files, script files, and any dependencies can be selected either from the Jupyter Server workspace or the user’s local file system. In either case, copies of the files selected are sent to TIBCO ModelOps for creating a scoring flow for deployment.
- The Notebook/script to deploy filed is necessary. The Python script must follow the conventions described for Python Step to successfully score data. The Python script is used in the Python step in the automatically-created scoring flow.
- An optional requirements file can be specified. If specified, this file describes the package dependencies for the Python step.
- Additional optional dependencies can be specified. If specified, these files describe the artifact dependencies for the Python step.
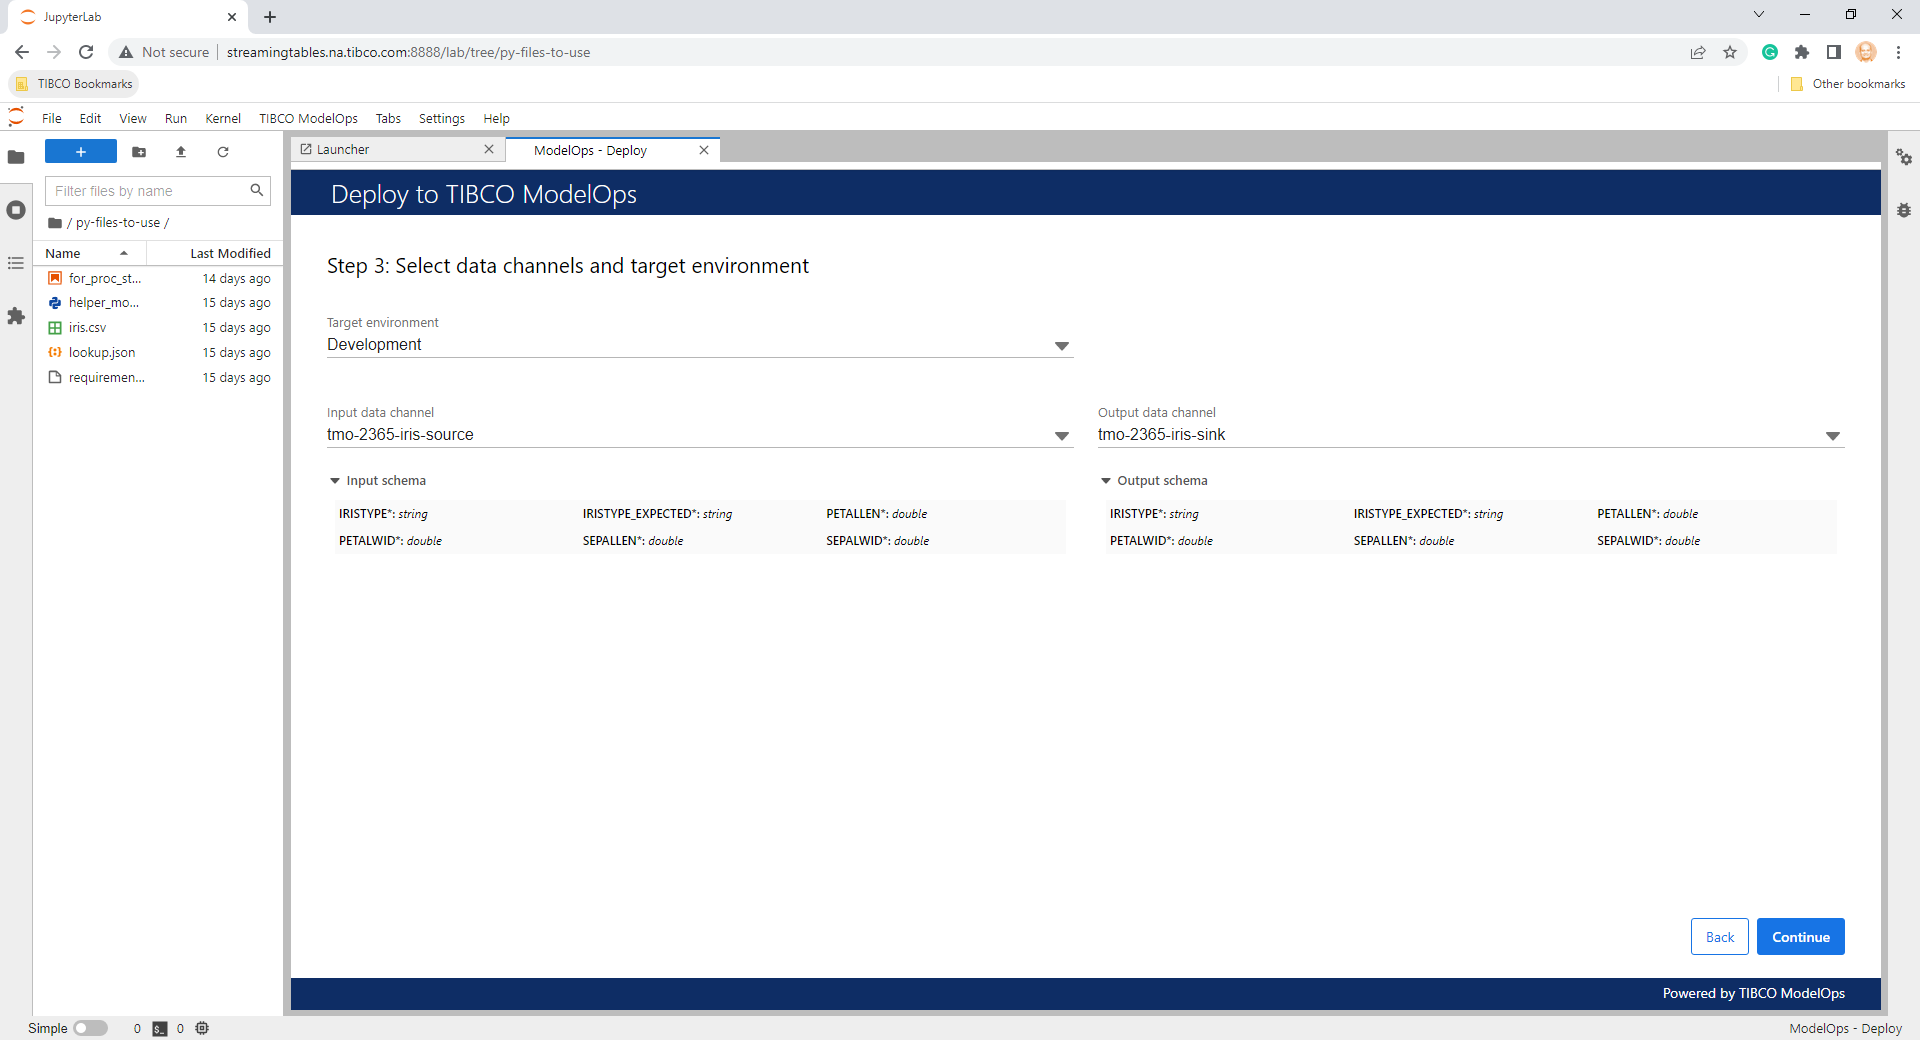
- Specify data channels and the target environment to use for deploying the automatically-created scoring pipeline. The data channels are also used to infer schemas for the Input and Output steps of the scoring flow.
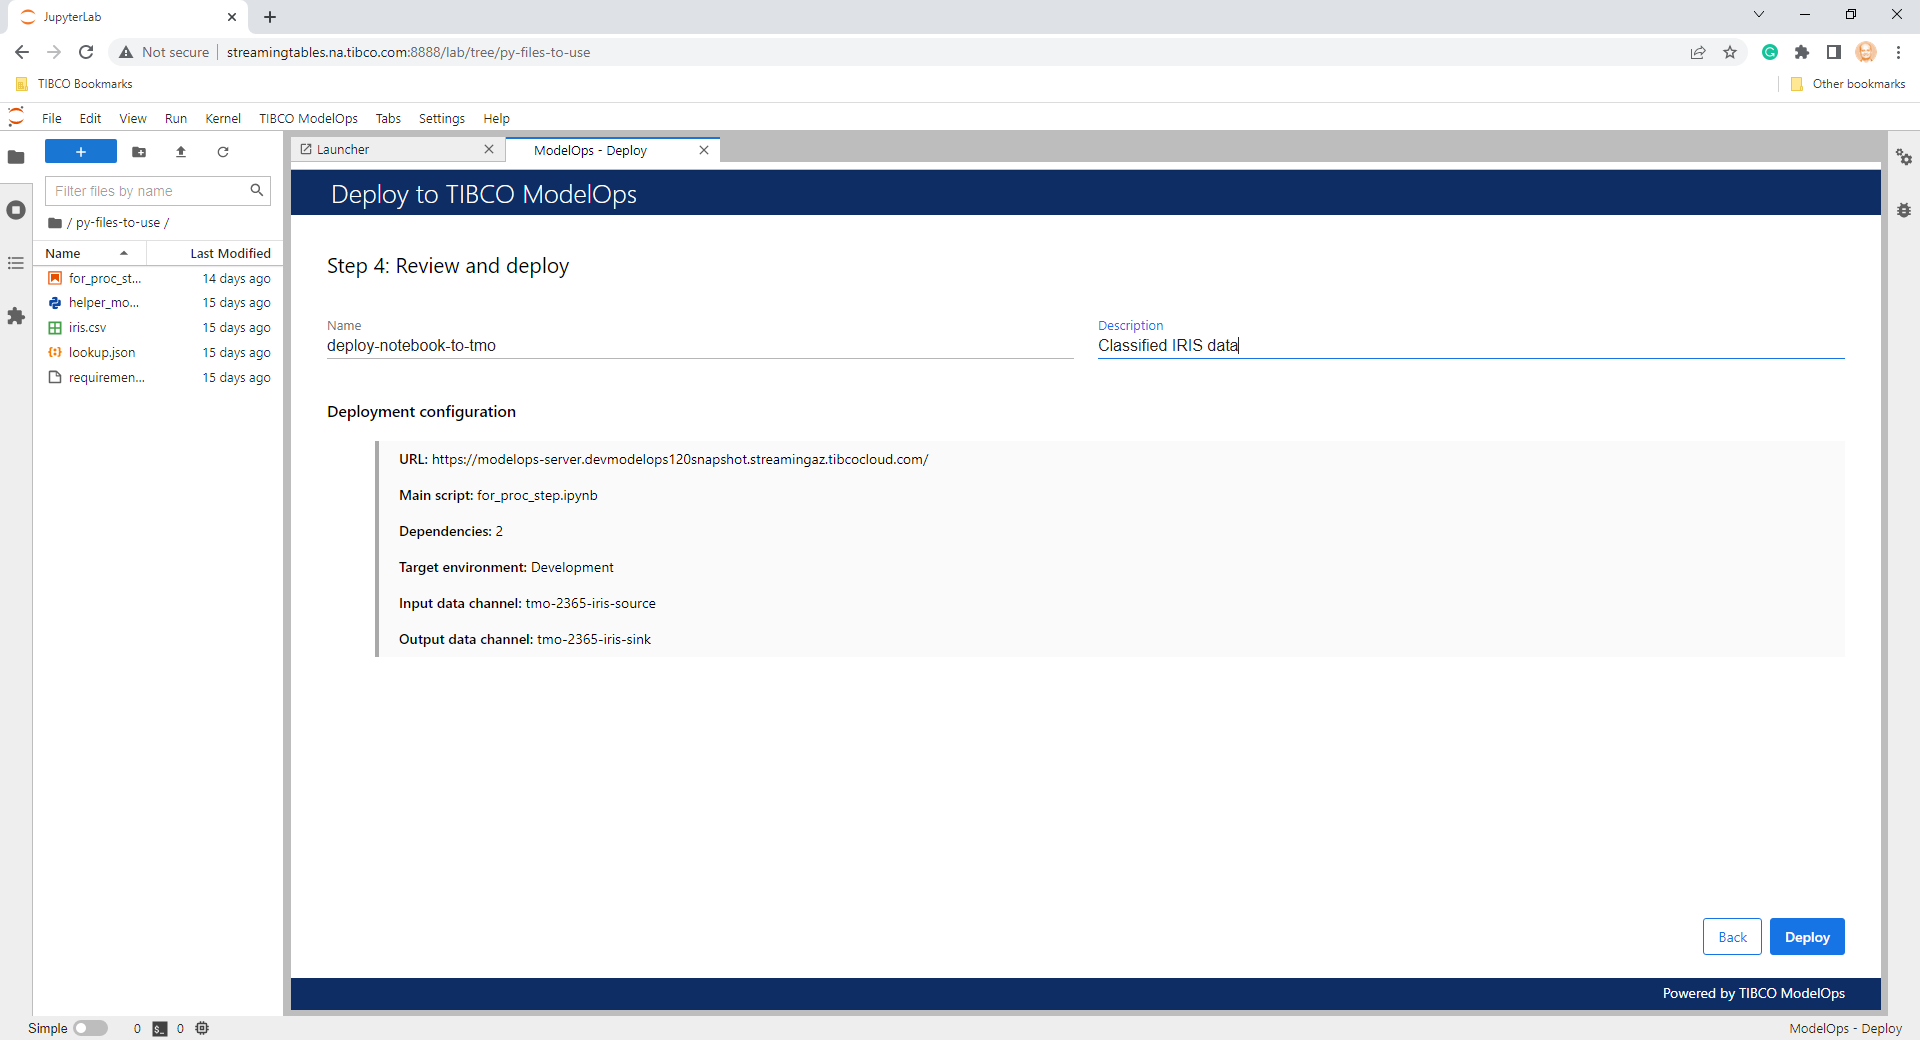
- Specify a name and description for the scoring pipeline. A summary of the deployment configuration is provided for review.
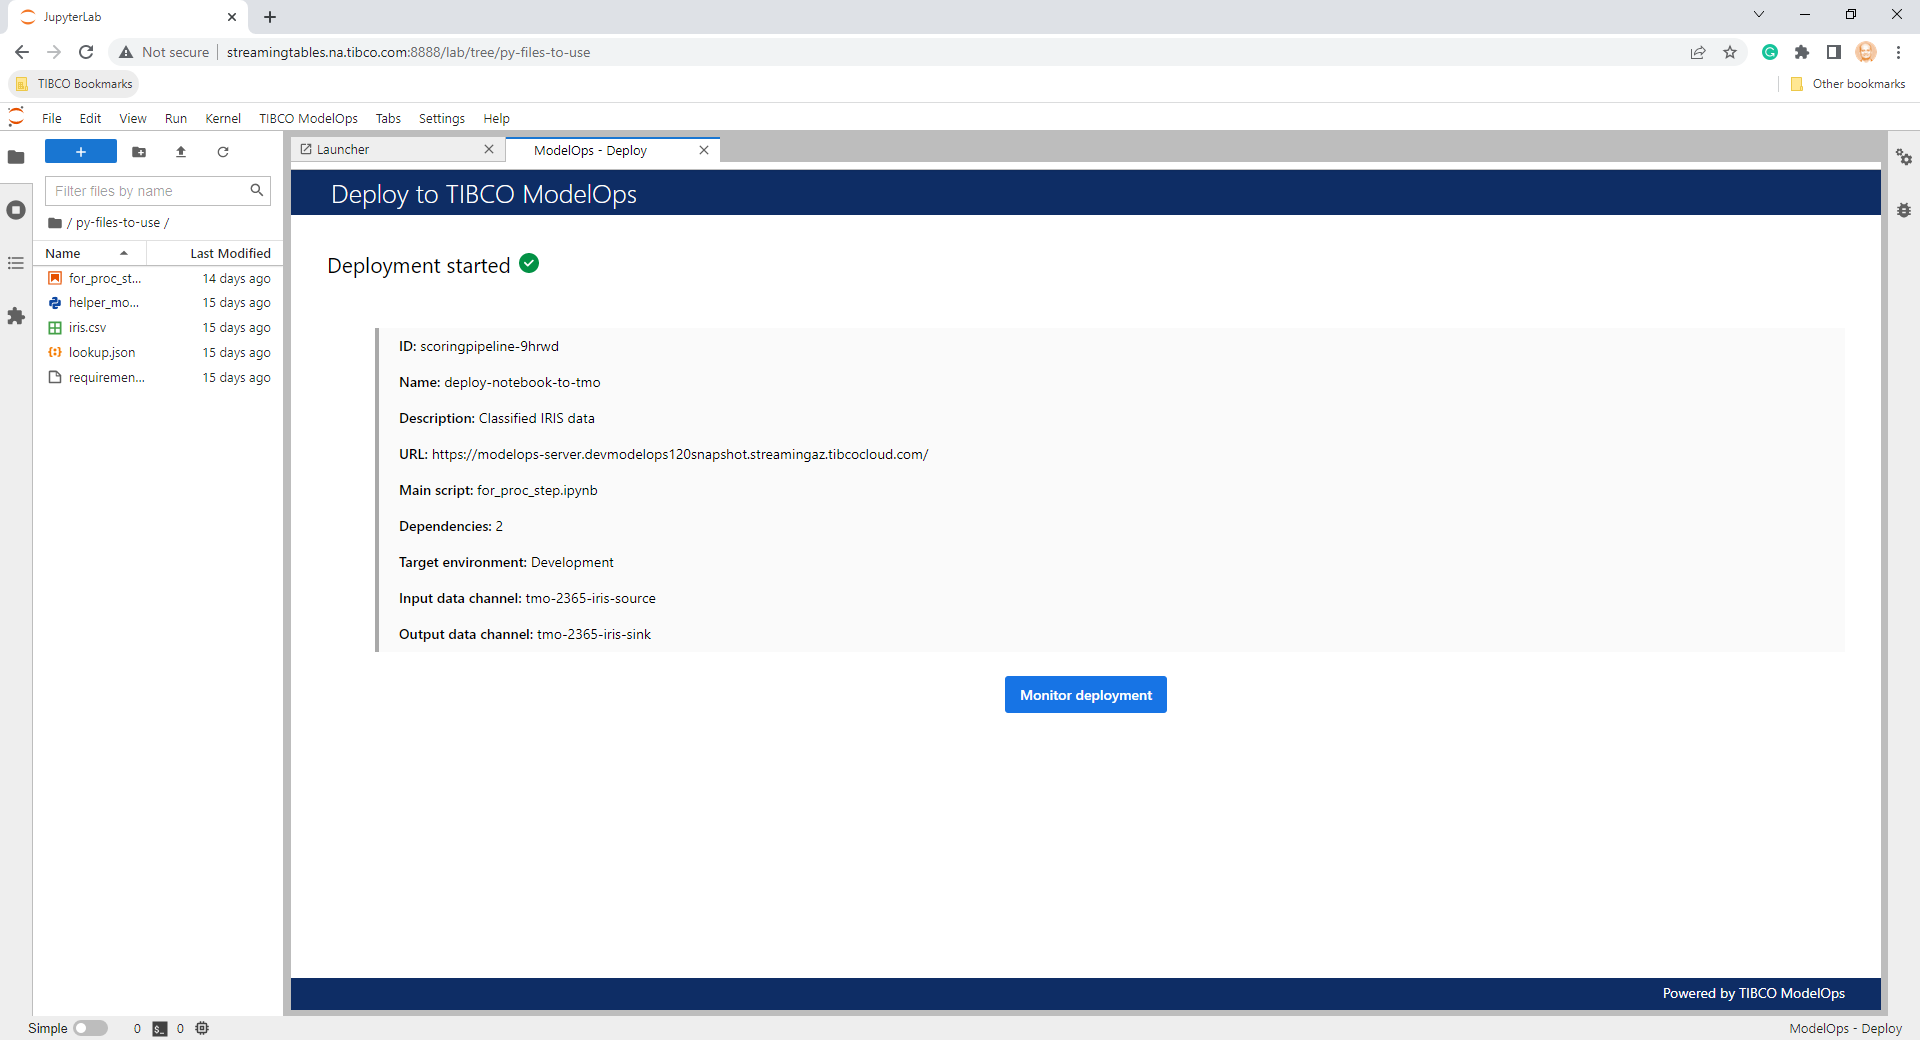
- After the deployment configuration has been reviewed, it can be deployed. Deployment status and deployment summary (including the scoring pipeline job identifier) are provided. The user can bring up the ModelOps - Monitoring panel by clicking Monitor Deployment.
Miscellaneous Deployment Details
The scoring pipeline is deployed immediately; see details relating to schedule and duration for deploying a scoring pipeline. The scoring pipeline lifetime is not tied to the user’s Jupyter session. The scoring pipeline has to be manually terminated either through the ModelOps - Monitoring panel in JupyterLab or through the TIBCO ModelOps UI.
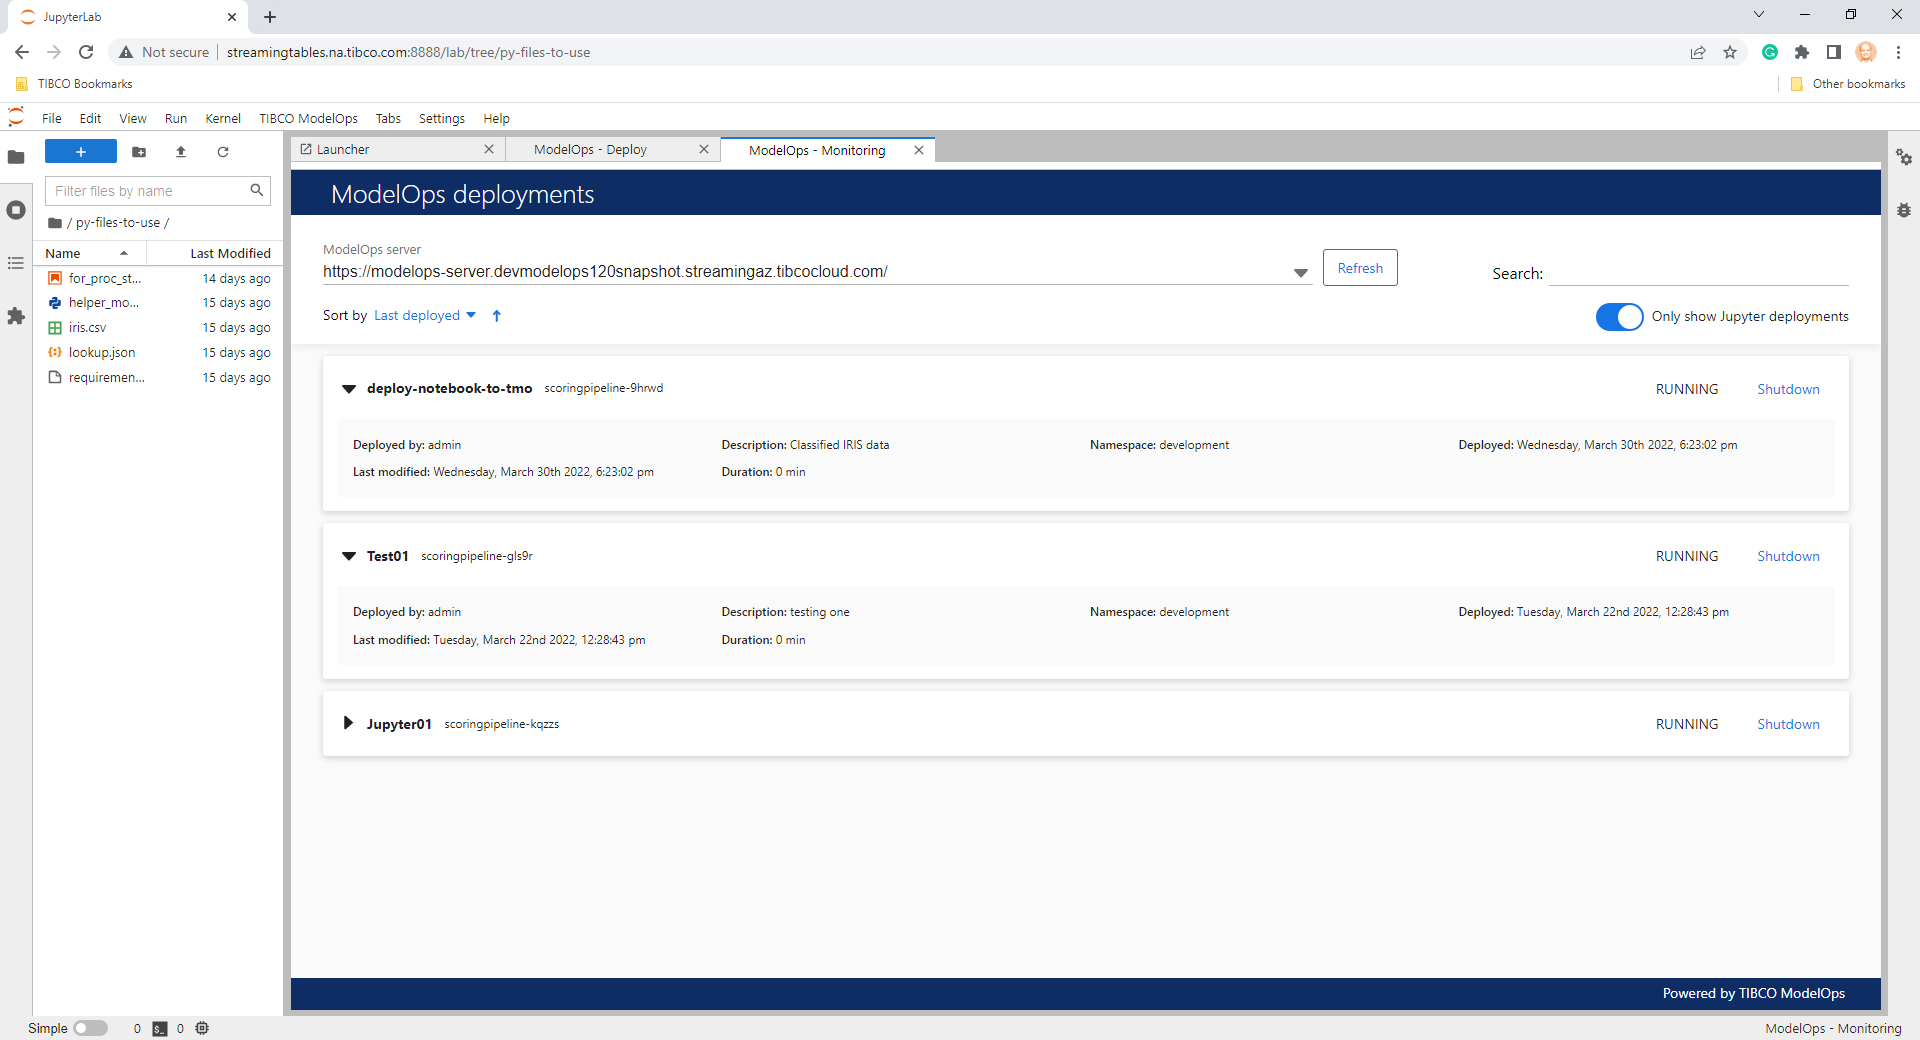
Procedure to Monitor Jupyter Deployment
To monitor Notebook deployments in TIBCO ModelOps, click Monitor TIBCO ModelOps deployments from the TIBCO ModelOps menu. A ModelOps - Monitoring panel, which lists various deployments (and related details) on a given TIBCO ModelOps server, is presented to the user. The UI also offers various features to sort and filter the deployment list.
The user can terminate a deployment by clicking the Shutdown link provided on each deployment item.
The first step for monitoring deployments is to specify the TIBCO ModelOps server to use. The resulting deployment list can be filtered by specifying a token in the Search field. The display order of the deployment list can be modified using the options provided by the Sort by field. The Only show Jupyter deployments toggle can be used to control whether the result list contains all the deployments on a given server or only the Jupyter Notebook deployments. The user can refresh the deployment results by clicking Refresh.
Installing TIBCO ModelOps JupyterLab Extension
A JupyterLab server installation is required to install and use the TIBCO ModelOps extensions. TIBCO ModelOps custom extensions for JupyterLab are packaged in the Wheel Binary Package format. The wheel containing the extensions can be downloaded from here. Run the following commands in the command window or a shell:
To install the extension on a given Jupyter instance, run:
pip install tibco_modelops_extension
To verify that the server extension is enabled, run:
console jupyter server extension list
To verify that the front-end extension is enabled, run:
console jupyter labextension list
To uninstall the extension from a given Jupyter instance, run:
pip uninstall tibco_modelops_extension
NOTE: After installing the custom extensions, the JupyterLab server has to be restarted for the server extension to function properly.