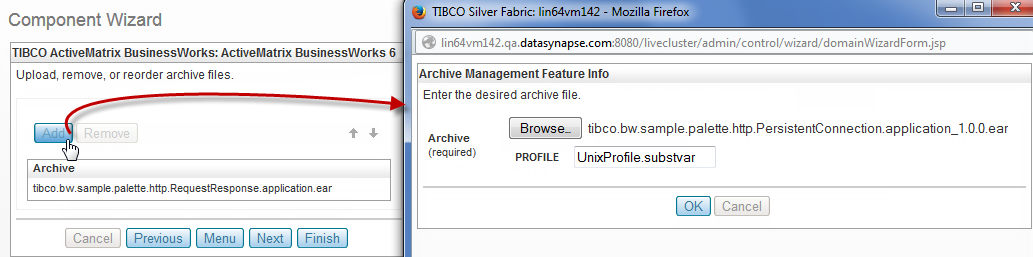
Uploading a BusinessWorks Project

If you want TIBCO Silver Fabric Enabler for BusinessWorks components to publish and run one or more BusinessWorks projects, upload one or more archive files (EAR or ZIP files) as follows:

Procedure

  1. Click the Add button in the Upload, remove, or recorder archive files panel as shown in Uploading Archives figure:
    Uploading Archives
  2. Click the Browse button in the Upload A File panel to navigate to your EAR or .zip file.
    You can upload one of following archive files:
    • .ear File: When you upload a BusinessWorks EAR file, it uses the default value of the global variables set in TIBCO Business Studio. The EAR file should have a JAR file and a META-INF folder, where the profile is defined so that it can be used to deploy the application.
      • Enter a Profile to be used with the EAR upload.

        When using an EAR file, enter the full file name of an application archive substitution variables file as the value of PROFILE. Your EAR file should contain at least one profile definition: <Profile_Name.substvar with the application archive substitution variables like: UnixProfile.substvar

    • .zip File: You can create a .zip file that contains an EAR file and a profile file named <Profile_Name>.substavar. The enabler uses this profile to deploy the application.

      The .zip file can contain other files used in the profile along with the .ear file, which is used in place of the profile field.

      Note: Do not enter a profile when using a .zip file, because the profile (and the contained substitution variables) are automatically picked up from the zipped archive.

    Alternatively, you can deploy applications using an associated TIBCO Enterprise Administrator, the bwadmin utility, or by making REST calls.

    Refer to TIBCO Silver® Fabric Enabler for TIBCO Enterprise Administrator User’s Guide for more information on the TIBCO Enterprise Administrator.

    Refer to Continuous Deployment - Deploy Archives Directly to Endpoints.

  3. Click OK and perform one of the following steps according to your requirement:
    • Repeat the steps to add more application archives to deploy and run.
    • Click Next to proceed with further configuration of the component.
    • Click Finish to complete and save configurations to the component.