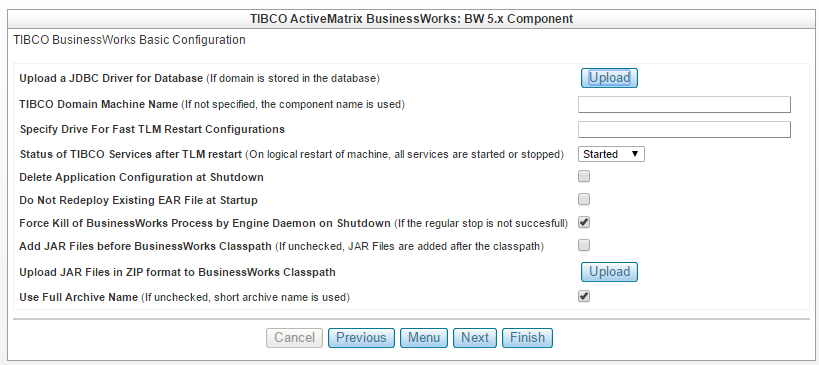
The TIBCO BusinessWorks Basic Configuration page allows for definition of the JDBC driver, setting a specific TIBCO Domain machine name (the TIBCO Logical Machine name - TLM), provides for specification of Fast TLM Restart, and allows uploading of external jar files and prepending/appending the path in the Classpath.
Each of the settings on this page deserves an explanation so they will be described in the order of their appearance on the page.
Procedure
Upload a JDBC Driver to publish with the TIBCO® ActiveMatrix BusinessWorks Distribution for TIBCO Silver® Fabric.
Check this option when the admin domain uses EMS SSL. A page Upload EMS SSL certifications is displayed in the component wizard. You can upload the trusted certificate, digital certificate and private key.
Set the
Domain Machine Name (Optional) for publishing of a unique component.
Select Delete Application Configuration at Shutdown. This option undeploys and removes all the applications deployed on the TIBCO Logical Machine at component shutdown.
Select
Do not Redeploy Existing EAR File at Startup check box to avoid redeployment of the EAR file whenever the TIBCO Logical Machine restarts.
Select
Force Kill of BusinessWorks Process by Engine Daemon at Shutdown checkbox to forcefully kill the BusinessWorks processes at shutdown. Even though the BusinessWorks engine is always stopped at shutdown, in case the Hawk is down, BusinessWorks engine stops abruptly resulting in orphan engines. To avoid such orphan engines, the engine daemon kills the bwengine forcefully.
Upload JAR file(s) in ZIP format to the BusinessWorks Classpath- Uploading individual JAR file(s) either appends or prepends to the Classpath. All uploaded JARs adds in the same way according to how the check box is set.
Note: To remove unwanted JAR files use the Menu button to display the list of Wizard configuration steps and select
Add/Override/Customize Enabler and Component-specific content files. Relative paths to external jar files added might be removed with that window.