Deploying Gateway Components Using TIBCO Administrator
To administer the Core Engine or any component such as Central Logger or Global Throttle Manager of TIBCO API Exchange Gateway within the TIBCO Administrator, follow these steps:
Procedure
-
Back up Files
- Navigate to the ASG_HOME/bin directory.
- Open the asg-engine.tra file in a text editor.
- Ensure that the tibco.env.HAWK_HOME property is set correctly to the location of TIBCO Hawk installation home. For example, the property is set to c:/tibco/hawk/4.9.
- Ensure that the tibco.env.RV_HOME property is set correctly to the location of TIBCO Rendezvous installation home. For example, the property is set to c:/tibco/tibrv/8.3.
- Ensure that the tibco.env.ASG_CONFIG_HOME property is set correctly to the location of gateway configuration directory. For example, the property is set to C:/TIBCOAPIX_Exchange211GA_CONFIG/tibco/cfgmgmt/asg.
- Save changes to the file, if any.
- Back up the asg-engine.tra file on all the machines where the components of TIBCO API Exchange Gateway are deployed.
- Back up the asg-core.ear file.
-
Register TIBCO API Exchange Gateway Component
To register the TIBCO API Exchange Gateway component within TIBCO Administrator, follow these steps:
- Start the TIBCO Administrator, if not running.
- Log in to the TIBCO Administrator using your credentials.
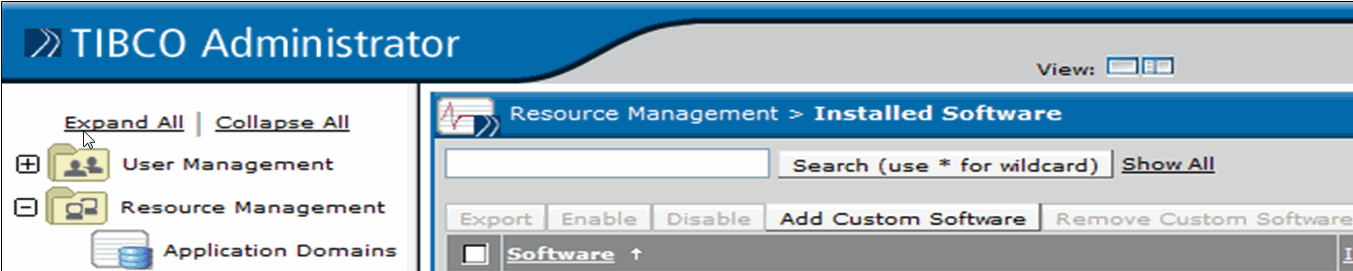
- Expand the Resource Management node.
- Click Installed Software.
- Click Add Custom Software. Verify that the list of machines associated with the domain are displayed.
- Click the radio button to select the machine where TIBCO API Exchange Gateway is installed.
- Click OK.
-
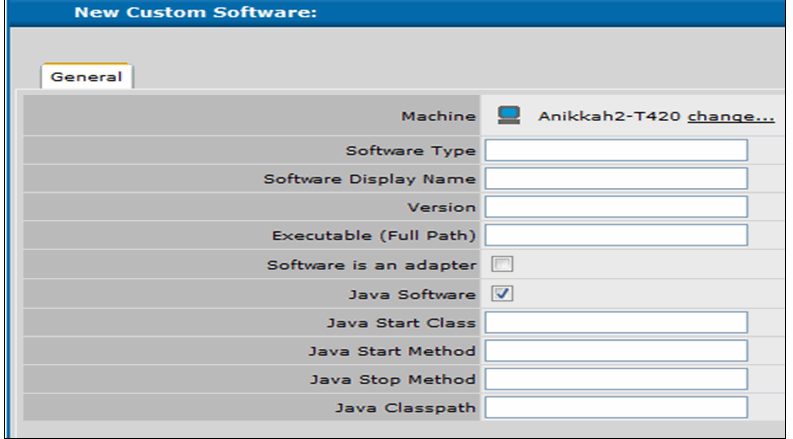
Enter the values as explained in the following table:
New Custom Software Properties Parameter Value Description Software Type be-engine Specifies the name of custom software. This is a required field and should not be changed. Software Display Name User_Specified_Software_Name Specifies a name of the software. The name of the software displayed under Installed Software in TIBCO Administrator is a concatenation of this display name and the version value as entered in the Version field.
Version 5.1.4 Specifies the version of TIBCO BusinessEvents used by TIBCO API Exchange Gateway. This is a required field. For example, for TIBCO API Exchange Gateway 2.1.1, enter 5.1.4
Executable (Full Path) Full_Path of asg-engine.exe Specifies the full path of the executable file on the machine. For example, c:\tibco\asg\2.1\bin\asg-engine.exe Software is an adapter Select the check box. Java Software Select the check box. Java Start Class com.tibco.asg.container.standalone.ASGMain Specifies the JVM to be used to launch this application. This value must match the value entered in the ASG_HOME/bin/asg-engine.tra file. Java Start Method main Specifies the main function in start the application. This method must be main as entered in the ASG_HOME/bin/asg-engine.tra file. - Click Save.
-
Load New Application
- Navigate to Application Management > All Applications.
- Click New Application.
- Click Choose File and select the ASG_HOME/bin/asg_core.ear file.
- Click OK.
- Verify the settings on the New Application Configuration screen.
- Enter name of application and deployment name under Application Parameters, as follows:
- Click Save.
- Expand the Application_Name node.
- Click ASG_Core.bar.
- In the General section, select the Enable Service check box.
- Click Save.
-
Deploy Application
- Expand Application Management > Application_Name > Configuration.
- Click Application_Name.
- Click Advanced. Edit the default values of parameters, if required.
- Click Save.
- Delete the newly generated asg-engine.tra file.
- Copy the original asg-engine.tra back up file to asg-engine.tra.
- Click Deploy.
- Clear the Start successfully deployed services check box.
-
Click
OK.
Note: When any TIBCO API Exchange Gateway component is deployed for the first time, a new asg-engine.tra file is created under ASG_HOME/bin directory, which does not contain full information. To correct this, follow these steps:
Using the Administrator, follow these steps to perform the force deployment on all machines:
-
Modify Generated TRA File
After the TIBCO API Exchange Gateway components are deployed, a corresponding TRA file is created in the Tibco_Domain_name/application/Application_Name directory.
For example, for the BookQuery application, the default file name is BookQuery-Process_Archive.tra file.
Follow these steps to edit these files for correct parameter settings:
- Open the TRA file in a text editor.
- Search for the application.args=%APP_ARGS% string. Ensure that there are no additional parameters after APP_ARGS in this line. For example, if the deployment has generated additional parameters within this line such as -p, remove the text.
- Search for the tibco.hawk.microagent.name=COM.TIBCO.ADAPTER.be-engine line. Replace this line with Hawk.AMI.DisplayName=COM.TIBCO.ADAPTER.be-engine.
- Search for the tibco.clientVar.DirTrace line. Replace this line with: Engine.Log.Dir.
- Save changes to the file.
-
Modify Generated CMD File
After the TIBCO API Exchange Gateway components are deployed, a corresponding CMD file is created in the Tibco_Domain_name/application/Application_Name directory.
For example, for the BookQuery application, the default file name is BookQuery-Process_Archive.cmd file.
- Open the CMD file in a text editor.
-
Append the parameters –u, -a, -n,-c and their associated values to the end of the
asg-engine.exe
command. Refer to
TIBCO API Exchange Gateway User’s Guide for details on these parameters.
For example,
C:/tibco/be/be/5.0/bin/asg-engine.exe --run --propFile "C:/tibco/classic/tra/Tibco_Domain_name/application/BookQuery/BookQuery-ASG_Core.tra" -c "C:\tibco\classic\asg\2.1\bin\asg_core_deploy.cdd" -u asg-caching-core -a BookQuery -n BookQuery ASG_HOME/bin/asg_core.ear
- Save changes to the file.
-
Start Engine Instance
- Navigate to Application Management > ASG_Core > Service Instances.
- Click the Machine_Name-Application_name service instance.
- Click Start.
-
To ensure that the service instance is started successfully, follow these steps:
- Verify that the state of application is changed to Running.
- Ensure there are no errors in the Tibco_Domain_name/application/Application_Name/logs directory.
- Using a browser, enter the following URL to submit a ping operation request:
http://IP_Address_Of_machine_name:listening_port_value/ping
The gateway must return a successful response.