Creating a WebDAV Server Type Extension

Procedure

  1. To add a new server type (also called Runtime in TIBCO Business Studio) you must extend com.tibco.xpd.deploy.core.serverTypes. By convention, servers are defined in separate eclipse plug-ins named com.tibco.xpd.deploy.server.servername. Therefore, create a new plug-in for the deployment server called com.tibco.xpd.deploy.server.webdav.
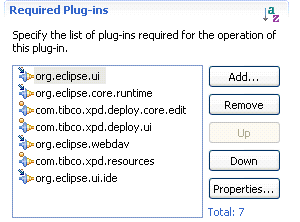
  2. Next, provide the necessary dependencies:
  3. Add the serverType extension that looks similar to the following:
    <serverType  connectionFactory=
    "com.tibco.xpd.deploy.server.webdav.WebDavConnectionFactory"
          id="com.tibco.xpd.deploy.server.webdav"
          name="Web DAV">
       <supportedRepository
             repositoryId="com.tibco.xpd.deploy.ui.WorkspaceRpository">
       </supportedRepository>
       <configParameter
             key="siteUrl"
             label="&Site URL:"
             name="Site URL"
             parameterType="string"
             required="true">
       </configParameter>
       <configParameter
             key="username"
             label="&User Name:"
             name="User Name"
             parameterType="string"
             required="false">
       </configParameter>
       <configParameter
             key="password"
             label="&Password:"
             name="Password"
             parameterType="password"
             required="false">
       </configParameter>
       <configParameter
             defaultValue="false"
             key="showSubfolders"
             label="Sho&w Sub Folders"
             name="Show Sub Folders"
             parameterType="boolean"
             required="true">
       </configParameter>
    </serverType>
    • The connectionFactory attribute points to an instance of ConnectionFactory interface, and its purpose is to provide the server connection implementation class for a particular server:
      public class WebDavConnectionFactory implements ConnectionFactory {
          public Connection createConnection(Server server) {
              return new WebDavConnection(server);
          }
      }

      Connection implementation is the central class of the server and is described in Creating the Server Type Connection Implementation.

    • Server type must support at least one repository type. There are two repository types already defined in the com.tibco.deploy.ui plug-in, but you can also define your own repository type by extending the com.tibco.xpd.deploy.core.repositoryTypes extension. This tutorial uses the default, com.tibco.xpd.deploy.ui.WorkspaceRpository, which simply provides deployment modules directly from Eclipse workspace.
    • Finally, all necessary server connection parameters are defined:

      siteUrl – URL to the WebDAV directory (also called collection) where files will be deployed.

      username, password – Authentication information for the WebDAV server.

      showSubfolders – Sets whether subfolders of the site should be shown. By default this parameter is false. If the repository is large, setting this parameter to true can cause refresh problems.

      Creating the Server Type Connection Implementation

Result

The server type Connection implementation class is responsible for communication with a remote server.

This includes the following:

  • connecting to / disconnecting from server
  • deploying modules
  • providing and refreshing server elements
  • updating server state
  • performing server element operations

The simplest form of Connection implementation could look like this:

public class WebDavConnection implements Connection {
    private final Server server;
    public WebDavConnection(Server server) {
        this.server = server;
    }
    public void connect() throws ConnectionException {
        server.setServerState(ServerState.CONNECTED_LITERAL);
    }
    public void disconnect() throws ConnectionException {
        server.setServerState(ServerState.DISCONNECTED_LITERAL);
    }
    public boolean isConnected() throws ConnectionException {
        return server.getServerState() == ServerState.CONNECTED_LITERAL;
    }
public DeploymentStatus deployModule(String url) throws DeploymentException {
	return new DeploymentSimpleStatus(
          DeploymentSimpleStatus.Severity.OK, "", null);
    }
    public void refreshServerContent() throws ConnectionException {
    }
    public Server getServer() {
        return server;
    }
    public Object performServerElementOperation(ServerElement serverElement,
            Operation operation) throws DeploymentException {
        return null;
    }
    public Object getAdapter(Class adapter) {
        return null;
    }
}

Although this implementation only changes the server state on a connect or disconnect action, it is sufficient for the purposes of the tutorial.

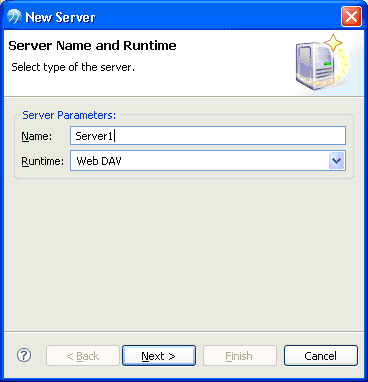
In TIBCO Business Studio, you should now be able to start the New Server Wizard and choose Web DAV as the Runtime. For example:

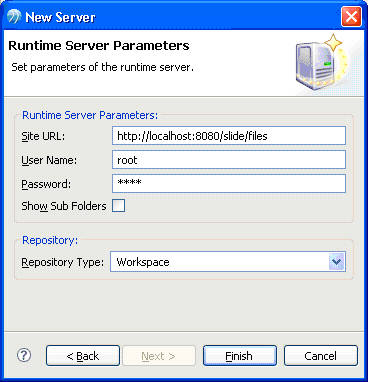
If you select Web DAV as the runtime, on the screen that follows, you can view the rendered parameters of the server and the assigned repository. The widgets to capture parameter values are automatically generated using the parameter descriptions provided in the extension.

After clicking the Finish button, you can view the new server created under the Deployment Servers in the Project Explorer. You can also invoke connect and disconnect actions from the context menu and as a result see the server state change.