Working Through the Demo1 Example
Both the demo1 example in the bw5 folder and the Demo1 example in the bw6 folder show how to use Publication Service and Subscription Service to handle changes in a database table.
After migrating the demo1 example in the bw5 folder to TIBCO Business Studio or importing the Demo1 example in the bw6 folder to TIBCO Business Studio, you can run either example in TIBCO Business Studio. The procedures of running the examples are the same. This guide describes how to run the Demo1 example in the bw6 folder.
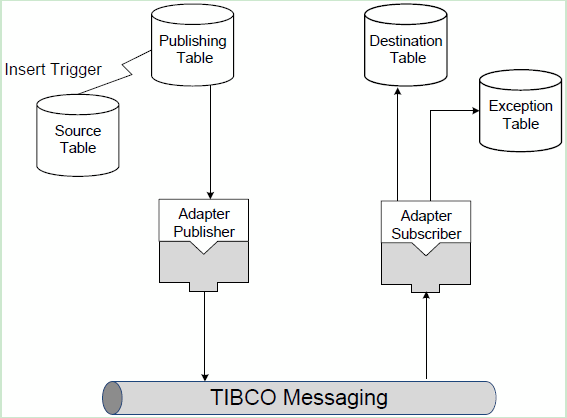
Tables and Data Flow
In this example, you have to deal with the following tables to exchange data:
- Source table
- Publishing table: publishing tables mirror tables that you have identified for monitoring. They contain additional columns, primarily a sequence number and delivery status, which are required by the adapter to detect new rows. You can create a publishing table for each table you want to activate using TIBCO Business Studio.
- Destination table
- Exceptions table: if a database restriction or failure occurs, an exceptions table can be configured to receive a message. If insertion into an exceptions table also fails, an error message is displayed and the adapter configuration is terminated.
When you insert, update, or delete data in the source table, the following actions occur:
- For Publication Service, when data changes in the source table, if you set Publish by Value as the storage mode, the insert, update, delete, and upsert operations fire a trigger and the inserted row is copied to the publishing table. If you set Publish by Reference as the storage mode, only the rows inserted in the primary key column and the user-defined key column can be copied to the publishing table.
- The publisher adapter polls the publishing table to check if any new row has been inserted. Newly inserted rows are fetched by using JDBC, packed into a message, and published.
- The subscriber adapter listens for messages. When a message is received, the subscriber adapter inserts a row or deletes it in the destination table by using JDBC.
The following figure illustrates these actions:
- Creating the Demo Tables
Before starting the example, you have to create the demo tables in a database. - Specifying a Working Directory
Before you start adapter configurations, you must specify a working directory to save the runtime adapter. - Updating the Database Connection
The adapter configurations in the Demo1Oracle project are preconfigured, and you can use the design-time configuration before running the sample project. However, you have to update the database connection information for each adapter configuration. This exercise uses the jmspub and jmssub adapter configurations. - Starting the Adapter Configurations
After configuring the adapter configurations and adapter services, you can use the Adapter Launcher tool to start the adapter configurations. - Inserting Data into the Source Table
After starting the adapter configurations, you can insert data into the source table and test the adapter services. - Cleaning up the Database
After running the example, you can delete the example tables. The cleanup script deletes the example tables that were created by the demo1_database_vendor.sql script.
Copyright © Cloud Software Group, Inc. All rights reserved.