Configuring TIBCO ActiveMatrix BPM to Use Integrated Windows Authentication With SQL Server
You can configure the communication between TIBCO ActiveMatrix BPM and the database to use Integrated Windows Authentication (IWA) rather than the database user account.
- Stop the ActiveMatrix BPM application:
- Connect to SQL Server Management Studio as an administrator of the SQL Server Instance.
- Right-click your SQL Server instance and select Properties.
- On the Server Properties dialog, select Security and ensure that SQL Server and Windows Authentication mode is selected.
- Click OK to close the Server Properties dialog.
- Drill down to
, right-click on the user name of the login that TIBCO ActiveMatrix BPM runs as, then select
Properties.
By default this user is machinename/Administrator, where machinename is the name of the machine on which you have installed TIBCO ActiveMatrix BPM.
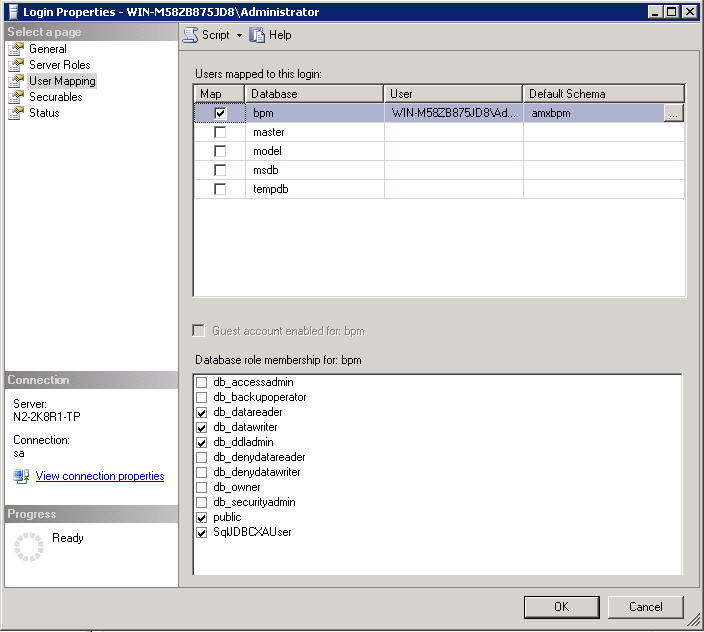
- Configure the bpm database:
- On the Login Properties dialog, select User Mapping.
- From the Users mapped to this login box, select bpm to add the current user name as a user in the bpm database.
- From the Default Schema column for the bpm database, click Browse.
- On the Select Schema dialog, click Browse and select the amxbpm schema.
- Click OK twice to close the dialogs.
- In the Database role membership for: bpm box, select the following memberships:
- From the Login Properties dialog, click Server Roles, then deselect all of the server roles except public.
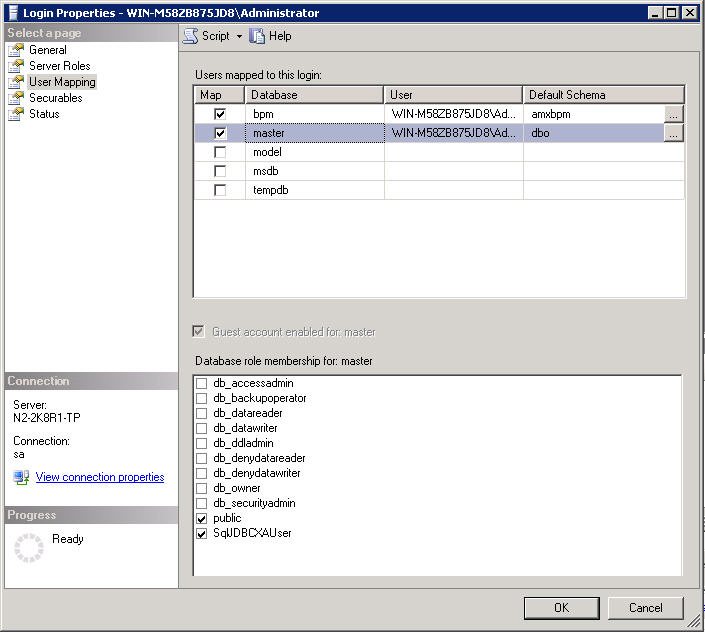
- Configure the master database:
- From the Login Properties dialog, click User Mapping.
- From the Users mapped to this login box, select master to add the current username as a user in the master database.
- From the Default Schema column for the master database, click Browse.
- On the Select Schema dialog, click Browse and select the dbo schema.
- Click OK twice to close the dialogs.
- In the Database role membership for: master box, select the following memberships:
- Update all of the datasources:
- Click .
- In the upper-left pane, select "JDBC " in the Type field, select Environment and choose "BPMEnvironment", then select Application.
- Select a datasource from the list in the Resource Templates box.
- In the lower pane, select the Advanced tab, then click Add in the Connection Properties section to add a new datasource property.
- In the Name box, type "integratedSecurity".
- In the Value box, type "true".
- Click
Save to save your changes.
You are prompted to apply the changes in the resource template to the runtime.
- Click Save to apply the changes to the runtime.
- Repeat steps 9c - 9h for each datasource.
- Re-install the JDBC datasource resource instances:
- Click .
- From the Hosts box, click SystemHost.
- In the SystemHost section, click the Resource Instances tab.
- Select the All Instances folder in the left pane.
- In the View field, choose JDBC.
- Select a datasource instance, then click
Install.
When the datasource has finished installing, the Action Status changes to Install Successful.
- Repeat steps 10e - 10f for each datasource instance.
- Copy the sqljdbc_auth.dll file from the folder where you installed your JDBC drivers, and paste it into a directory specified in the PATH system variable (for example, C:\Windows\system32).
- Restart the BPM node.
- From ActiveMatrix Administrator, click .
- From the Nodes box, select your BPM node and click Restart.
When the BPM node is fully restarted, the JDBC resource instances will appear as 'Running' and 'In Sync', with the Action History reporting 'Install Successful' (also, the ActiveMatrix BPM application (amx.bpm.app) will be 'Stopped' and 'In Sync'). When the BPM node is fully restarted, you can proceed to the next step.
- Restart the ActiveMatrix BPM application: