Selecting Filter Attributes
Selecting filter attributes involves choosing the attributes upon which you want to filter the items, then entering a value for each attribute.
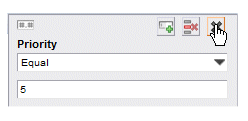
For example, you could select the Priority attribute when filtering work items, then enter a value of 1 — all work items with a priority of 1 are returned from the server and displayed in the work item list.
The following table lists the available attributes on which you can filter work items.
| Filter Attributes for Work Item Lists | ||
|---|---|---|
| Attribute Name | Description | Data Type |
| Attribute #1 - #40 | These attributes, which can be populated via a script in the process, can contain various information. | #1, #15: Integer
#5: #16: #17: -#18: Decimal #6, #7: #19: #20: DateTime All others: Text |
| Description | The description of the task associated with the work item. | Text |
| Distribution Strategy | Describes the way in which a work item was distributed to users. The possible entries are:
|
Enumeration(1) |
| Target Date | A deadline date/time for the work item. For more information, see Work Item Deadlines . | DateTime |
| Instance Description | A description of the process instance. This may or may not have been specified, depending on how the process was defined. | Text |
| ID | A unique alphanumeric value identifying the process instance from which the work item was created. | Text |
| Name | The name of the user task associated with the work item. | Text |
| Priority | Denotes the importance of the work item. This value is assigned to the user task (which results in a work item) when the process is defined.
Example: 1 |
Numeric |
| Process Name | The name of the process that was started to create this work item. | Text |
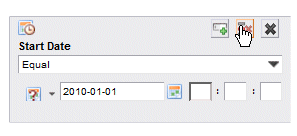
| Start Date | The date and time the work item is
scheduled to start.
Example: 2010-08-25 14:30:00 |
DateTime |
| State | The current state of the work item in your work item list. The possible entries are:
|
Enumeration1 |
| Work Item ID | A unique identifier for the work item. This is generated by the system when the work item is created.
Example: 608 |
Numeric |
| (1) For enumerations, you can only select from the possible entries on the Filter dialog | ||
The following table lists the available attributes on which you can filter process instances:
| Filter Attributes for Process Instance Lists | ||
|---|---|---|
| Attribute Name(1) | Description | Data Type |
| ID | Uniquely identifies the process instance. | Text |
| Process Name | The name of the process that was started to create this instance. | Text |
| Outstanding Count | This is the number of outstanding work items in this process instance.
Also see, Outstanding Work Items . |
Numeric |
| Parent Process ID | The instance ID of the parent process — only applicable for re-usable sub-processes. | Text |
| Priority | This is a numeric value that has been assigned to the process instance by an administrator. The numeric value assigns a relative importance to the process instance, which allows users to prioritize their work. | Numeric |
| Start Date | The date and time the process instance was started.
Example: 2008-08-25 14:30:00 |
DateTime |
| Status | The current status of the process instance. The possible statuses are:
|
Text |
| Version | The version number of the process from which the instance was started. | Numeric |
| Module Name | This is the path to the XPDL file that defines the "process package". | Text |
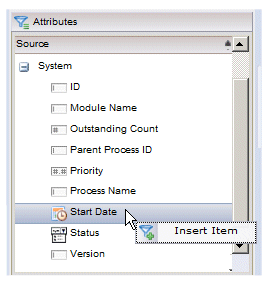
| (1) The attributes shown on the Filter dialog for process instances are listed in a tree structure, categorized by “System” and “Custom”. System attributes contain information that the system entered in the attribute, such as start date, current status, etc. Custom attributes represent customer-specified fields that are added to a process when it is defined. Those fields can then be added to forms. When a user enters information in the fields on a form (e.g., customer name, address, loan amount, etc.), that information is stored in the custom attribute for that field. For more information, see Custom Attributes in Process Instance Lists . | ||
The Attributes section on the Filter dialog lists all of the attributes on which you can filter.
To specify an attribute to filter on, do one of the following:
- Double-click the desired attribute in the Attributes section,
- click the desired attribute and drag it into the Filter section, or
- right-click the desired attribute and select Insert Item from the context menu.
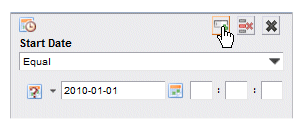
This causes the data-entry dialog for the selected attribute to appear in the Filter section. For example:
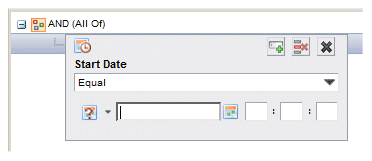
The data-entry dialog for every attribute contains the following data-entry fields:
- Logical operator - This is a drop-down list that allows you to choose how the specified value is to be compared to the actual values in the attributes of the item. You can specify “equal to”, “not equal to”, “less than”, etc.
For example, to display all work items whose start date is prior to Jan. 1, 2010, select the Start Date attribute, choose the “LessThan” logical operator, then choose Jan. 1, 2010 from the value field date picker.
The logical operator drop-down list also includes a “Range” selection for DateTime attributes, which allows you to specify a range of dates/times for which you would like work items or process instances returned. For information about using the Range operator, see DateTime Ranges.
- Value field(s) - Each data-entry dialog contains one or more value fields in which you enter the value for the items you want returned.
The way in which you enter a value depends on the data type for the attribute you are adding. The data type for each attribute is shown in the tables in Selecting Filter Attributes. For information about data types, see Value Data Types.
After choosing a logical operator and entering a value, you can add the filter attribute to the filter expression by clicking the Add button (or just press the Enter key):
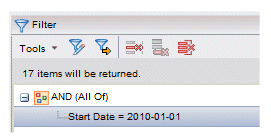
The filter attribute is added to the filter expression in the Filter section. For example:
You can add additional filter attributes to the filter expression in the manner described above.
The filter attribute data-entry dialog has a couple other buttons on it that allow you to either close the dialog without making changes, or remove the attribute from the filter expression: