Multiplicity of Relationships
Relationships between BOM classes have a multiplicity, for instance, one-to-one (1..1), zero-to-many (0..*), or one-to-many (1..*). You can also have a finite lower or upper multiplicity bound like one-to-finite upper bound (1..m), finite lower bound-to-finite upper bound (n..m), or exactly finite bound (n). On a generated form, a particular pane type is rendered for a child class based on the multiplicity value.
If a Student class, for instance, has a child class called Course, with a 0..* relationship (meaning that one student can have many courses), the Course class will be rendered as a grid pane. The attributes of the Course class (for instance, course number, course name, time, room number, and so on.) will appear as columns in the grid pane. Each course for a given student will be represented by a row in the grid pane.
Implicit Validations
The multiplicity constraints defined in the BOM are reflected in the implicit validations. The validation messages conform to the following:
Validation Messages for BOM Level Multiplicity Constraints
| Multiplicity Constraint | Validation Message |
|---|---|
| One-to-many (1..*) | Must contain at least one value. |
| One-to-finite upper bound(1..m) | Must contain between one and {m} values. |
| Finite lower bound-to-finite upper bound (n..m) | Must contain between {n} and {m} values. |
| Zero-to-finite upper bound (0..m) | Must contain between zero and {m} values. |
| Exactly one (1) | Must contain exactly one value. |
| Exactly equal to the finite bound (n) | Must contain exactly {n} values. |
These apply for both primitive attributes and complex children.
Master-Detail Panes
If a child class has a relationship to the parent class that allows multiple instances of the child class, and the child class itself contains a child class with multiple attributes, the two child classes will be rendered on the default form in a master-detail pane.
The first child, the master pane, will be rendered in the form as a grid pane, and the second child, the detail pane, will appear as a vertical pane which can be used for editing all attributes of both child classes.
By default, the check box is cleared, and the detail pane is generated as a vertical pane. This information applies to the default forms and newly generated forms. The forms that are already generated, remain unaffected.
In this case, the grid pane will be read-only, but a row can be selected for editing in the vertical pane (detail) by clicking that row in the grid pane (master).
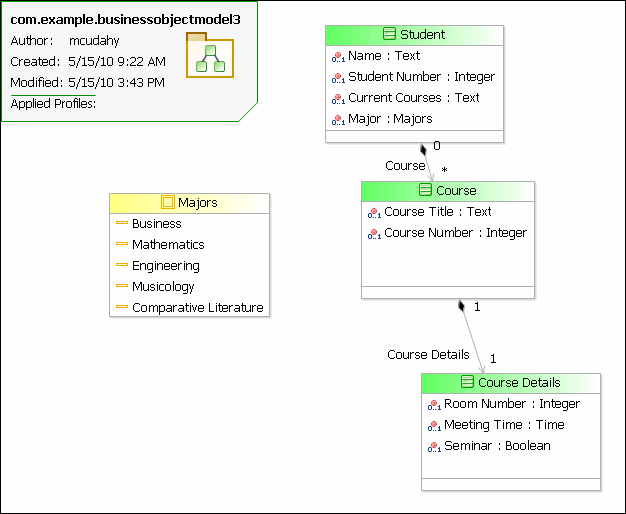
As an example, a Student class might be the parent of a child class called Course. Each student could have zero-to-many courses. The course class, in turn, might have a child class called Course Details. The BOM diagram is shown in the figure Business Object Model Editor Showing Child Classes.
The business object model shown in the figure Business Object Model Editor Showing Child Classes is rendered in a form with a master-detail pane for the Course and Course Details classes.
Selecting a row in the grid pane (that is, the master pane) allows that row to be edited in the vertical or record pane (that is, the detail pane). An alternate way of selecting rows for editing is to enable navigation for the record pane. Navigation is turned off by default, but is enabled by selecting the Show Navigator check box in the Properties tab of the record pane’s Properties view. The navigator then appears for the record pane.

