Adding a Validation

TIBCO Forms does not validate controls and panes that are invisible, disabled, have any empty value, or that are contained within a pane that is invisible or disabled. Only collection panes are validated even if they are empty.

Procedure

  1. With the form open in the Form Designer, click the control or pane where you wish to add new validations.

    The Properties view shows the properties for that control or pane. You can view the validation script for any control or pane by clicking the control or pane, and clicking the Validations tab in the Properties view of the control or the pane. See Reference for a detailed description of each property available on the Validations tab.

  2. Click the Add button to add a new validation.
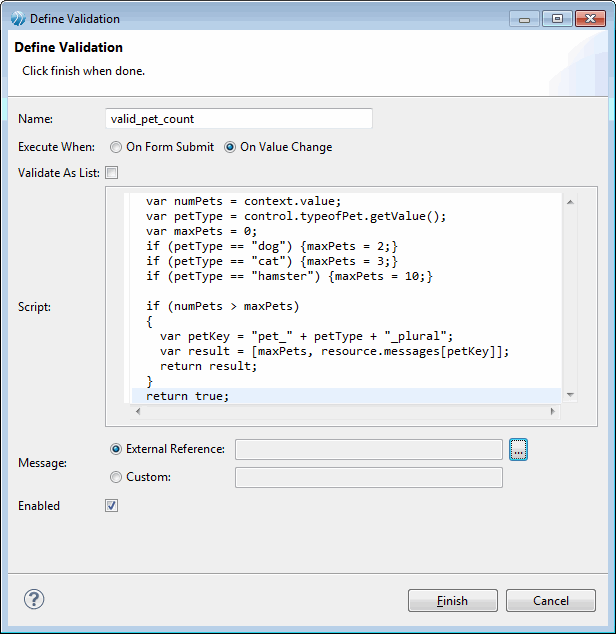
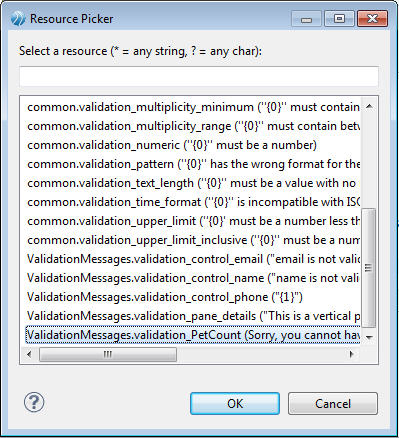
    The Define Validation dialog opens.

    The Define Validation Dialog
  3. Specify a unique name for the script in the Name field.
  4. Select the Execute When option from:
    1. On Form Submit: Sets the validation script to run when the user submits the form. When more than one control is involved, such as when you want to ensure that at least one of the two or more fields are filled in, you can select On Form Submit.
    2. On Value Change: Sets the validation script to run when the user specifies a value in the field, and then exits that field. The validations of the syntax of specified values are best performed On Value Change.
  5. If you are defining a validation on a pane or control that supports multiple values (for example, grid panes, list controls, and multi-select optionlists), select Validate As List to control how the validation is run.
    Note: If you select Validate As List, then the validation runs just once for the entire list of items, and context.value contains an Array (for primitive values) or a list (for multi-valued pane validations). If you do not select Validate As List, then the validation runs once for each item in the multi-valued control or pane, with context.value set to a new item each time the validation is invoked.
  6. Specify the validation script in the Script text area.
  7. Select the type of Message from:
    • External Reference: Picks the validation message from an external *.properties resource. You can define validation messages at the form level in an external resource file with validation_ as a prefix in the key, and share the file across forms or projects. Also, the default implicit validations can reference messages in the common resource bundle. External reference validation messages can use substitution variables to include runtime data values in an externalized static text string.
    • Custom: Allows you to specify custom text message or a message that contains substitution variables, for example: “Sorry, you cannot have more than {0} {1}”. You can dynamically determine the validation message at the runtime using substitution variables.
  8. If you select the Message type as External Reference, click the picker button to open the Resource Picker dialog. Select a validation message from all the available validation_* resource keys, and click OK.
    Note: The Resource Picker dialog displays a filtered list of only validation_* resource keys.
    The Resource Picker Dialog

    See Example 3 Validation Message Referenced from External Resource for details.

  9. If you select the Message type as Custom with substitution variables, ensure that the validation script expression evaluates to an array of strings.

    The length of the array must be equal to the number of substitution variables in the message. See Example 2 Custom Validation Message with Substitution Variables for details.

  10. Confirm that the Enabled check box is selected, and click Finish to complete the process of defining a validation.
Related tasks