Uploading an Application Archive

Uploading an application archive copies the specified file to the specified domain. The archive is copied to the BW_HOME\domains\domain_name\archives directory. If the specified archive already exists in the domain, it can be replaced on upload.

The following steps show how to upload an application archive.

bwadmin Command Line

Procedure

  1. Execute the following command from the command line. Specify the fully qualified location of the application archive file. Note the use of forward slashes "/" for the Windows path. This Windows example uploads the BookStore sample that has been copied to the C:\ear folder.
    BW_HOME\bin>bwadmin upload -d MyDomain C:/ear/tibco.bw.sample.binding.rest.BookStore.application_1.0.0.ear
    Tip: If the specified application archive already exists in the selected domain, use the -replace option to replace it.
  2. By default, the upload command copies the archive file to the BW_HOME\domains\domain_name\archives folder. To upload an archive to a different location, use the -path option and specify a path relative to the BW_HOME\domains\domain_name folder. For example, the following example creates the BW_HOME\domains\domain_name\test folder and uploads the archive file:
    BW_HOME\bin>bwadmin upload -d MyDomain -path ../../test/MyArchives C:/ear/tibco.bw.sample.binding.rest.BookStore.application_1.0.0.ear 

Admin UI

Procedure

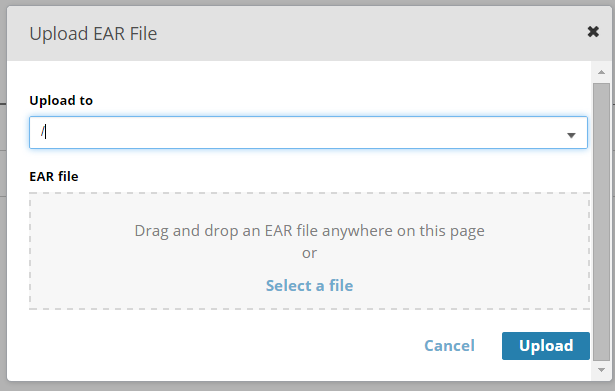
  1. Select the domain and open the Application Archives page. Click Upload.
  2. In the Upload EAR File dialog box, enter the following information:
    • Upload to: EAR file upload folder. Default location is the domains folder.
    • EAR file: Drag and drop the archive file. If the file already exists in that folder, select the Replace any existing version check box.

  3. Click Upload, then Done.
    The archive is displayed on the Application Archives page.