Installing in GUI Mode
When you run the installer in GUI mode, the installer presents panels that you can use to choose the installation environment and customize your installation.
Procedure
- Run the TIBCOUniversalInstaller executable.
- On the Welcome screen, click Next.
- Read the license agreement, select I accept the terms of the license agreement if you agree to the terms, and click Next.
-
Choose to create a new installation environment that is be your
TIBCO_HOME and specify the path to the new environment. If you want to run scripts, make sure that the
TIBCO_HOME path does not contain any spaces, such as
Program Files. Then click
Next.
Option Procedure Create a new TIBCO_HOME In the Directory field, specify the directory into which the product is installed. The directory cannot be the same as the directory of an existing installation environment. The directory path cannot contain the following special characters:
# $ % & * < > ? ` |
Use an existing TIBCO_HOME Select an existing installation environment from the drop-down menu. -
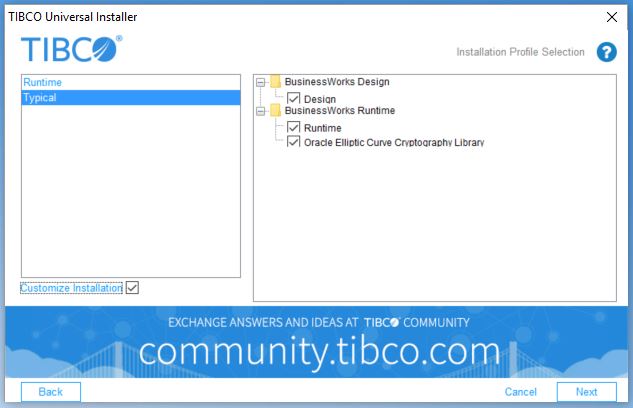
On the Installation Profile Selection screen, select one or more of the pre-configured profiles, or click
Customize Installation, and explicitly select the components you want to install. By default, the pre-configured profiles include the
Oracle Elliptic Curve Cryptography Library (ECCL) component. The software requires the ECCL only if you want to use the ECC ciphers with SSL/TLS configurations. Without the ECCL, the SSL/TLS functionality is still available, but without the ECC ciphers.

- On Linux and Solaris, the design feature requires Eclipse LGPL assembly to be available in the temporary directory prior to installation. See Software Requirements for details. The installer prompts the LGPL License Agreement screen for the Eclipse LGPL assembly. Read the license agreement, select I accept the terms of the license agreement if you agree to the terms, and click Next to proceed.
-
On the
LGPL Assembly Download screen, select one of the following download options and click
Next.
- Download Gnome Binding assembly from TIBCO: Select this option if you are connected to the Internet or do not want to use a previously downloaded assembly. The assembly is automatically downloaded and stored in the assemblies subdirectory of the directory where you extracted the installer.
- Provide the location for the assembly previously downloaded from TIBCO: Select this option if you are not connected to the Internet. Click Browse to navigate to the directory where the previously downloaded LGPL assembly is stored. Select the directory, and click Open.
-
Note: Skip this step if the Oracle Elliptic Curve Cryptography Library component was not selected in the Installation Profile Selection screen.If you choose to install the Oracle Elliptic Curve Cryptography Library component, the design feature requires the Sunec LGPL assembly to be available in the temporary directory prior to installation. See Software Requirements for details. The installer prompts the LGPL License Agreement screen for the Sunec LGPL assembly. To download the Oracle Elliptic Curve Cryptography Library, select I accept the terms of the license agreement, and click Next. If you do not want to download the Oracle Elliptic Curve Cryptography Library, click Cancel to exit.
-
On the
LGPL Assembly Download screen, select one of the following download options and click
Next.
- Download Oracle Elliptic Curve Cryptography Library assembly from TIBCO: Select this option if you are connected to the Internet or do not want to use a previously downloaded assembly. The assembly is automatically downloaded and stored in the assemblies subdirectory of the directory where you extracted the installer.
- Provide the location for the assembly previously downloaded from TIBCO: Select this option if you are not connected to the Internet. Click Browse to navigate to the directory where the previously downloaded LGPL assembly is stored. Select the directory, and click Open.
- On the Pre-Install Summary screen, verify the list of products and components selected for installation, and click Install.
- Verify the Post-Install Summary, click Finish to complete the installation process, and close the installer window.
Copyright © 2020. TIBCO Software Inc. All Rights Reserved.
