Creating a Job
This topic describes the process of adding a job to a workspace.
Procedure
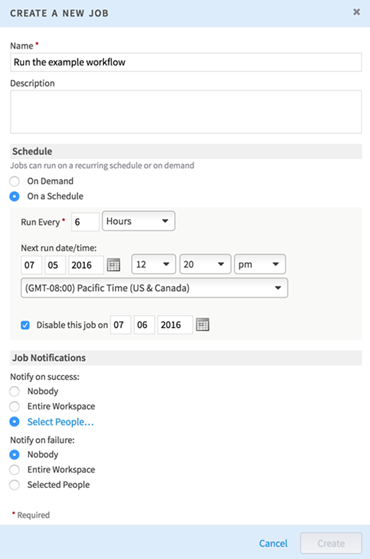
- Name: Choose a descriptive name for the job.
- Description: Optionally, add a description about the job.
- Schedule: Specify whether to run this job on demand or on a schedule. If you choose
On a Schedule, this panel expands to include scheduling information.
- Run Every: You can choose to run the job every
n hours, days, weeks, or months, where
n is an integer.
- If Weeks is selected, check boxes are available to choose the days of the week the job should run. You can select one or many days (for example, every Monday, Wednesday, and Friday).
- If Months is selected, options are available to run the job on the defined day of the month (for example, the 5th of each month), day of the week (for example, the 2nd Monday of each month), or the last day of the month.
- Next run date or time: Select when the job next runs. This is when the schedule starts running. You can select days, times, and the time zone.
- Disable this job on: If you want the job to run only for a selected amount of time, choose when the schedule ends. You can select date and time.
- Summary information: Describes the schedule as entered above.
- Run Every: You can choose to run the job every
n hours, days, weeks, or months, where
n is an integer.
- Job Notifications: Specify whether to send notifications to people regarding the job's status.
- Notify on success: If the job succeeds, the specified people are notified of the job's status and results.
- Nobody: No one receives notifications. You must return to the job tab in this workspace to see the job's status and results.
- Entire Workspace: Everyone in the workspace receives a Team Studio notification and an email notification.
- Selected People: If you choose this option, the
Select People link is displayed. Click this link to display the
Pick Notification Recipients dialog box, in which you can choose people to notify. Click
+ next to a person's name to add that person to the recipient list, and then click
Save Changes.

- Notify on failure: If the job fails, the specified people are notified of the job's status and results.
- Nobody: No one receives notifications. You must return to the job tab in this workspace to see the job's status.
- Entire Workspace: Everyone in this workspace receives a Team Studio notification and an email notification.
- Selected People: If you choose this option, the
Select People link is displayed. Click this link to display the
Pick Notification Recipients dialog box, in which you can choose people to notify. Click
+ next to a person's name to add that person to the recipient list, and then click
Save Changes.

- Notify on success: If the job succeeds, the specified people are notified of the job's status and results.
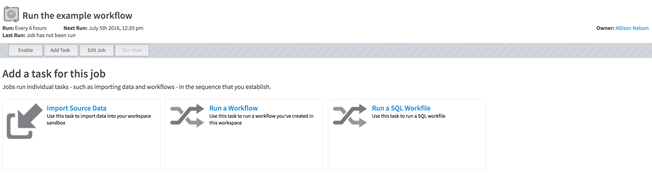
- When you are finished configuring the job details, click Create. The job detail screen is displayed. Here you can add or edit tasks for your job. If you chose a scheduled job, Team Studio creates the job in a disabled state so you can make changes to the job and not worry about it starting without your knowledge. When you are ready to start the job schedule, you can enable the job.
Copyright © 2021. Cloud Software Group, Inc. All Rights Reserved.