Workspace Roles
Workspace roles describe a person's expertise and role in the project. This helps with team communication and messaging of what each person works on. You can have only one workspace role at a time, but it can be changed at any time. The available roles are:
Members and Non-Members
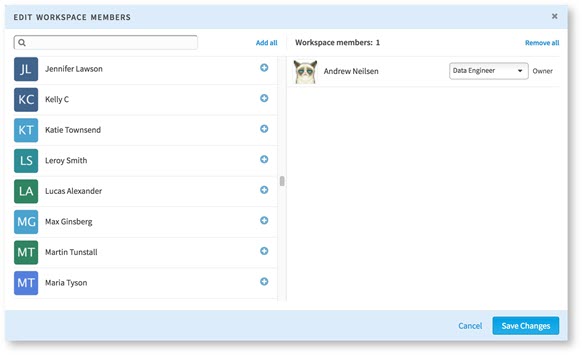
You can add or edit members from the workspace overview tab. Click Add or Edit Members. Use the + next to a user's name to add the user to the workspace. Then you can use the drop-down list to select a workspace role. Click Save Changes to update the workspace members list.
All workspace members can perform the following tasks:
- Add an Insight: Insights appear in the workspace activity stream and your home page. If the insight is published (accomplished by clicking Publish on the insight entry in the activity stream), it appears on all Team Studio users' home page activity streams. This is a good way to promote information to the whole team.
- Add a Note: You can comment on the workspace here. Comments can have file attachments and text formatting. You can also notify selected members on your project team about your activity.
- Add and edit Tags: Add or edit tags for this workspace. Tags help you search for and categorize projects and files.
- Edit Workspace Settings: Members of the workspace who are not the workspace owner or a Team Studio administrator can edit the workspace name and summary.
- Update the Stage: You can update the stage of your workspace here. This allows you to keep track of your project through the analytics process. There are five roles: Define, Transform, Model, Deploy, and Act. Selecting a role displays information about that role. You can also add a comment when you change a workspace role. See Workspace Stages for details.
- Add a Sandbox: When you add a sandbox, you can easily import files or datasets from your data source. These are your workspace's copies, and you are free to manipulate and transform them. A workspace can only have one sandbox, and once you have added a sandbox, you cannot remove it.
Non-members can view the workspace in read-only mode, but only if the workspace is public. Non-members can also:
Owners or Team Studio Administrators
The following is a list of additional tasks that you can perform if you own the workspace or have an Administrator role:
- Edit Workspace settings: You can edit all the fields in the Edit Workspace Settings dialog box, such as changing the workspace privacy, owner, and status.
- Add and edit members: A list of currently existing members is displayed on the left side of the dialog box, while the current workspace members are on a list on its right side. Click + next to a person's name to add them to a workspace. You can also edit their workspace role from this dialog box.
- Delete this workspace: Use this command to delete the current workspace and everything in it. All associated imports are unscheduled. Performing this action cannot be undone.

