Editing an Array of Objects Using a Grid Pane
Arrays of objects may be represented in forms using a grid pane. The grid pane can be configured to support adding or deleting records in the underlying array of objects.
Note: In earlier Forms tutorials, we made changes to the business object model, and not directly to the form. In this way, we were able to customize the form while continuing to use the default form. The advantage of doing so is that the default form is continually and automatically synchronized with the underlying data.
But for this tutorial, we will make changes directly to the form, forgoing that advantage in order to make further customizations. Once we open the form for editing, it becomes a customized form, rather than a default form. This means the form must be manually synchronized with the data by opening the business process, right-clicking the user task, and clicking .
Procedure
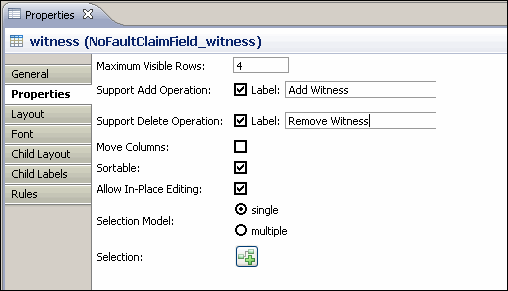
- In the Label field for Support Add Operation, type Add Witness. In the Label field for Support Delete Operation, type Remove Witness. These labels will appear on the form within the buttons that invoke those actions.
- Save the form and click the GI Preview tab to preview the form.
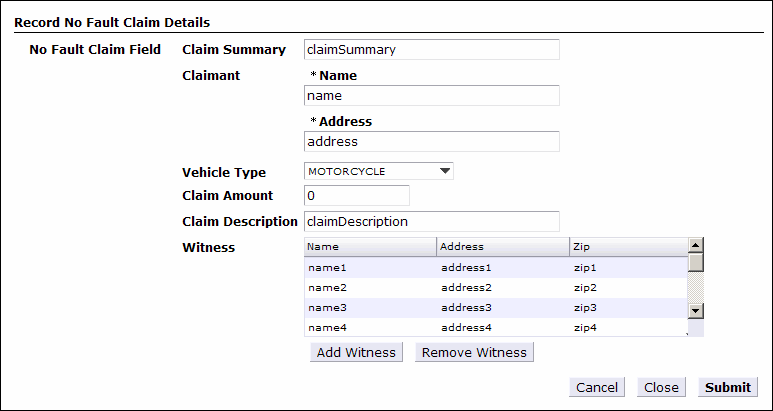
Result
Next Steps
You can now:
- Install the solution to this Tutorial and compare it with your version. See the instructions in the following section for how to do this.
- Proceed to the next tutorial "How to Customize the Appearance of a Form," which describes how to alter the look and feel of a form so that it’s appearance conforms to your organization’s design guidelines.
- Optionally, you can assign participants to the user tasks. To do this:
- Assign a position in the organization model (from the project EasyAsExtendedOMSolution that you imported earlier) as the participant for each of the user tasks. The How to Design a Simple "WelcomeUsers" Process tutorial describes how to do that.
- If you wish, you can then deploy the project, as described in the How to Implement and Deploy the "Welcome Users" Application for deploying the "WelcomeUsers" project.
Next topic: Verifying the Tutorial Solution
Previous topic: Modifying the Appearance of Fields in a Default Form
Copyright © Cloud Software Group, Inc. All rights reserved.