Editing Resource Push Destinations
The Resource Editor is used to edit push destinations for resources.
For information about accessing the Resource Editor, see Accessing the Resource Editor.
Procedure
-
From the left pane in the Resource Editor, select the resources for which you would like to edit push destinations.
Changes to push destinations will be applied to all currently selected resources. (You can select one or more resources, edit push destinations (or anything else in the right pane), then select different resources and make additional changes in the right pane, all within one editing session without the need to click Apply or OK until you are completely done editing.)
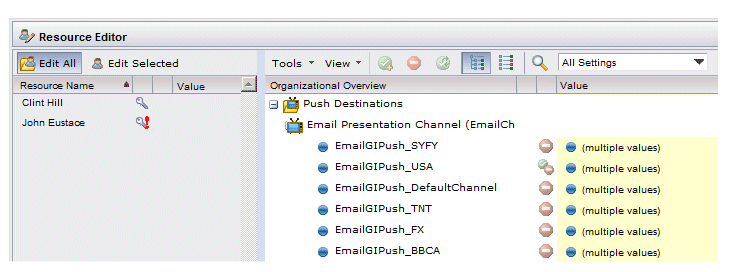
- In the right pane of the Resource Editor, scroll down to the Push Destinations section:
-
Edit the push destinations for the selected resources in one of the following ways:
Grant the push destination by either clicking the
 icon on the toolbar, or selecting
Grant the selected setting(s) from the
Tools menu. This is selectable only if at least one of the selected resources does not currently have the push destination specified.
This allows you to grant the push destination without actually entering a value. Having the push destination with an empty value may have a special meaning, depending on the application that handles the push destination.
Note: Also see Resource Editor Status Icons for information about all of the possible status icons when editing push destinations.Remove the push destination by either clicking the
 icon on the toolbar, or selecting
Remove the selected setting(s) from the
Tools menu. This is selectable only if at least one of the selected resources currently has the push destination specified.
When you remove a push destination setting in this way, it also removes any value that had been set for the push destination.
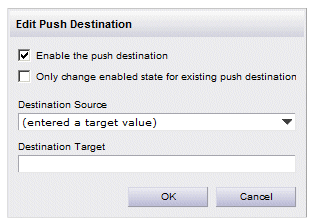
- Set the value for the push destination by clicking to the right of the push destination icon (the blue circle):
- Enable the push destination - This check box is provided to allow you to disable the push destination without removing the values specified for the push destination.
- Only change enabled state for existing push destination - This check box will appear only when multiple resources are selected and their values differ. If you check this box, the Destination Source and Destination Target fields become disabled and the enabled state will be changed for the selected resources that already have a push destination defined.
- Destination Source - From this drop-down list, select a resource attribute that contains the email address. (Note that if the email address is ultimately coming from an LDAP attribute, you must map the LDAP attribute to a resource attribute — for information, see
Mapping Resource Attributes.)
If you select a resource attribute from the Destination Source field drop-down list, the Destination Target field is disabled.
- Destination Target - Enter the desired email address in the
Destination Target field. To be able to do this, you must select “(entered target value)” from the
Destination Source field drop-down list.
When you specify the value for a push destination, the
 icon is shown for that push destination, indicating that a change is being made, as well as the value that was entered. For example:


