Creating a User
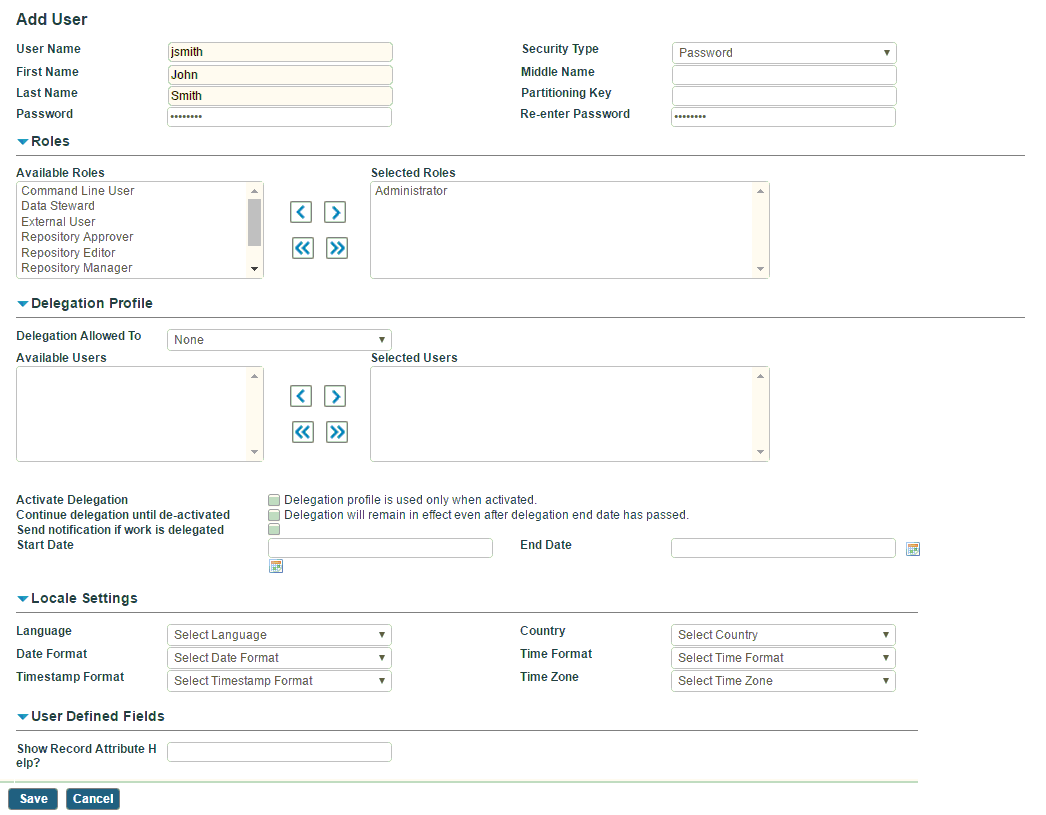
Using the Add User screen, you can create a new user for a company.
Procedure
The following table displays the access rights of each role.
| Menu / Role | TIBCO Admin (tadmin) | Admin | Data Steward | External User | Repository Approver | Repository Editor | Repository Manager | Channel Manager (GDSN only) | Sales Rep (GDSN only) | Support Engineer | Work Supervisor |
|---|---|---|---|---|---|---|---|---|---|---|---|
| Inbox | X | X | X | X | X | X | X | X | X | X | X |
| Administration > All Company Profiles | X | ||||||||||
| Administration > User Accounts | X | X | X | ||||||||
| Administration > Roles | X | X | X | ||||||||
| Administration > My Company Profile | X | X | X | X | X | ||||||
| Administration > Backend System Profiles | X | X | X | X | X | X | X | ||||
| Administration > Resource Security | X | X | X | ||||||||
| System Operations | X | X | |||||||||
| Master Data > Data Sources | X | X | X | X | |||||||
| Master Data > Repositories | X | X | X | X | X | X | |||||
| Master Data > Subset Rules | X | X | X | X | X | X | |||||
| Master Data > Synchronization Profiles | X | X | X | X | X | X | |||||
| Master Data > Synchronization Formats | X | X | X | X | X | X | |||||
| Master Data > Mass Update | X | X | |||||||||
| Browse and Search | X | X | X | X | X | X | X | X | X | ||
| Business Process | X | X | X | ||||||||
| Event Log | X | X | X | X | X | ||||||
| Support Tools > Query Tool | X | X | |||||||||
| Support Tools > Log Download | X | X | |||||||||
| NOTE: “X” denotes the availability of the menu for the role. In case of “X” marked for the main menu, all sub-menus are available for the particular role. For example, Administrator and Work Supervisor have access permissions for all sub-menus under Master Data. | |||||||||||
- Delegation Profile: specify the
delegation profile of the user. You can forward work items assigned to you to another user. The users are available for selection depending on their roles and privileges. To activate the delegation profile, you need to specify how the delegation will be activated and deactivated and whether to send notification when work is delegated.

Using the delegation and reassignment feature, you can control delegation and reassignment of work items from one user to another.
Delegation and reassignment is based on a list of specified user roles and their related access privileges. A delegation profile is used to limit the roles and users to whom work can be reassigned.
For each organizational role, the TIBCO MDM administrator specifies which roles can be delegated by another role. When a user attempts to reassign a work item, the action is limited to a select list of user roles. Only users with the appropriate roles and access privileges are shown as possible candidates for the reassignment.
- Locale Settings: specify the locale setting details in the following fields:
- Language and Country: Select the language and country.
- Date Format: Select a date format from the drop-down list. The supported formats are:
MM/DD/YYYY
DD-MON-YYYY
MM/DD/YY
DDMMYYYY
YYYY-MM-DD
YYYY/MM/DD
DD-MM-YYYY
DD/MM/YYYY
DD-MM-YY
All date fields on the screens are displayed in the selected format for this user.
- Time Format: Select a time format from the drop-down list. The supported formats are:
hh:mm:ss (24 hours)
hh:mm:ss AM/PM (12 hours)
All time fields on the screens are displayed in the selected format for this user.
Note: If you do not select the date or time format, the default format is selected from Configurator. By default, the MM/DD/YYYY and hh:mm:ss formats are specified for the Default Display Date Format and Default Display Time Format properties respectively. However, if you have specified the date or time format using UI, the selected date and time format take precedence over the application level configuration. - Timestamp Format: Select a timestamp format from the drop-down list. The supported formats are:
YYYY-MM-DD hh:mm:ss.S – Time is displayed in 24 hours format with milliseconds. S indicates milliseconds.
YYYY-MM-DD hh:mm:ss.S AM/PM – Time is displayed in 12 hours format with milliseconds.
YYYY-MM-DD hh:mm:ss.S z – Time is displayed in 24 hours format with milliseconds and time zone. Z indicates time zone. By default, the system time zone is displayed.
YYYY-MM-DD hh:mm:ss.S AM/PM z – Time is displayed in 12 hours format with milliseconds and time zone.
Note: If you do not select the timestamp format, the default format is selected from Configurator. By default, the YYYY-MM-DD hh:mm:ss.S format is specified for the Default Display Timestamp Format property. However, if you select the timestamp format using UI, the selected timestamp format takes precedence over the value that is specified for the Default Display Timestamp Format property. - Time Zone: Select the time zone specific to your region from the drop-down list. If you do not select any time zone, the system time zone is applicable.
- Show Record Attribute Help?: enter yes or no to activate the mouse over display of Help in the record add, modify, and copy screens. The default (if no data input is provided here) is to display the Help.


