JavaScript must be enabled in order to use this site.
Please enable JavaScript in your browser and refresh the page.
Enabling Remote JMX Monitoring on JBoss WildFly Application Server
Perform the following steps for remote JMX monitoring using Java VisualVM for JBoss WildFly application server.
Procedure
While connecting to JavaVisualVM, you need to mention the management user credentials. Therefore, first create the management user credentials.
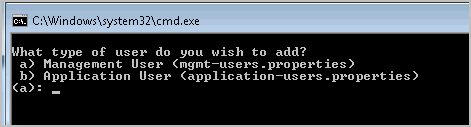
Navigate to$JBOSS_HOME/bin directory and run
add-user.bat or
add-user.sh file. The following two options are displayed in the command prompt.
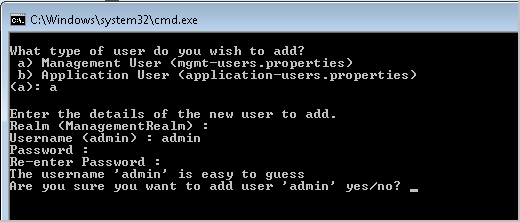
Type
a . You need to enter Realm credentials.
Do not enter any values. Leave it blank.
Press Enter. You need to enter user credentials.
Note: User name and password must be different, else an error is displayed.
Type the user name, password, and confirm password.
Type
yes to proceed with the entered user credentials.
Management user is successfully created.
Modify the
standalone.xml file
Navigate to
$JBOSS_HOME/standalone/configuration directory and open the
standalone.xml file.
Modify the
standalone.xml file as follows:
<subsystem xmlns="urn:jboss:domain:jmx:1.3">
   <show-model value="true"/>
   <remoting-connector use-management-endpoint="true"/>
</subsystem>
Save the
standalone.xml file.
Start JBoss WildFly application server
On the command line, run the script that includes environment variables.
Navigate to
$JBOSS_HOME/bin .
Enter the following command:
./standalone.sh -Djboss.bind.address.management=IP address
Start Java VisualVM
Navigate to
$JBOSS_HOME/bin/client directory and copy
jboss-cli-client.jar and place it to the
$JAVA_HOME/lib directory.
Ensure that
JAVA_HOME refers to the location from where you want to run Java VisualVM.
On the command line, type
$JAVA_HOME/bin .
Enter the following command:
jvisualvm --cp:a $JAVA_HOME\lib\jboss-cli-client.jar The JavaVisualVM window is displayed with the Local and Remote options.
Add JMX Connection
For the Remote option, double-click or right-click to add the host name. After adding the host name, you need to add the JMX connection. Type the following URL in the Connection field:
service:jmx:remoting-jmx://IPAddress :9999
For example,
service:jmx:remoting-jmx://10.97.108.72:9999 .
In this case,
9999 is the JMX port for the TIBCO MDM Server on 10.97.108.72.
Specify the user credentials that you have created in
Create Management User Credentials .
Click
Connect .
If the JMX connection is successful, the connection URL link is displayed following the host name.
Copyright © Cloud Software Group, Inc. All rights reserved.