Enabling SSL on JBoss WildFly Application Server

Enable and verify SSL on JBoss WildFly Application Server.

Default Application Realm

By default, JBoss WildFly application server uses 8443 port for the HTTPS protocol. Type the following URL into your browser: https://IPaddress:8443/eml/Login. By default, the application realm is available at the following locations in the standalone.xml file:
  1. <security-realm name="ApplicationRealm">
    <server-identities>
    <ssl>
    <keystore path="application.keystore" relative-to="jboss.server.config.dir" keystore-password="password" alias="server" key-password="password" generate-self-signed-certificate-host="localhost"/>
    </ssl>
    </server-identities>
    <authentication>
    <local default-user="$local" allowed-users="*" skip-group-loading="true"/>
    <properties path="application-users.properties" relative-to="jboss.server.config.dir"/>
    </authentication>
    <authorization>
    <properties path="application-roles.properties" relative-to="jboss.server.config.dir"/>
    </authorization>
    </security-realm>
  2. <http-connector name="http-remoting-connector" connector-ref="default" security-realm="ApplicationRealm"/>
  3. <https-listener name="https" socket-binding="https" security-realm="ApplicationRealm" enable-http2="true"/>
    Note: The application.keystore is auto generated on the first use with a self-signed certificate for localhost.

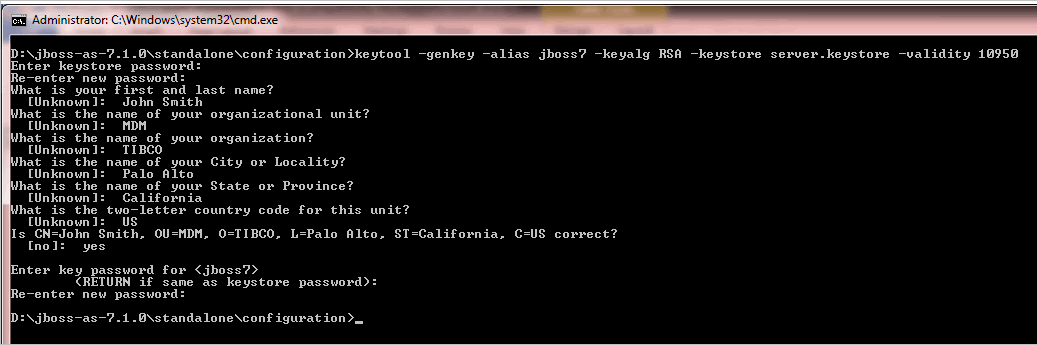
Create Custom Application Realm

If you do not want to use the default application realm, you can create custom application realm using the subsequent steps.

Procedure

  1. Generate Key
    1. On the command line, type $JBOSS_HOME/standalone/configuration.
    2. Enter the following command:
      keytool -genkey -alias jbossWildFly -keyalg RSA -keystore server.keystore -validity 10950
      Note: Where,
      • the value of -alias refers an alias for the JBoss WildFly application server name.
      • the value of -keystore refers to the filename where the generated key is saved.
      • the value of -validity refers to the validity of the certificate. Specify the value in days. For example, if the certificate is valid for 30 years, specify 10950.

        You can modify the values as per your requirement.

    3. Press Enter. The command prompts to enter the password.
    4. Enter the password.
    5. Re-enter the new password. The command displays a list of questions related to your organization.
    6. Type an answer for each question.
    7. Enter the password.
    8. Re-enter the new password.
      A server.keystore file is generated in the $JBOSS_HOME/standalone/configuration directory.
  2. Configure WildFly for HTTPS Connector
    1. Navigate to $JBOSS_HOME/standalone/configuration directory and open the standalone.xml file.
    2. Add the following elements:
      <security-realm name="TibcoMDMRealm">
      <server-identities>
      <ssl>
      <keystore path="E:\MDM910JBOSS\wildfly-10.1.0.Final\standalone\configuration\server.keystore" keystore-password="Tibco123!" alias="jbossWildFly"/>
      </ssl>
      </server-identities>
      <authentication>
      <local default-user="$local" allowed-users="*" skip-group-loading="true"/>
      <properties path="application-users.properties" relative-to="jboss.server.config.dir"/>
      </authentication>
      <authorization>
      <properties path="application-roles.properties" relative-to="jboss.server.config.dir"/>
      </authorization>
      </security-realm>
        
      Note: The <authentication> and <authorization> elements are mandatory.
    3. Locate the "http-remoting-connector" and update property with TibcoMDMRealm:
      <http-connector name="http-remoting-connector" connector-ref="default" security-realm="TibcoMDMRealm"/>
    4. Locate the "https-listener" and update property with TibcoMDMRealm:
      <https-listener name="https" socket-binding="https" security-realm="TibcoMDMRealm" enable-http2="true"/>
    5. Save the updated standalone.xml file.
  3. Port Configuration
    1. Navigate to $JBOSS_HOME/standalone/configuration directory and open the standalone.xml file.
    2. Change the default WilfFly HTTPS port from 8443 to 443 under <socket-binding-group>:
      <socket-binding-group name="standard-sockets" default-interface="public" ...>
      <socket-binding name="http" port="80" />
      <socket-binding name="https" port="443" />
      ...
      </socket-binding-group>
    3. Save the updated standalone.xml file.
  4. Verify SSL Configuration
    1. Type the following TIBCO MDM URL into your browser:
      https://IPaddress:443/eml/Login

      If the TIBCO MDM Login screen is displayed, an SSL is successfully configured.

      Note: If the TIBCO MDM Login screen is not displayed, perform the following steps:
      • For Internet Explorer,
        1. Click Tools > Internet Options. The Internet Options window is displayed.
        2. Click the Advanced tab.
        3. Under Security, verify whether Use SSL versionnumber and Use TLS versionnumber check boxes are selected.
      • For Mozilla Firefox,
        1. In a new tab, type about:config in the address bar and press Enter.
        2. Click I accept the risk!.

          A list of preferences is displayed.

        3. Type TLS in the Search text box.

          A list of TLS preferences is displayed.

        4. If the security.tls.version.max preference is highlighted and the value is set to other than 3, right-click and select Modify to restore the default value of 3.
        5. If the security.tls.version.min preference is highlighted and the value is set to other than 1, right-click and select Modify to restore the default value of 1.
          Note: The values for these preferences indicate: 1 refers to TLS 1.0, 2 refers to TLS 1.1, and 3 refers to TLS 1.2.