Creating an Inbound Queue

An inbound queue signifies the messages received from any external application by TIBCO MDM. Configurator provides an option to create and modify an inbound queue.

Procedure

  1. Navigate to Tools.
  2. Select Inbound Queue. The Inbound Queue dialog box is displayed.
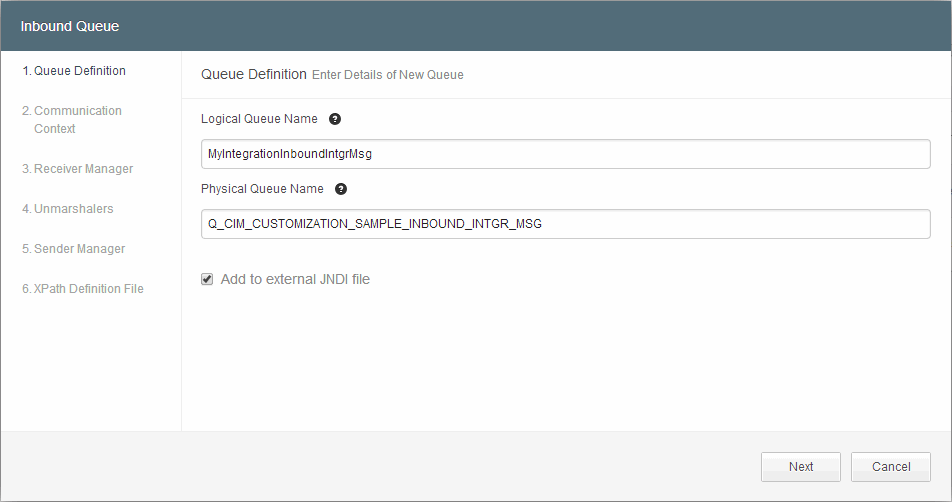
    1. In the Queue Definition step, define a logical queue to send messages to the application.

      The following table describes the Queue Definition fields:

      Inbound Queue - Queue Definition (TIBCO Vendor)
      Field Name Description
      Logical queue name Specify the logical queue name to send received messages to the application. For example: MyIntegrationInboundIntgrMsg.

      The logical queue name is mapped to this physical queue name.

      Physical queue name Specify the physical queue name. For example: Q_CIM_CUSTOMIZATION_SAMPLE_INBOUND_INTGR_MSG.
      Add to external JNDI file Select the check box to allow the queue connection setup through JNDI and generate a .bindings file.
  3. If you have selected the WebSphere MQ vendor in Settings, specify extension attributes for a queue. The following additional fields are displayed:
    Inbound Queue - Queue Definition (WebSphere MQ Vendor)
    Field Name Description
    Target client Select the value from the drop-down list. If the receiving application does not use a JMS client, select NONJMS_MQ. The other possible value for Target Client is JMS_COMPLIANT.
    Code Set SID If the receiving application has requested a specific CCSID, set this value (usually the same as the Queue Manager default value). For example: CCSID=819.
  4. Click Next to continue.
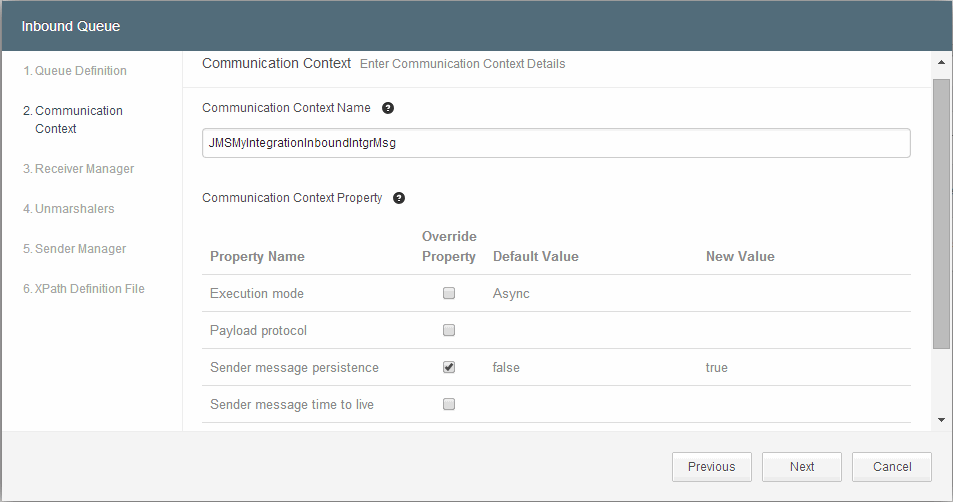
    1. In the Communication Context step, you can assign distinguishing properties to the message.
    • Communication Context Name: The communication context name is automatically generated. It is based on the logical queue name. You can edit this name. For example: JMSMYIntegrationInboundIntgrMsg. However, it is recommended to use the system-generated name whenever possible. Communication context is used to create a named group of communication properties.
    • The Inbound Queue - Communication Context Properties table describes the Communication Context properties:
      Inbound Queue - Communication Context Properties
      Property Name Description
      Execution mode The supported queue execution modes are Sync and Async. The default value is Async.
      Payload protocol  
      Sender message persistence The valid values are true or false. The default value is false.
      Sender message time to live  
      Receiver message time out The default value is 300000 milliseconds.
      Payload packaging scheme The default value is STANDARD_INTEGREATION.
      Override Property Select the Override Property check box if you want to change the default value. A drop-down list is displayed in the New Value column. You can select another value for the corresponding property.
  5. Click Next to continue.
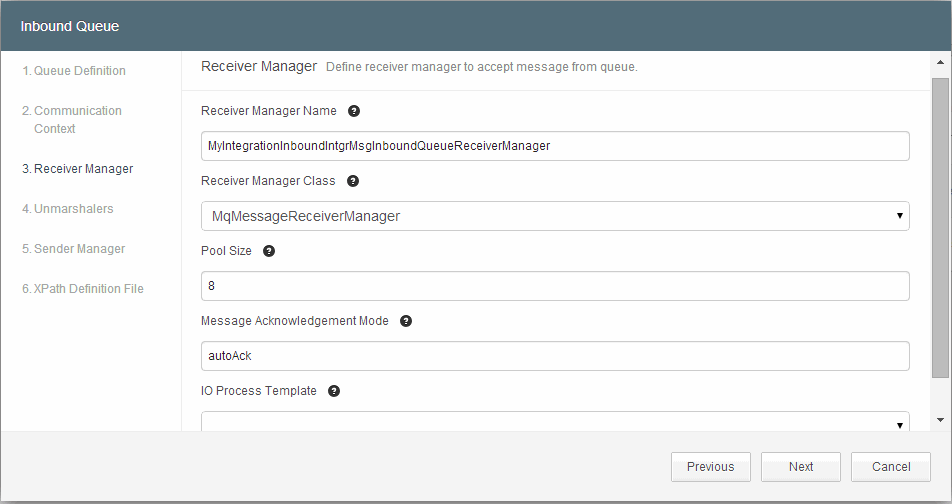
    1. In the Receiver Manager step, enter the details to receive messages on the queue.
    • The Inbound Queue - Receiver Manager table describes the Receiver Manager Fields:
      Inbound Queue - Receiver Manager
      Field Name Description
      Receiver Manager Name The receiver manager name is automatically generated using the logical queue name. You can edit the name. For example: MYIntegrationInboundIntgrMsgInboundQueueReceiverManager.

      It is recommended to use the system-generated name whenever possible.

      Receiver Manager Class Select the Receiver manager class. The available options are MqMessageReceiverManager or MqDynamicallyFilteredMessageReceiverManager.

      It is recommended that MqMessageReceiverManager be used unless you want to define selectors for some messages.

      Pool Size Determines how many messages from the new queue can be processed in parallel. The default value is 8.
      Message Acknowledgement Mode Determines how the acknowledgement of the processed message is generated. The default value is autoAck (automatic acknowledgement), other options are clientAck (explicit client-based acknowledgement) or dupsOKAck (duplicate messages are acceptable).
      IO Process Template Select any one of the following IO process templates:
      • StandardInboundIntgrMsgByteStreamMsgIOProcess: Use this process template when the incoming message is a Byte message. This IO process extracts the message from the bytestream, and creates an XML file with a name starting with JMS_StandardInboundIntgrMsg.
      • StandardInboundIntgrMsgStringMsgIOProcess: Use this process template when the incoming message is a Text message. This IO process extracts message content, and creates an XML file with a name starting with JMS_StandardInboundIntgrMsg.
      • InboundIntgrMsgIOProcess: Use this process template when the incoming message is a Text message. This IO process extracts message content, and creates an XML file with a name starting with JMS_InboundIntgrMsg.
      • StandardInboundIntgrMsgUTFStringMsgIOProcess: Use this process template when the incoming message is a Byte message, encoded with UTF-8 format. This IO process extracts the message from the bytestream, and creates an XML file with a name starting with JMS_StandardInboundIntgrMsg.
      • StandardIntgrEventByteStreamMsgIOProcess:Use this process template when the incoming message is a Byte message. This IO process extracts the message from the bytestream, and creates an XML file with a name starting with JMS_StandardIntgrEvent.
      • StandardIntgrEventStringMsgIOProcess: Use this process template when the incoming message is a Text message. This IO process extracts message content, and creates an XML file with a name starting with JMS_StandardIntgrEvent.
       
      • StandardIntgrEventUTFStringMsgIOProcess : Use this process template when the incoming message is a Byte message, encoded with UTF-8 format. This IO process extracts message content from the bytestream, and creates an XML file with a name starting with JMS_StandardIntgrEvent.
  6. Click Next to continue.
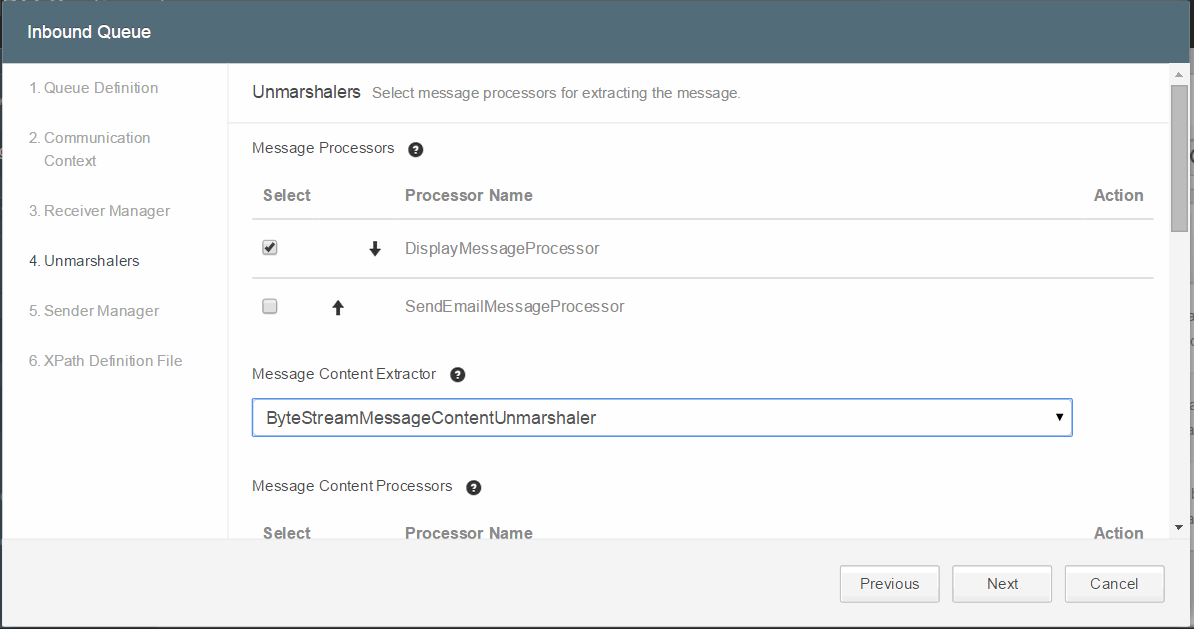
    1. In the Unmarshers step, you can define an unmarshaling pipeline so messages received on external queues can be read.

Note: If you have selected an IO process template in the Receiver Manager step, some message processors are preselected and ordered in a particular sequence.

The Inbound Queue - Unmarshalers table describes the Unmarshalers fields and description:

Inbound Queue - Unmarshalers
Fields Description
Message Processors (msgFromMsgUnmarshalers)and Message Content Processors (msgContentFromMsgContentUnmarshalers) Because there can be multiple message processors and message content processors, these are displayed in grids. Select the message processors to use in the pipeline by selecting the corresponding check box. Using the arrow keys, you can order the sequence in which processors are to be used in the pipeline for message extraction.

The last row in these grids is empty. You can enter a message processor name of your choice to be used in the pipeline.

For the editable properties, the Edit link is displayed. The Edit link enables you to edit properties of some message processors. The Edit link is enabled only when the processor has been selected. The processors are:

  • CreateFileMessageContentProcessor
    MapFromMessageContentCarrierMessageContentProcessor
    MapToMessageContentCarrierMessageContentProcessor
    SendEmailMessageContentProcessor
    TransformFileMessageContentProcessor
    TransformStringMessageContentProcessor
    XMLFromMessageContentCarrierMessageContentProcessor
    XMLToMessageContentCarrierMessageContentProcessor
    XSLEnvelopeMessageContentProcessor
    XSLTransformMessageContentProcessor
    SendEmailMessageProcessor

    For user-defined message processors, enter property name-value pairs.

Message Content Extractor (msgContentFromMsgUnmarshaler) Select the message content extractor from the drop-down list. For the editable properties, the Edit link is displayed. The Edit link enables you to edit properties for user-defined processors.
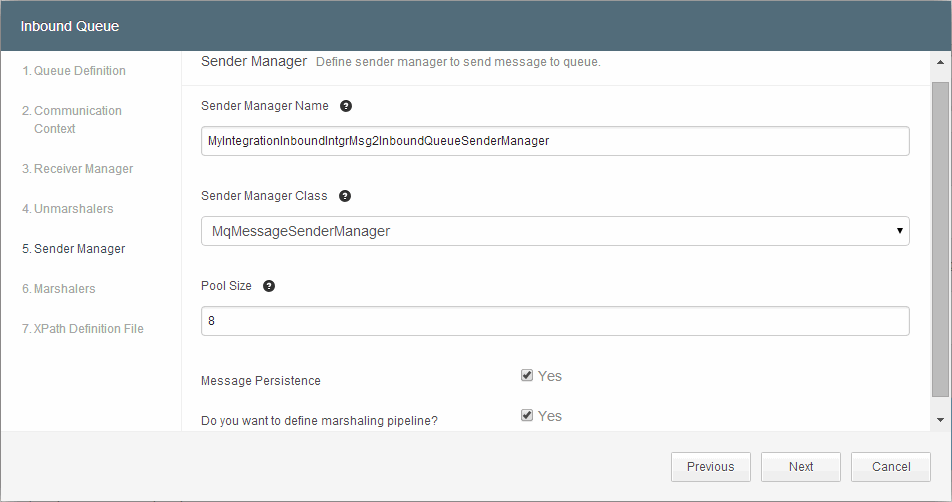
  1. In the Sender Manager step, you can define a sender manager to send messages to the application.

    The following table describes how to define the sender manager:

Inbound Queue - Sender Manager
Field Name Description
Sender Manager Name The sender manager’s name is automatically generated using the logical queue name. You can edit the name. For example: MYIntegrationInboundIntgrMsgInboundQueueSenderManager.
Sender Manager Class Select the sender manager class. The available options are MqMessageSenderManager or MqDynamicallyFilteredMessageSenderManager.

It is recommended to use the system-generated name whenever possible, unless you want to define selectors for some messages.

Pool Size Determines how many messages from the new queue can be processed in parallel. The default value is 8.
Message Persistence By default, the check box is selected.
Do you want to define marshaling pipeline? Select the check box to override the existing marshaling pipeline before sending the message to the application for further processing.

  1. Click Next to continue.

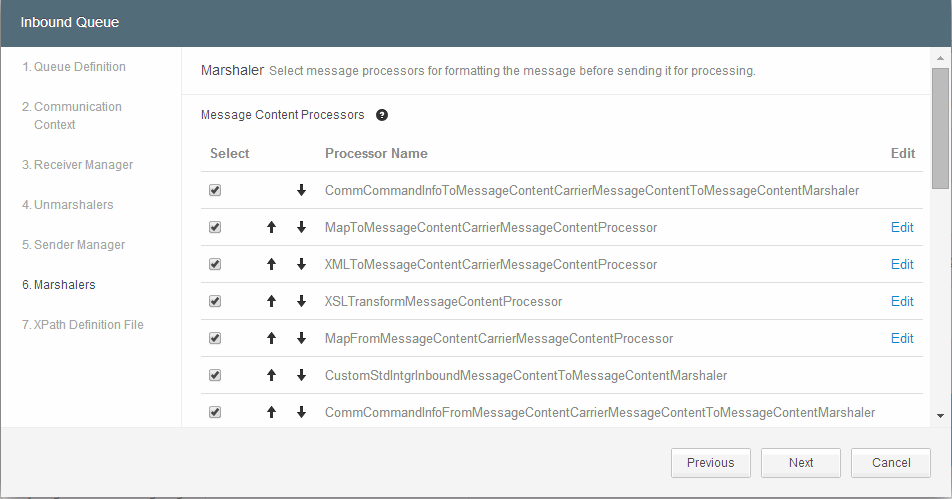
    The Marshler step is displayed if you have selected the Do you want to define marshaling pipeline? check box in the Sender Manager step.

    By default, some of the message processors are selected and ordered in a particular sequence based on the marshaling pipeline: CommStandardInboundIntgrMsgMsgIOProcess. You can edit the message content processor properties.

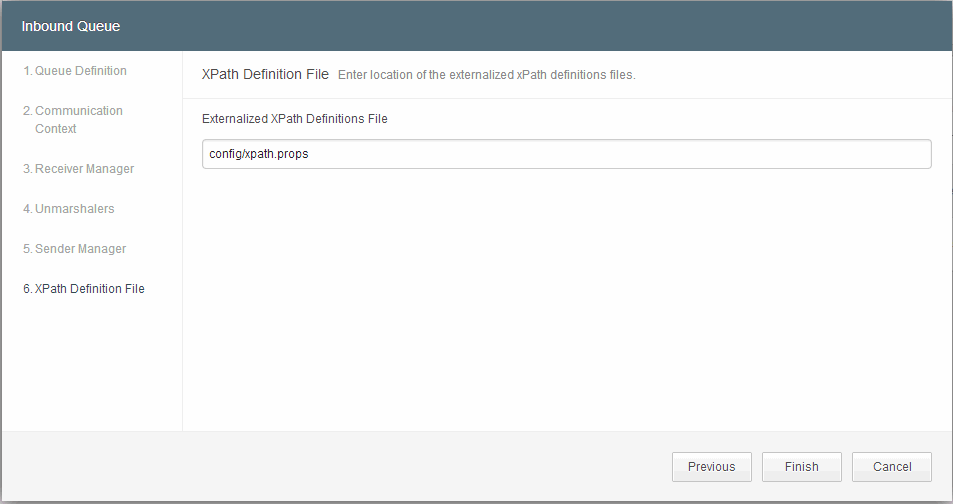
    1. In the XPath Definition File step, you can enter the location of the XPath definitions file.

      This location should be relative to $MQ_HOME. The default xpath.props file is located at $MQ_HOME/config/xpath.props.

      The XPath definition file includes the externalized list of XPaths used in the common messaging handler. This file provides flexibility to use XPath according to your requirements. You can define the XPath related to the payloadPackagingScheme. The XPath definition file contains various XPaths that are used to extract the information needed for the response handler.

      While defining a new payloadPackagingScheme if the message is not mLXML or GDSN standard, you can provide the following list of XPaths in the XPath definition file:

      Inbound Queue - XPaths for MDM
      XPath Name Description
      XPATH_RECEIVER_DOMAIN_VALUE Receiver GLN
      XPATH_SENDER_DOMAIN_VALUE Sender GLN.
      XPATH_PAYLOADID message Identification
      XPATH_RESPONSE_MESSAGEID Message ID
      XPATH_EANUCC_MESSAGEID Message ID
      XPATH_RESPONSE_NODE Response Node
      XPATH_CIN_NODE Catalogue Item Notification Node
      XPATH_TRANSACTION_NODES Marketplace Profiles
      XPATH_GTIN The GTIN path is used as a part of the REGISTRATIONKEYS. It identifies the records that are currently used in a workflow. As a result, these records get queued.
      XPATH_SUPPLIER_DOMAIN_VALUE The Supplier GLN is used as a part of the REGISTRATIONKEYS. It identifies the records currently used in a workflow. As a result, these records get queued.
      XPATH_TARGET_MARKET The Market place ID used as a part of the REGISTRATIONKEYS. It identifies the records currently used in a workflow. As a result, these records get queued.
      XPATH_CREATIONDATE The creation date is used as registration order. This date is used in sequencing.
      XPATH_DOMAIN_TYPE  

      In addition, you can provide the following list of XPaths for GDSN:

      Inbound Queue - XPaths for GDSN
      XPath Name Description
      XPATH_EANUCC_TRANSACTIONLIST  
      XPATH_EANUCC_COMMANDLIST  
      XPATH_CIC_CONTENT_OWNERS  
      XPATH_CIC_CONTENT_OWNERS_PER_TXN  
  2. Click Finish.

    A new category is created at the cluster level under Queue Setup > Queue Definition. An inbound queue is created under this category. The name of the queue is based on the specified logical name, for example, MyIntegrationInboundIntgrMsg. If a message processing pipeline is defined while creating an inbound queue, the queue name is suffixed with Sender, for example, MyIntegrationInboundIntgrMsg_Sender.