Using the All Company Profiles screen, if you are the super user, you can create a company. Specify the name and an internal name for the company. You must also specify whether it is Datapool, a Supplier, or a Retailer type of company.
Procedure
Login to TIBCO MDM as the super user, tadmin.
Click
Administration > All Company Profiles. This opens the All Company Profiles screen.
Click
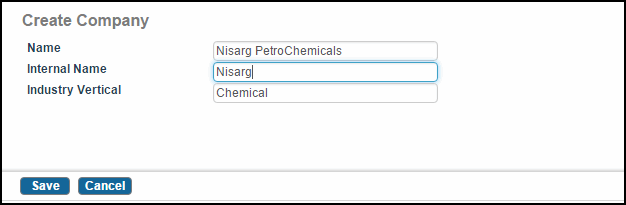
Create. This opens the Create Company screen.
Specify the
Name of the company (MyCompany in this example). This is the name that will be specified in the Company Name field on the Login screen. You can modify the Company Name later.
Note: You can specify the company name in mixed case. However, when the user logs on to the application the company name is matched without case sensitivity.
Specify an
Internal Name (such as CorpA). The internal name is used to create a directory; it should contain only English characters and must follow the directory naming conventions of the operating system on which the application is installed. This name is for internal reference only and cannot be modified. The internal names that are reserved are: TIBCOCIM, TIBCO, VELOSEL, STANDARD, 1SYNC, 1SYNCTEST, VTEST, WWRE.
Note: You must use ASCII characters for company internal names. If these names include non-ASCII characters, copying the files from Windows to UNIX or Linux and vice versa may result in corruption of filenames.
Specify the
Industry Vertical
name, that is the type of the company. For example, for the GDSN edition, you can specify Retailer, Supplier, or a Datapool.
Click
Save to create the company
MyCompany.
Verify whether the company has been successfully created by ensuring that the name is displayed on the
All Company Profiles screen. Now, create at least one admin user for the created company. This user can be used to configure this company.
Note: You must assign the Administrator role to the admin user.