Specifying the Columns to Display in Event Lists

The columns that display by default in event lists represent the attributes that are common to all event types. However, you can customize event lists to display the required columns.

Procedure

  1. Click Select Columns from the event list View menu. The Column Selector dialog is displayed.

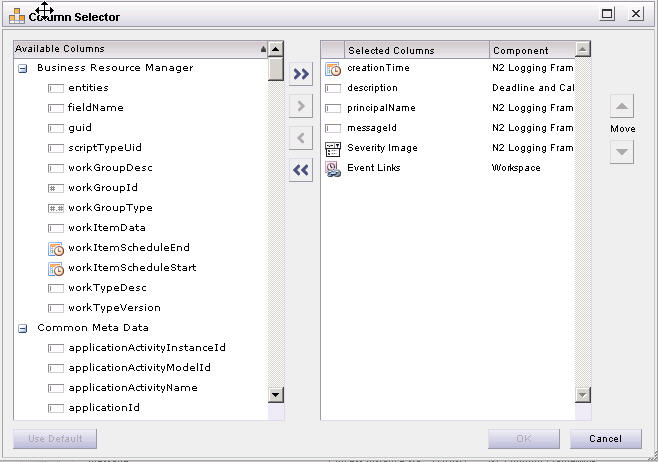
    The Column Selector lists the available columns/attributes in a tree structure categorized by the components that write values to the attributes. You can expand or collapse the list below each component name, as needed, by clicking on the + or - icon to the left of the component name.

    Use the Column Selector to choose which columns to display among the available columns. Note that when you customize columns for an event list, it applies only to that particular event list, not to any of the others. Customized columns for an event list are persisted, however, i.e., they will stay customized for that specific event list until you change them again with the Column Selector, or manually. Also, note that persisted settings are saved on the server, so if you log onto a different machine, those settings will be in effect on that machine also.

    As mentioned above, the default out-of-the-box columns in the event list are those that are common to all event types. However, you can specify a new default by clicking Set as Default Columns from the event list View menu.

  2. Select the required columns, using the following actions:
    • Individual columns can be selected by clicking on the required name.
    • Multiple columns can be selected by holding down the Ctrl key while clicking on the required names.
    • A group of columns can be selected by clicking on one name, then holding down the Shift key and clicking on the last name in the required group.
  3. Move columns to the required list in the Column Selector:
    • Columns can be moved back and forth between lists by selecting the required column(s), then clicking the “>” or “<“ buttons.
    • An individual column can be moved from one list to the other by double-clicking on the column name.
    • Columns can also be moved from one list to the other by using a “drag and drop” method — click on the required column name (or group of selected column names), and while holding the mouse button, drag them to the required list and release the mouse button.
    • All columns can be moved from one list to the other by clicking on the “>>” or “<<“ buttons.

      You can also change the columns to the current default for that list type by clicking the Use Default button.

  4. Once the columns you want displayed are shown in the list on the right, you can change the order in which they will appear on the list by doing one of the following:
    • Using the Order buttons. Click on the column whose order you would like to change, then click on the Order button to move the column up or down in the list.
    • Using the drag and drop method. Click on a column and drag it to the required location in the list.
  5. Click OK when the list on the right contains the columns you would like displayed, in the order you would like them displayed.

    The list is displayed with the chosen columns.