Updating Forms with the Synchronization Wizard
If the set of task parameters changes after a form has already been created, you can use the Synchronize Form wizard to update the set of form parameters, controls, and bindings in the linked form. Likewise, if a change is made in the business object model that impacts the form (for instance, if an attribute is added to a class that defines a type on the form), the synchronization wizard will update the form appropriately.
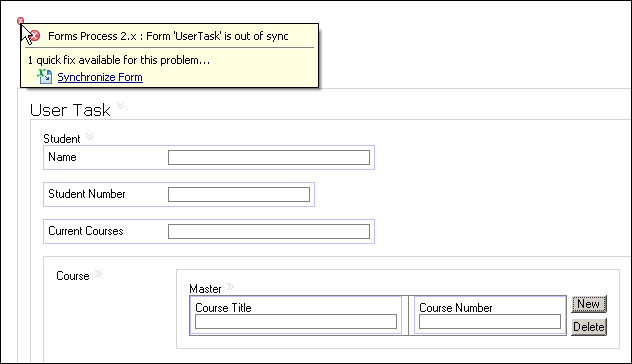
When a form needs to be synchronized, a problem marker appears on the form in the Form Designer, usually near the element that is out of sync, as well as in the Properties and Content Outline views. Mouse over the problem marker on the form to see a tool tip containing a description of the problem and a link to launch the synchronizer, as shown in Problem Marker: Form out of sync.
You can also use the ![]() button available in the Project Explorer view, Outline view, and Properties view. When the problem markers are in scope for the active view’s input, this action is visible and can be clicked to inspect the markers and execute quick fixes.
button available in the Project Explorer view, Outline view, and Properties view. When the problem markers are in scope for the active view’s input, this action is visible and can be clicked to inspect the markers and execute quick fixes.
On clicking the ![]() button, two hyperlinks are available:
button, two hyperlinks are available:
- The marker link (opens the offending resource in its appropriate editor)
- The quick fix link (opens the Quick Fix wizard)
If there are multiple markers, the tooltip window displays left and right arrow buttons to navigate the markers. If a marker issue has multiple quick fixes, they are all listed in the lower section.
Options for Synchronization
If multiple problem markers are associated with selected element on the form, the tool tip includes left and right arrows for navigating through them. Also, in the case of multiple synchronization problems, the tool tip can present different quick fixes for handling the problems.
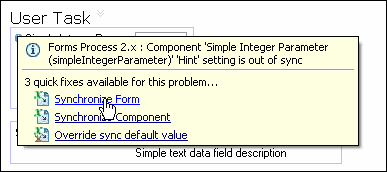
The first two quick fixes are: choose to synchronize the entire form, or synchronize just the component whose problem marker was used to launch the wizard. In the latter case, although fixes for all out-of-sync components will be displayed, only the component whose problem marker you "moused over" will have the checkboxes checked for its available synchronization actions, that is, selected for updating by the wizard.
There is a third option when multiple components are out of sync. You can choose to override the sync default value, that is, to leave the form as it is (perhaps because the problem is minor or because you intend to fix the user task parameter, instead, to bring the user task and the form into sync). This option will cause the wizard to ignore the suggested fix or fixes and remove the problem marker for the component whose marker was used to launch the wizard.
Synchronization Quick Fixes shows an example of three possible synchronization quick fixes presented by the tool tip: synchronize form, synchronize component, and override sync default value.
Click the desired link in the tool tip to launch the Synchronize Form wizard.
To launch the wizard directly, without using a tool tip, right-click the user task, and click . The menu for launching the wizard is shown in GUID-F42DD98A-A17F-4D9F-9E19-B52F7E369F04.html#GUID-F42DD98A-A17F-4D9F-9E19-B52F7E369F04__ID-149-0000055C.
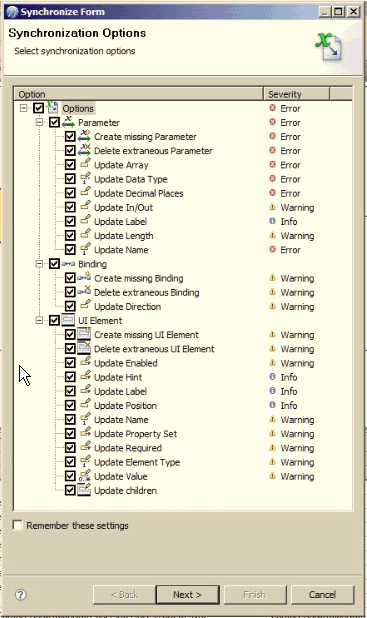
The first screen of the wizard, shown in First Page of Synchronization Wizard, presents a list of all the possible conditions on which the wizard can check and report, and, in each case, the severity associated with the item being out of sync. Normally, all of the checkboxes can be left checked.

If you check the Remember these setting checkbox, the synchronization options wizard will not start on page one in the future, Synchronization Options, but will take you straight to page two, Synchronization Actions. From page two, you can still reach page one by clicking the Back button.
Click Next to advance to the Synchronization Summary page, which displays the changes that can be made, such as parameters to be added, modified, or removed from the form. Clicking the Expand All (+) or Collapse All (-) button on this page will expand or collapse the list of actions displayed. The checkboxes enable you to select the actions the wizard will perform when you click the Finish button.
Actions performed by the wizard will respond to the Undo and Redo commands invoked on the Edit menu. Note that if a synchronization fix is undone, recreating the out-of-sync condition, the problem marker may not be displayed again until the synchronization wizard is invoked again.
Synchronization Wizard Preferences
The list of conditions that are checked by the wizard (shown on the wizard’s first page), and the severity level indicated by the problem marker icon (and displayed in the tool tip) for each item, can be modified by editing the Synchronization Options. In the menu bar, click to view and edit the synchronization settings. You can also click to open the dialog and check or uncheck the checkboxes to remove or add an item to the list of items that will be checked when the wizard is run. Click the severity for an item to display an option list for selecting a different severity. In most cases, the default severity choices are suitable.
You can also click to view descriptions of the items that can be synchronized by the wizard, and view or edit the setting for the severity associated with an out-of-sync condition for each item.
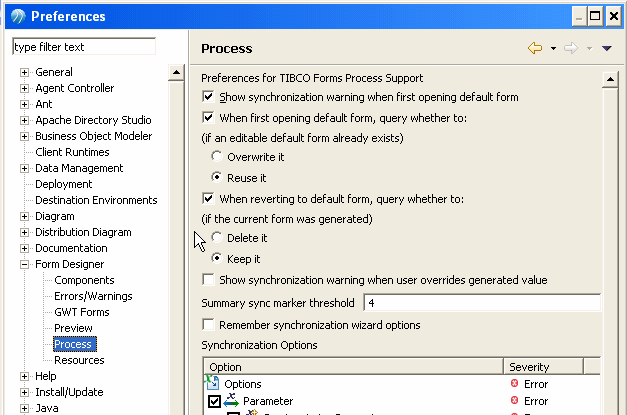
There are additional preferences affecting synchronization that can be edited in the Process dialog (), shown in Preferences for TIBCO Forms Process Support.
Most of the settings here are self-explanatory. The Summary sync marker threshold setting deserves mention, however. This is the number of sync markers on the form above which individual problem markers are not shown. By default, the threshold is 4. Change this setting by typing the desired number in the text field. If the number of sync markers on the form are above the Summary sync marker threshold value, only one summary marker reading "Form <form name> is out of sync," will be displayed.
If you check the Remember synchronization wizard options checkbox, the wizard will not start on page one in the future, Synchronization Options, but will take you straight to page two, Synchronization Actions. From page two, you can still reach page one by clicking the Back button.


