Determining Which Resources to Include
The Organization Browser constructs a list of potential resources.
It does this in the following way:
- It starts with a list of potential resources from the primary LDAP source (that satisfy the specified query string).
- An attempt is made to match those potential resources with entries in each secondary resource. If an exact match is found in every secondary LDAP source, the data from the secondary sources is merged in with the data from the primary source.
If a potential resource is not found inside one or more of the secondary LDAP sources, the potential resource is eliminated from the list.
If matches are found in every secondary LDAP source, they must uniquely identify only one LDAP entry in each source. If one or more match multiple items, the item remains in the potential resources list but is marked as invalid.
As an example, suppose you have two LDAP sources: Acme-Employees and Acme-Developers. The Acme-Employees LDAP source includes sales and support resources, as well as developers. The Acme-Developers LDAP source includes Acme employees who are developers, as well as developer contractors who are not Acme employees. If you want the list of potential resources to include all Acme employees that are developers, and the business process needs attribute data from both LDAP sources, you would add both sources to one container, using filter criteria to filter out all resources other than Acme developers.
Conversely, if the attribute data needed by the business process is available in one of the LDAP sources, it is much more efficient to include only the one LDAP source in the container.
Procedure
-
In the left pane, under the
LDAP Containers header, select the LDAP container to which you want to add a secondary LDAP source, then click the
 icon (or the
Edit LDAP Container selection on the
Tools menu). The
Container Definition
dialog is displayed:
icon (or the
Edit LDAP Container selection on the
Tools menu). The
Container Definition
dialog is displayed:
-
Click the
 icon (or select
New LDAP Source
from the
Tools menu) to display the
Define LDAP Source dialog.
Note: After an LDAP container is created, and resources have been created in that container, you cannot delete or change the secondary LDAP sources defined for that container, nor add additional secondary LDAP sources to the container. (The only exception is that you can change the value of the Resource Name Attribute for an existing LDAP source.)
icon (or select
New LDAP Source
from the
Tools menu) to display the
Define LDAP Source dialog.
Note: After an LDAP container is created, and resources have been created in that container, you cannot delete or change the secondary LDAP sources defined for that container, nor add additional secondary LDAP sources to the container. (The only exception is that you can change the value of the Resource Name Attribute for an existing LDAP source.) - Optionally, in the Search Base field, enter the branch (e.g., an organization unit) in which you would like to limit the search in the LDAP tree structure. This increases the efficiency of the search if the LDAP contains a large number of branches.
-
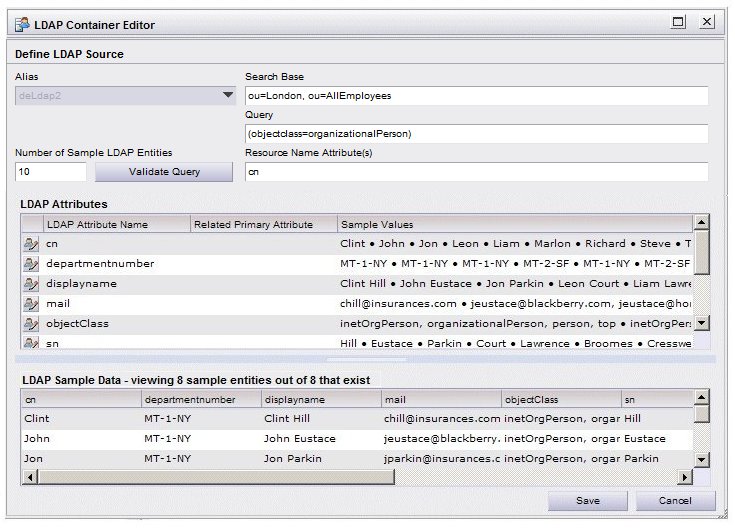
Click the
Validate Query button. This causes a list of resources to be returned that satisfy the query specified on the
Define LDAP Source dialog. For example:
Notice that on this dialog, the LDAP Attributes section has a Related Primary Attribute column — this column did not appear when you defined the primary LDAP source — it is displayed only when you are defining secondary LDAP sources. The Related Primary Attribute column is used to specify which attributes you want to compare to determine if the resource from the secondary LDAP source should be included in the list of potential resources. This is explained in more detail in later steps.
Note: If there are LDAP attributes that contain binary data, those attributes may or may not be included in the list of LDAP attributes, depending on the setting of the getBinaryLDAPAttributes parameter in the WCC configuration file (config.xml). For information about this parameter, see the TIBCO Workspace Configuration and Customization guide. -
At this point, you need to make a determination which attributes in the secondary LDAP source will be compared to attributes in the primary LDAP source.
The goal of comparing secondary / primary attributes is to ensure that data from the secondary LDAP source is only merged together with the appropriate potential resource from the primary LDAP source.
Where a match cannot be found, or where it is not one-to-one, the potential resource will not have a complete, accurate set of information, and it will be either omitted (where no match is found) or marked as invalid (where the match isn't one-to-one).
For example, if there are several resources with the same last name, you need to check more than just the last name; maybe checking first name too will be enough, or maybe you need to check more attributes (because there may be multiple resources in the secondary LDAP source with the same first and last name — it would not know which to include). Maybe there are other types of data, such as an employee ID that would work better and would avoid inconsistencies in data entry (typos, nicknames, abbreviations, etc.).
You may need to also go back and view the data in the attributes in the primary LDAP source — from the Container Definition dialog, select the primary LDAP source, click the Edit LDAP Source icon (
 ), then click the
Validate Query
button.
), then click the
Validate Query
button.
For this example, we know that the “ou” attribute in the primary LDAP source contains the complete name of the resources (Clint Hill, John Eustace, etc.), the “displayname” attribute in the secondary LDAP source contains the same information. So those attributes would be prime candidates to link in the Related Primary Attribute column.
Note: If you choose attributes that contain names, always be aware that there may be differences in the way those names were entered in the different LDAP sources, for example, Bob vs. Robert, Mike vs. Michael, or simple misspellings. Things like employee numbers tend to make good attributes to link. - In the row for the LDAP attribute you want to relate to the primary source LDAP attribute, click in the Related Primary Attribute column.
- Click in the empty field that is exposed when you click in the column. This displays a list of the attributes available in the primary LDAP source:
- Select the desired attribute from the list. For this example, we will select “ou”:
- When you are finished linking attributes, click Save.
- In the left pane, select the container you just created.
-
From the
Tools menu on the resource list, select
Include Invalid Resources In List.
This causes the following icon to be shown for any resources for which it was unable to find an exact match in the secondary LDAP source, based on the attributes you specified to link the primary and secondary LDAP sources.

If this icon is shown, it means there are multiple resources in the secondary LDAP source that match the attributes you linked.
For example, let’s say you linked only the “sn” attribute from both sources, which contains the resource’s last name in both sources, and the following is displayed when you select Include Invalid Resources In List.

This means that Tony Pulis exists in the primary LDAP source, but there is more than one resource in the secondary LDAP source where the “sn” attribute contains the value “Pulis”.
In this example, you would probably need to specify another attribute in the Related Primary Attribute column (see step 9) to make the relationship more specific.
If you are not getting the resources you expect, you may also find that data needs to be cleaned up in one or more of the LDAP source because of misspellings, etc.
Also note that once resources are either created or mapped to a group or position, the resource icon is no longer grayed out:
Resource has been created or mapped to a group or position. Resource has not yet been created or mapped. For information about mapping and creating resources, see Mapping Resources and Creating Resources.