You can replace the embedded data in the BPM visualizations in the BPM Spotfire analysis file with new data from the BPM database using the information link. This enables you to update the visualizations with current data. You can only update one table at a time so you need to repeat these steps for each table you want to update.
Note: The new data must be structured in the same way as the tables in the existing visualization.
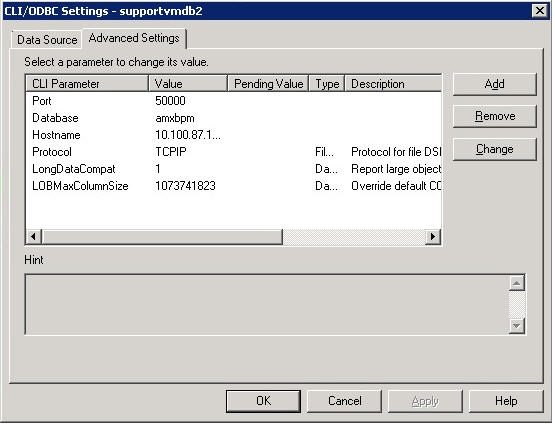
Warning: (Only applies if you are using DB2) The
ec_wi_status table contains columns of type clob. However, the DB2 ODBC Driver does not support clobs. Therefore, you must set the following CLI Parameter values on the
Advanced Settings tab of the
DB2 CLI/ODBC Driver Settings dialog to replace data in the
ec_wi_status table:
LongDataCompat=1
LOBMaxColumnSize=1073741823
Procedure
Create an information link in Spotfire.
Click
Tools > Information Designer.
The Information Designer window is displayed.
In the Information Designer window select
New > Datasource.
In the new datasource, populate the database connection details based on your database and save the datasource.
Locate the EC Table in the created datasource, select either ec_pe_status (for process instance data) or
ec_wi_status (for work item data). Right-click the table and select
Create Default Information Model. Click
OK on all the subsequent screens.
The information link for the table is created.
Repeat the step above for the other table.
From your TIBCO Spotfire Client, open the
TIBCO AMX BPM Template EMBEDDED.dxp file.
Click
File
> Replace Data Table..., then on the
Replace Data Table - Select Data Table dialog select either:
WI STATUS IL to replace work item data
PE STATUS IL to replace process instance data
You must now add a Transformation to transform any currency values to the correct type. The next steps depend on the database you are using.
For Oracle/MSSQL:
Select
Show transformations.
Select
Add.
Select
ATTRIBUTE16 in
Available columns.
From the New data type drop-down list, select
Real. In the
Preview pane, you will see that the data type for the columns have changed to
Real.
Select the first column in the list of
Available Columns that has a data type of
Currency.
From the
New data type drop-down list, select
Long Integer. In the preview pane, you will see that the data type for the column you selected has changed to
Long Integer.
Repeat this step for all columns with a data type of
Currency.
For DB2:
Select
Show transformations.
Select
Add.
Select
ATTRIBUTE5 in
Available columns.
From the New data type drop-down list, select
Real. In the
Preview pane, you will see that the data type for the columns have changed to
Real.
Click
Show transformations. The transformations part of the dialog displays.
From the
Transformations drop-down list, select
Change data types.
Click
Add. The
Change Data Types dialog displays. The
Change Data Types dialog displays the columns that make up the table.
Click the
Select drop-down icon, select the information link created for the table and click
OK.
The data is then reloaded from the database connection.
Open the visualizations to check that the data has been updated.
Note: You can only update one table at a time so you need to repeat these steps each time you want to update a table with new data.
Click
File > Save As to save your updated table to a new
.dxp file.
Note: You could save the new
.dxp file to a shared location so that all teams can have access to the new updated template.
The
Save dialog is displayed.
Click
Override these settings and embed all data.
Click
OK to close the dialog.
On the
Save Document As
, browse to the location where you want to save your new .dxp file.
In the
File name:
box, type in the name of your new
.dxp file and click
OK to close the dialog.