Defining the Primary LDAP Source
Each LDAP container must contain a primary LDAP source — all resources from the primary LDAP source (subject to a filter query) are included in the list of potential resources for use in the BPM application.
Procedure
-
Open the Organization Browser (see
Accessing the Organization Browser).
When you start the Organization Browser, it reads the organization model from the Directory Engine and displays a graphical representation of it in the left pane of the Organization Browser.
If any LDAP containers had previously been defined, they will be listed under the LDAP Containers heading at the bottom of the left pane:
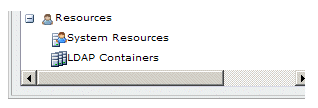
The first time you display the Organization Browser, there will not be any containers listed (as in the example above).
Note: After you’ve defined a container, you can edit it by selecting the container in the list, then clicking the icon (or the
Edit LDAP Container selection on the
Tools menu). You can generally follow the same steps in this section to edit an existing LDAP container.
However, if the existing LDAP container contains resources, the LDAP sources for that container are fixed; you cannot delete or change the primary or secondary LDAP sources, nor add additional secondary LDAP sources.
Also note that if an LDAP source defined in an LDAP container is currently offline, you cannot edit the container until the LDAP source is back online.
-
Click the
 icon (or select
New LDAP Container from the
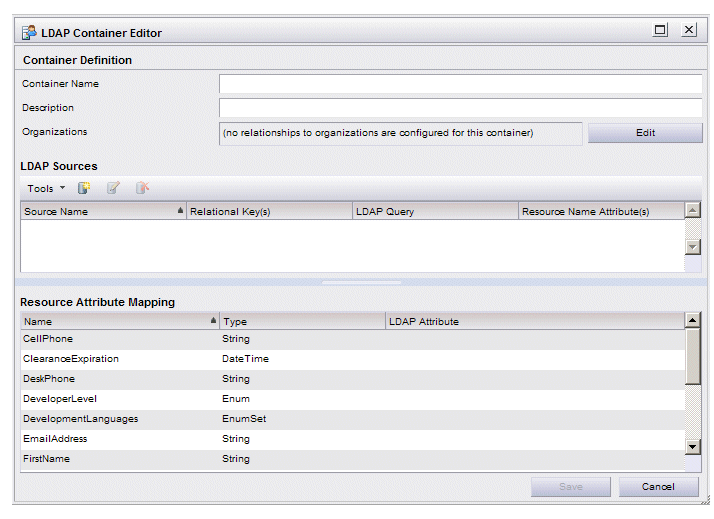
Tools menu). The following dialog is displayed:
- Enter a name and description for the new container in the Container Name and Description fields.
-
If desired, you can now specify organization relationships for the new container (note that this is applicable only if there are multiple organizations in your organization model).
If the container has a relationship with an organization, resources in the container will be able to see that organization in the Organization Browser, as well as organizations that do not have an explicit relationship with a container. Resources can be mapped to positions in organizations that the user can see in the Organization Browser.
For more information about organization relationships, see Container Organization Relationships.
If you are not specifying organization relationships for this container, proceed to step 5.
To specify organization relationships:
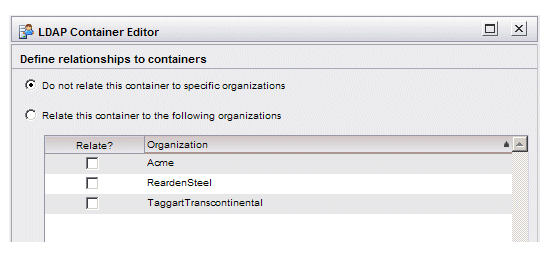
- Click the Edit button to the right of the Organizations field.
-
Check the appropriate boxes for the organizations you want the new container to have a relationship.
Checking a box causes the Relate this container to the following organizations option to automatically be selected.
Selecting the Do not relate this container to specific organizations option causes all check boxes to become unchecked.
- Click Save.
-
Click the
 icon (or select
New LDAP Source
from the
Tools menu) to display the
Define LDAP Source
dialog.
The Define LDAP Source dialog is used to select the primary LDAP source from which resources will be obtained, as well as to provide query information so that you can limit the number of resources returned from the LDAP Server.
-
From the
Alias field drop-down list, select the LDAP source from which you want to obtain resources.
The names in the Alias drop-down list are user-readable names that an administrator has assigned to each of the LDAP Servers available in the enterprise.
-
Optionally, in the
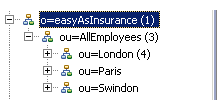
Search Base field, enter the branch (e.g., an organization unit) in which you would like to limit the search in the LDAP tree structure. This increases the efficiency of the search if the LDAP contains a large number of branches.
The search base must provide the complete path to the desired branch in the LDAP tree structure. For example (this illustration is from an external application that shows the LDAP source), if you want to limit the search to the “London” organization unit in the following LDAP source ...
-
In the
Query field, enter a filter string that will be used to determine which of the resources to return from the LDAP source. This allows you to limit the resources returned. For example, you may only be interested in considering resources from a specific department or region.
It may be helpful to click the Validate Query button at this point, which causes the LDAP Attributes and LDAP Sample Data sections to be displayed and populated with entries from the LDAP source. You can use the information in the LDAP Attributes and LDAP Sample Data sections to see the attributes that are in your chosen LDAP source, as well as the values stored in those attributes.
Note: Note that if you are using the Safari browser, and the connection to the LDAP is slow, the browser may timeout if the request for sample data takes longer than 10 seconds. To work around this issue, use one of the other supported browsers.Note, however, before clicking the Validate Query button, you may want to change the default query string of “cn=*” (assuming you know the attributes available in the LDAP). The “cn=*” query string causes all records to be returned whose cn attribute contain a value. That query string may not be appropriate for your LDAP source.
Query strings must be enclosed in parentheses. This allows you to specify multiple strings, each one enclosed in its own parentheses (see the examples below).
You can use the following special characters with query strings:
Special Character Meaning * Wild card character. Matches zero or more of any character. & Logical AND. Returns resources that satisfy the first string AND the second string. Place this special character to the left of the first query string, then enclose the entire expression in parentheses, as follows:
(&(string1)(string2))
| Logical OR. Returns resources that satisfy the first string OR the second string. Place this special character to the left of the first query string, then enclose the entire expression in parentheses, as follows:
(|(string1)(string2))
! NOT. This means that you want all resources that do NOT match the specified value. Place this special character to the left of the query string to which it applies, inside of the parentheses:
(!(string))
Also note that queries are not case sensitive.
The following are some examples.
- The following query returns all resources that have
sn attribute values beginning with “s”:
(sn=s*)
- The following query returns all resources that have
sn
attribute values beginning with “s”
or “p”:
(|(sn=s*)(sn=p*))
- The following query returns all resources with
carlicense attribute values equal to “Full”
and
employeetype attribute values equal to “Permanent”:
(&(carlicense=Full)(employeetype=Permanent))
- The following query returns all resources where
sn
attribute values
don’t
start with “s” and
don’t start with “p”:
(&(!(sn=s*))(!(sn=p*)))
Note: Depending on the specific LDAP Server being used, the query syntax can vary. If the syntax described above does not return the expected results, consult the documentation for your LDAP Server.Note that the values in a particular LDAP attribute may not be consistent across different LDAP Servers.
- The following query returns all resources that have
sn attribute values beginning with “s”:
-
In the
Resource Name Attribute(s)
field, enter one or more LDAP attributes by which you want the resources to be displayed in the list of potential resources. This is significant for a couple of reasons:
- These are the names by which the user must log into the BPM application.
- These are the names by which the resources will be listed (in the Resource Name column) when mapping resources to groups and/or positions in the organization model. That is, they must be names that the user doing the mapping can use to uniquely identify the resources. For example, you probably wouldn’t want to use only “sn” (surname), as that may not be unique among all of the resources.
The default resource attribute is “cn”, which typically contains a full name. But depending on the data in the LDAP source, there may be more suitable attributes for this use.
You can specify multiple attributes in the Resource Name Attribute(s) field. For instance, you could enter “givenname sn” to display the resource’s first name and last name (again, depending on what is stored in those attributes on the chosen LDAP source).
Once you save the LDAP Container you will be able to view the list of resources for the container. For the LDAP entities you see in that list that have not yet been “created”, the resource name will be constructed based on the Resource Name Attribute(s).
When a resource is created, either using the Resource Editor or from the main Organization Browser window, you are given the opportunity to edit the constructed resource name.
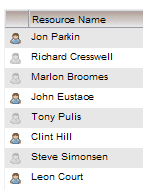
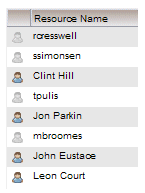
It is possible to change the Resource Name Attribute(s) setting for the container, but that will not affect the resource name of existing resources. It will, however, change the name that is constructed for the remaining LDAP entries that are not yet resources. For instance, using the example shown above, if we change the value in Resource Name Attribute(s) to “uid” (which contains the resource’s first initial and last name), the Resource Names now appear as shown below in the list of potential resources.
-
In the
Number of Sample LDAP Entities field, enter the number of resources you would like returned in the sample data. This has no bearing on the number of resources returned in the list of potential resources — it only limits the number returned to this dialog so you can view the data stored in each of the attributes.
Note, however, if you make this a very large number, it can have an impact on how long it takes to display the sample data in the LDAP Attributes and LDAP Sample Data sections.
The number of samples defaults to 10.
-
Click the
Validate Query button. This causes a list of resources to be returned that satisfy the query specified on the
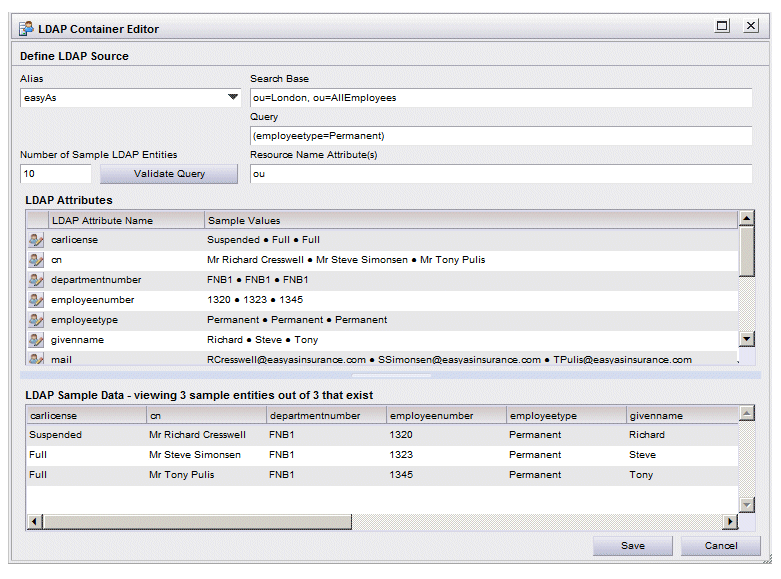
Define LDAP Source dialog. For example:
In this example, the query took place only in the “AllEmployees / London” branch in the “easyAs” LDAP source. It returned only resources whose employeetype attribute equals “Permanent”, and it set the resource name to the value in the ou attribute.
The LDAP Attributes and LDAP Sample Data sections list all of the attributes available in the records that were returned, including some sample values from those attributes.
Note: If there are LDAP attributes that contain binary data, those attributes may or may not be included in the list of LDAP attributes, depending on the setting of the getBinaryLDAPAttributes parameter in the WCC configuration file (config.xml). For information about this parameter, see the TIBCO Workspace Configuration and Customization guide.Note: If you are using the Safari browser, and the connection to the LDAP is slow, the browser may timeout if the request for sample data takes longer than 10 seconds. To work around this issue, use one of the other supported browsers.The title of the LDAP Sample Data section also includes the number of entities that were returned in the sample data. Note that this number may be less than the value in the Number of Sample LDAP Entities field, as fewer entities may have satisfied the search criteria.
If the validation fails because the query syntax is invalid, or there is another issue, an exception dialog is displayed. You will need to correct the problem, then validate again (i.e., click Validate Query again).
Note that if you change any of the query values — alias, search base, or query string — the lists on the bottom of the dialog are removed until you re-validate.
You can also click the Validate Query button at any time to refresh the sample data in the LDAP Attributes and LDAP Sample Data sections.
Note: LDAP attributes can be defined to store a sequence of values where the order is always preserved. A multi-line mailing address is one example of this. For storage, LDAP combines the data into one block of text with delimiters between the values. The dollar symbol is commonly used as a delimiter.Tools that are used to maintain the LDAP may display this type of multi-line, delimited data in a different manner. For example, it might substitute each delimiter with a comma and a space. For editing, it may display the information in a multi-line text area, with each value on a separate line.
If attributes in your LDAP contain this type of multi-line, delimited data, when that data is viewed on the Define LDAP Source dialog, it is shown separated by the delimiters stored in the LDAP source (i.e., the delimiters are not substituted with other characters). For example:
- Optionally modify the resource name (i.e., the value in the Resource Name Attribute(s) field) using the buttons to the left of the attributes in the list of LDAP attributes. To do this, click the button to the left of the desired LDAP attribute name:
-
When you are satisfied with the entries in the fields on the
Define LDAP Source dialog, click the
Save button. This returns you to the
Container Definition dialog.
Note that if you return to the Define LDAP Source dialog by clicking the
 icon (or the
Edit LDAP Source
selection on the
Tools menu) on the
Container Definition dialog, the
Alias field is now disabled.

Once you’ve defined the LDAP source for the chosen LDAP container, you cannot change it from the Define LDAP Source dialog — you can only change the search base, the query, or the display attributes.
If you want to use a different LDAP source for the container, you must delete the LDAP source from the Container Definition dialog, then define a new LDAP source for the container (or just define another container containing the desired LDAP source(s)).
Once the primary source is saved, the search base, if specified, is shown in the LDAP Query column with the specified query, as follows:

- From the Container Definition dialog, click the Save button. This saves the container definition you’ve set up.
-
In the left pane on the Organization Browser, select the newly created LDAP container in the
LDAP Containers section.
The upper-right pane of the Organization Browser is now populated with the list of potential resources.
You can now do one of the following:
- add one or more secondary LDAP sources to your container - see Defining One or More Secondary LDAP Sources.
- map resources to groups/positions - see Mapping Resources.
- map resource attributes - see Mapping Resource Attributes.
- create resources - see Creating Resources.

