Creating a Supervised Work View Using the Wizard
Supervised work views can be created using a wizard.
Procedure
- Click the Supervised Work folder in the work view list.
-
Click the
Create New View button (
 ) on the work view list menu bar (or select
New from the
Tools
menu).
-
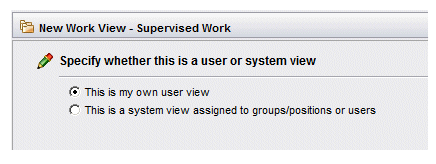
Choose the type of work view to create by selecting the appropriate option:
- A
user view is one that you create to list work items filtered and sorted as desired.
If you are creating a user view, select This is my own user view, then click Next.
- A
system view is one that is automatically available to specified users, or to users that have been assigned to specific groups or positions.
Creating a system view is typically a supervisory or administrative function. Therefore, the discussion of creating a system view is provided in a separate section of the documentation.
If you are creating a system view, select This is a system view assigned to groups/positions or users, which causes additional items to be displayed on the dialog. Refer to the information in System Views to complete that dialog, then return to this step to complete the creation of the work view.
- A
user view is one that you create to list work items filtered and sorted as desired.
- On the next dialog, enter the desired name for the supervised work view in the Name field and an optional description in the Description field(1).
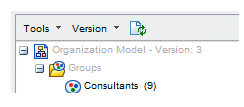
- Ensure that the appropriate organization model version is selected. This is shown in the first row of the organization model (Version 3 in the following example):
-
In the
Select Work List for View section, choose the type of work items that are to appear in the supervised work view, as follows:
- Offered Work Items for an Organizational Entity - This causes the supervised work view to contain only work items that were sent directly to the selected organizational entity(2), and that still have a state of Offered.
- Allocated Work Items for an Organizational Entity - This causes the supervised work view to contain only work items that were originally sent directly to the selected organizational entity,1 but have since been allocated to a specific resource (their state = Allocated). Note that when viewing this type of supervised work view, it does not show you to whom the work item has been allocated. However, you can easily determine that by selecting a work item, then selecting Open Event Viewer > This Work Item. The allocation event shows to whom the work item was allocated (in the Resource name attribute). The Description column also shows that information if it has not been changed from the default.
- Work Items for a Resource - This causes the supervised work view to contain work items that are currently in the Inbox of a specified resource, offered and allocated.
If the message “Insufficient rights to view the resource list for a group or position” is displayed when you select Work Items for a Resource, it means you don’t have the appropriate system action. To view the resource list, you must have the Resource Admin (DE.resourceAdmin) system action, which is available at the organization model level. For more information, see the Configuring User Access chapter in the TIBCO Workspace Configuration and Customization guide).
- All Work Items - This causes the supervised work view to contain all work items irrespective of the resource or organizational entity to which the work items are offered or allocated (although the list can still be filtered).
Note that this option appears only if you have the appropriate user access control (AllWorkItems), as well as the View Global Work List (BRM.viewGlobalWorkList) system action.
If you choose the All Work Items option, proceed to step 9.
-
Optionally, choose whether unique names or display names are shown in the list of organizational entities.
When organizational entities are created in TIBCO Business Studio, they are given both "unique names" and "display names" (also called "labels").
The Tools menu contains a Show unique names for organizational entities selection that toggles between the two displays. By default, the display names are shown.
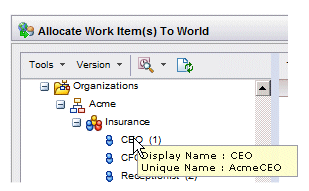
You can also hover the mouse pointer over an organizational entity to view both names for a particular organizational entity:
-
Select the desired organizational entity or an individual resource:
- If the supervised work view is to contain work items (either offered or allocated) sent to an organizational entity, select the desired organization unit, position, or group. For example:
Note that only organizational entities to which you have been given access permission are selectable — all others are grayed out. This permission is granted via the View Work List (BRM.viewWorkList) scoped system action. For more information, see the Configuring User Access chapter in the TIBCO Workspace Configuration and Customization guide.
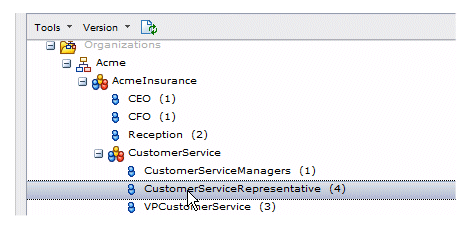
- If the supervised work view is to contain work items sent to an individual resource, you must first select one of the positions to which that resource has been mapped (you cannot select resources from groups, only from positions), then select the resource in the right pane. For example, if you want to create a supervised work view for a resource that has been mapped to the CustomerServiceRepresentative position, select that position, then select the desired resource. For example:
Note: You may not be able to see all resources mapped to a particular position because there are resources mapped to that position that were created in an LDAP container for which you don’t have visibility (because of an organization relationship). (This applies only to positions, not to groups.)

Note, however, the counts shown to the right of the position name in the left pane is the total count for the resources in the position. From this count, you can determine if there are resources mapped to the position that you cannot see.
For more information, see the Container Organization Relationships section in the Organization Browser User’s Guide.
- If the supervised work view is to contain work items (either offered or allocated) sent to an organizational entity, select the desired organization unit, position, or group. For example:
-
Click either the
Next button to continue defining the work view, or the
Finish button to complete the work view:
- Clicking Next allows you to define a filter, sort criteria, and columns for the work view — proceed to step 10.
- Clicking Finish completes the work view without specifying a filter, sort criteria, and columns. You are returned to the Work View list.
-
From the Filter dialog, you can do one of the following:
- Enter filter criteria for the view, then click Next to advance to the Sort dialog to specify how to sort the work items in the view.
- Enter filter criteria for the view, then click Finish if you have no desire to specify how to sort the work items in the view.
- Click
Next to advance directly to the Sort dialog if you have no desire to specify filter criteria.
Note that any filter criteria you specify through the wizard is considered the “base” filter for the work view (as opposed to a “refined” filter that is set through the Filter function on the work item list). For more information, see Base Filter and Refined Filter.
Because filtering work item lists is basically the same as filtering other types of lists in Workspace (with the exception of the specific fields on which you can filter), details of filtering is explained in a single chapter — see Filtering Lists.
-
From the Sort dialog, you can do one of the following:
- Enter sort criteria for the view, then click Next to advance to the Column dialog to specify the columns to display in the view.
- Enter sort criteria for the view, then click Finish if you have no desire to specify columns for the view.
- Click
Next to advance directly to the Column dialog if you have no desire to specify sort criteria.
Because sorting work item lists is basically the same as sorting other types of lists in Workspace (with the exception of the specific attributes on which you can sort), details of sorting is explained in a single chapter — see Work Items.
-
From the
Specify Display Columns for the View dialog, move the columns you would like displayed in the view to the list on the right, then click
Finish to complete the creation of the view.
This dialog works in the same way as the Column Selector dialog available from all other lists in Workspace. For information about using the Column Selector, see Customizing Columns in a List.
You cannot use any of the four following characters in the view name or description: < (less than), > (greater than), & (ampersand), or " (double quote). The application will not allow you to enter any of these characters.
Note that this type of supervised work view will contain work items that are offered directly to that entity — it does not contain work items that are offered or allocated to all of the members of the chosen organization entity.


