Example 1: Simple Factorial ANOVA with Repeated Measures
For this example of a 2 x 2 (between) x 3 (repeated measures) design, open the data file Adstudy.sta:
Ribbon bar. Select the Home tab. In the File group, click the Open arrow and from the menu, select Open Examples. The Open a Statistica Data File dialog box is displayed. Adstudy.sta is located in the Datasets folder.
Classic menus. From the File menu, select Open Examples to display the Open a Statistica Data File dialog box; Adstudy.sta is located in the Datasets folder.
- Calling the ANOVA module
- To start an ANOVA/MANOVA analysis:
- Ribbon bar
- Select the Statistics tab. In the Base group, click ANOVA to display the General ANOVA/MANOVA Startup Panel.
- Classic menus
- Select ANOVA from the Statistics menu to display the
General ANOVA/MANOVA Startup Panel.
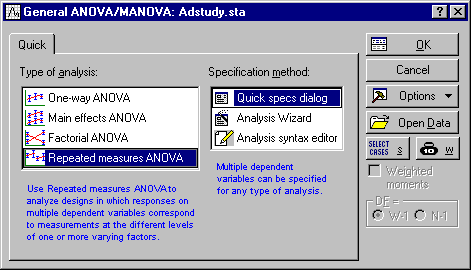
The Startup Panel contains options to specify very simple analyses (e.g., via One-way ANOVA - designs with only one between-group factor) and more complex analyses (e.g., via Repeated measures ANOVA - designs with between-group factors and a within-subject factor).
Select Repeated measures ANOVA as the Type of analysis and Quick specs dialog as the Specification method.
Then, click the OK button to display the ANOVA/MANOVA Repeated Measures ANOVA dialog box.
- Specifying the design (variables)
- The first (between-group) factor is Gender (with 2 levels: Male and Female). The second (between-group) factor is Advert (with 2 levels: Pepsi and Coke). The two factors are crossed, which means that there are both Male and Female subjects in the Pepsi and Coke groups. Each of those subjects responded to 3 questions (this repeated measure factor will be called Response: it has 3 levels represented by variables Measure01, Measure02, and Measure03).
Click the Variables button (on the ANOVA/MANOVA Repeated Measures ANOVA dialog) to display the variable selection dialog. Select Measure01 through Measure03 as dependent variables (in the Dependent variable list field) and Gender and Advert as factors [in the Categorical predictors (factors) field].
Then click the OK button to return to the previous dialog.
The repeated measures design. Note that the design of the experiment that we are about to analyze can be summarized as follows:
Between-Group Between-Group Repeated Measure Factor: Response Factor #1: Gender Factor #2: Advert Level #1: Measure01 Level #2: Measure02 Level #3: Measure03 Subject 1 Male Pepsi 9 1 6 Subject 2 Male Coke 6 7 1 Subject 3 Female Coke 9 8 2 . .
.
. .
.
. .
.
. .
.
. .
.
. .
.
Specifying a repeated measures factor. The minimum necessary selection is now completed and, if you did not care about selecting the repeated measures factor, you would be ready to click the OK button and see the results of the analysis. However, for our example, specify that the three dependent variables you have selected are to be interpreted as three levels of a repeated measures (within-subject) factor. Unless you do so, Statistica assumes that those are three "different" dependent variables and will run a MANOVA (i.e., multivariate ANOVA).
In order to define the desired repeated measures factor, click the Within effects button to display the Specify Within-subjects Factors dialog.
Note: Statistica has suggested the selection of one repeated measures factor with 3 levels (default name R1). You can only specify one within-subject (repeated measures) factor via this dialog. To specify multiple within-subject factors, use the General Linear Models module (available in the optional Advanced Linear/Nonlinear Models package). Press the F1 key (or click ) in this dialog to review a comprehensive discussion of repeated measures and examples of designs. Edit the name for the factor (e.g., change the default R1 into RESPONSE), and click the OK button to exit the dialog.
- Codes (defining the levels) for between-group factors
- You do not need to manually specify codes for between-group factors [e.g., instruct Statistica that variable Gender has two levels: 1 and 2 (or Male and Female)] unless you want to prevent Statistica from using, by default, all codes encountered in the selected grouping variables in the datafile. To enter such custom code selection, click the Factor codes button to display the
Select codes for indep. vars (factors) dialog.
This dialog contains various options. For example, you can review values of individual variables before you make your selections by clicking the Zoom button, scan the file and fill the codes fields (e.g., Gender and Advert) for some individual or all variables, etc. For now, click the OK button; Statistica automatically fills in the codes fields with all distinctive values encountered in the selected variables,
and closes the dialog.
- Performing the analysis
- When you click the OK button upon returning to the
ANOVA/MANOVA Repeated Measures ANOVA dialog, the analysis is performed, and the
ANOVA Results dialog is displayed. Various kinds of output spreadsheets and graphs are now available.
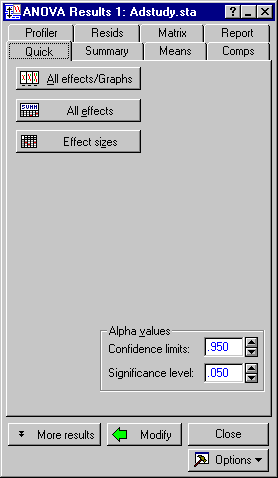
Note: this dialog is tabbed, which allows you to quickly locate results options. For example, if you want to perform planned comparisons, click the Comps tab. To view residual statistics, click the Resids tab. For this simple overview example, we will only use the results options available on the Quick tab.
- Reviewing ANOVA results
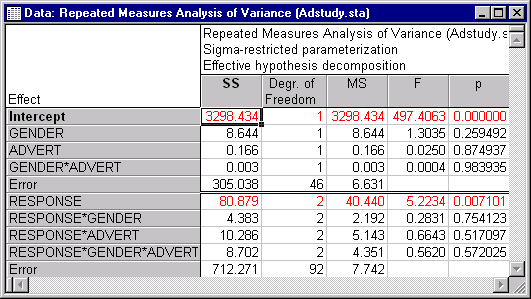
- Start by looking at the ANOVA summary of all effects table by clicking the All effects button (the one with a SUMM-ary icon
 ).
).
The only effect (ignoring the Intercept) in this analysis that is statistically significant (p =.007) is the RESPONSE effect. This result can be caused by many possible patterns of means of the RESPONSE effect (for more information, see the ANOVA - Introductory Overview). We will now look graphically at the marginal means for this effect to see what it means.
To bring back the ANOVA Results dialog (that is, "resume" the analysis), press CTRL+R, select Resume from the Statistics menu, or click the ANOVA Results button on the Analysis bar. When the ANOVA Results dialog is displayed, click the All effects/Graphs button to review the means for individual effects.
This dialog contains a summary Table of all effects (with most of the information you have seen in the All effects spreadsheet) and is used to review individual effects from that table in the form of the plots of the respective means (or, optionally, spreadsheets of the respective mean values).
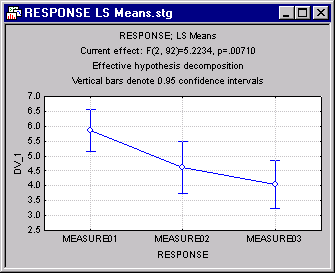
- Plot of Means for a Main Effect
- Double-click on the significant main effect RESPONSE (the one marked with an asterisk in the p column) to see the respective plot.
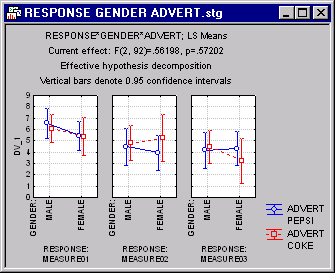
The graph indicates that there is a clear decreasing trend; the means for the consecutive three questions are gradually lower. Even though there are no significant interactions in this design (see the discussion of the Table of all effects above), we will look at the highest-order interaction to examine the consistency of this strong decreasing trend across the between-group factors.
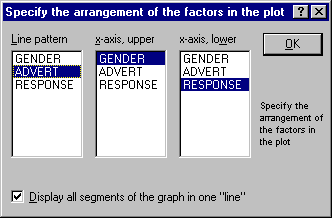
- Plot of means for a three-way interaction
- To see the plot of the highest-order interaction, double-click on the row marked RESPONSE*GENDER*ADVERT, representing the interaction between factors 1 (Gender), 2 (Advert), and 3 (Response), on the
Table of All Effects dialog. An intermediate dialog,
Specify the arrangement of the factors in the plot, is displayed, which is used to customize the default arrangement of factors in the graph.
Note: unlike the previous plot of a simple factor, the current effect can be visualized in a variety of ways. Click the OK button to accept the default arrangement and produce the plot of means.
As you can see, this pattern of means (split by the levels of the between-group factors) does not indicate any salient deviations from the overall pattern revealed in the first plot (for the main effect, RESPONSE). Now you can continue to interactively examine other effects; run post-hoc comparisons, planned comparisons, and extended diagnostics; etc., to further explore the results.
Interactive data analysis in Statistica. This simple example illustrates the way in which Statistica supports interactive data analysis. You are not forced to specify all output to be generated before seeing any results. Even simple analysis designs can, obviously, produce large amounts of output and countless graphs, but usually you cannot know what will be of interest until you have a chance to review the basic output. With Statistica, you can select specific types of output, interactively conduct follow-up tests, and run supplementary "what-if" analyses after the data are processed and basic output reviewed. Statistica's flexible computational procedures and wide selection of options used to visualize any combination of values from numerical output offer countless methods to explore your data and verify hypotheses.
Automating analyses (macros and Statistica Visual Basic). Any selections that you make in the course of the interactive data analysis (including both specifying the designs and choosing the output options) are automatically recorded in the industry standard Visual Basic code. You can save such macros for repeated use (you can also assign them to toolbar buttons, modify or edit them, combine with other programs, etc.). For more information, see Statistica Visual Basic.