Workbook Drag-and-Drop Features
The STATISTICA Workbook supports an entire range of drag-and-drop features within the workbook tree. By right-clicking on an item in the workbook tree, you can drag that item to a new location within the tree. In fact, since the drag-and-drop features support parent/child relationships, you can use these features to rearrange large portions of the workbook tree.
- Selecting Items for Drag-and-Drop
- The first step in using drag-and-drop features is to select the item (or items) that you want to move or copy. Afterwards, you can drag the selection (using either the left or right mouse button, see below) to its new location and drop it.
To select a single item, click on the item with either the left or right mouse button, depending on the type of drag-and-drop operation you want to perform. To select a parent node and all of its children, simply click on the parent node (or press SHIFT while clicking on the parent node and each of its children). To make discontinuous selections (i.e., select some of the children, but not all of them), hold down the CTRL key while clicking on each item you want to select. You can also make discontinuous selections across nodes using the CTRL key. See also, Can I select discontinuous items in the workbook tree?.
- Left and Right Mouse Button Operations
- STATISTICA supports both left and right mouse button drag-and-drop features, which means you can drag your selection using either the left or right mouse button. Left-button drag-and-drop features are limited to the default option of Move As Child, while right-button drag-and-drop provides you with a variety of placement options. Horizontal or vertical scrolling within the workbook tree can be done during a drag and drop operation. While clicking and holding the left or right mouse button during a drag-and-drop operation, move the mouse pointer to the left or right border of the tree view to scroll horizontally. For vertical scrolling during drag-and-drop, move the mouse pointer to the top or bottom border of the tree view.
- Left Mouse Button Drag-and-Drop
- To use left mouse button drag-and-drop, click on the selected item(s) and drag the selection to the desired location. When you reach the selection's new destination, release the left mouse button. The selection is automatically moved from its original location and placed as a child to the selected item in its new location.
- Right Mouse Button Drag-and-Drop
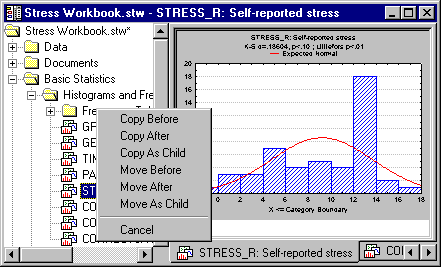
- To use right mouse button drag-and-drop, right-click on the selected item(s) and drag the selection to the desired location. When you reach the selection's new destination, release the right mouse button. A shortcut menu is displayed, giving you options to either copy or move the dragged item(s).

You can place the item before, after, or as a child to the newly selected item in the tree. Note that when you select more than one item, the original file structure of the dragged items will remain the same. For example, if you drag a node and all of its children and select Copy As Child, the original selection will be copied (not moved) to the new location with the node being placed as a child to the new selection. The children of the original node will not be placed as siblings to the original node; they will maintain their status as children. These features make it possible to customize the workbook tree to meet even the most complex of organizational structures.
Following is a chart of keyboard controls for use in a workbook.
Action Key Press Cursor Effect Move Child (none) 
Move the first selected item one level below the second selected item Move Sibling SHIFT 
Move the first selected item directly below and on the same level as the second selected item. Copy Child CTRL 
Copy the first selected item one level below the second selected item. Copy Sibling SHIFT+CTRL 
Copy the first selected item directly below and on the same level as the second selected item. For a brief example on using drag-and-drop features, see Rearranging the Workbook Tree with Drag-and-Drop.
