QC Charts Example 4: Setting Up Shop Floor Mode and Alarm Notification
- Overview
- This example guides you systematically through the necessary steps to prepare the chart for shop floor mode. When the Quality Control module is run in shop floor mode, a "simplified" user interface with disabled functionality will be presented to the operator on the shop floor. At the same time an automatic alarm notification system will be specified, so that intervention by the operator is required only when "something goes wrong."
The example is based on a data set reported in Montgomery (1985, page 177, 1991, page 234). Use the data file Pistons.sta that is located in your examples directory. In particular, we are interested in monitoring the size (diameter) of piston rings for automotive engines. Therefore, constant samples of five observations each have been taken from the ongoing manufacturing process.
- Preparing the Data file
- Open the data file Pistons.sta. Save it under a different file name (e.g. Pistons3.sta) by selecting Save as from the File menu.
Once, the data file is saved, insert two additional (empty) variables after variable Size in the file and label them Causes and Actions, respectively. You can also delete the variable Samples since it won't be needed for the analysis. As always, variables can be inserted or deleted using the Vars button on the toolbar.
Finally, append 10 new cases at the bottom of the data file. You can use the Cases button on the toolbar. We will later enter new values in those cases manually (on the pretext that we receive new process data). Note that you could use Statistica Enterprise for automatically retrieving process data from a database or a measurement device.
- Specifying the Analysis
- We will now create an X-bar & R chart for variable Size. Let us assume that the center line and control limits for the X-bar & R chart should be taken from historical process data. We know for sure that the process was in control in the past, and would like to apply the settings from that process. In particular, process target value and process sigma for the X-bar chart were established as 74.0000 and 0.01 respectively. Note that the settings for the X-Bar Chart also control the settings for the R chart.
Select Quality Control Charts from the Statistics - Industrial Statistics & Six Sigma submenu or from the Data Mining - Process Optimization - QC Charts submenu to display the Quality Control Charts Startup Panel. Then select X-bar & R chart for variables on the Quick tab (or the Variables tab). Click the Real-time tab and select the Auto-update option button. Leave all other options at their default settings and click OK.
This will display the Define variables for X-bar & R Chart dialog. Click the Variables button and select the variable Size as the Variable with measurements and click OK. Enter a value of 5 in the boxes for the two options Constant sample Size and Minimum number of observations per sample. This will ensure that Statistica takes consecutive sets of five values and identifies them as belonging to the same sample. Then click OK to produce the chart.
There are currently no out-of-control samples present in the data. Note that the center line and control limits for both charts had been computed from the data.
As a first step we will apply the established historical process parameters to the chart. Select the X (MA..)-specs tab in the results dialog and click the Center button. In the Chart center line dialog, enter the value 74.0 in the Process mean field OK. Click the Sigma button and enter 0.01 into the Process sigma button on the Sigma for dialog. Then click the Update button in order to apply the new settings to the chart.
- Setting up Automatic Alarm Notification
- Before we prepare the chart for the shop floor mode, we will specify "events" that will automatically be triggered whenever an out-of-control condition occurs. When an out-of-control condition occurs, a dialog will request input from the operator (cause and action). At the same time, the out-of-control condition will be recorded in a log file, and the text editor Notepad will be started.
To specify variables that contain actions and causes click the Setup button on the Brushing tab to display the Causes, Actions, Comments, and Data Brushing Setup dialog. Click the Variables containing Causes and Actions button and select variable Causes as the Variable with codes for causes and variable Actions as the Variable with codes for actions and click OK and OK again.
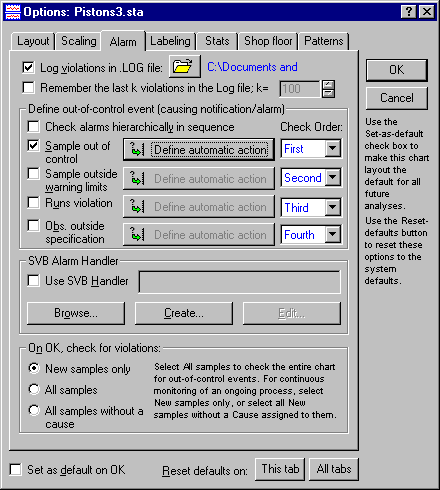
Now click the Options button and select the Alarm tab in the resulting Options dialog.
As a first step select the check box Log violations in .LOG file and specify a text file (e.g. Alarm.log) that will maintain a log of out-of-control conditions that occur.
As a second step check the Sample out of control check box and click the Define automatic action button to display the Define actions resulting from dialog.
Select the Automatically request input of cause, Automatically request input of action, and Automatically create the chart (if it currently does not exit) check boxes and check the Run/launch other application (with optional parameters) check box. Then click button 1 below that option and enter the following expression in the command line:
C:\WINDOWS\system32\NOTEPAD.EXE
This will cause Statistica to launch the text editor Notepad when an out-of-control condition occurs (assuming that Notepad is located in the WINDOWS directory). (Alternatively, you can enter a command line to send e-mail or call a pager number.) Note that prior to the analysis you could set up a text file (e.g., Report.txt) that contains a report form. You would then be able to open this report form automatically in Notepad by modifying the command line as follows:C:\WINDOWS\system32\NOTEPAD.EXE C:\REPORT.TXT
When you have specified the action, click OK. The automatic alarm notification is now specified and will become "active" when an out-of-control condition occurs. Of course, you could have specified to execute a Statistica Visual Basic program or launch an e-mail application instead of Notepad.
- Setting up Shop floor Mode
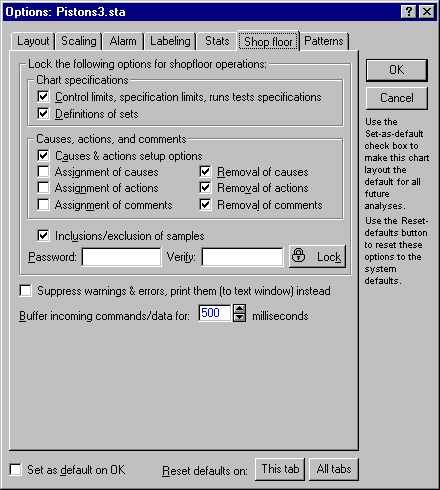
- After we have made all necessary preparations, we will now set up the QC chart for use on the shop floor. We will protect customization options with a password and present the operators on the shop floor with a simplified user interface.
As we continue to receive new process data, we want to plot only the last 25 (i.e., most up-to-date) samples. Therefore, on the Options dialog, select the option Plot subset of samples in control chart check box on the Layout tab. Then select the option plot last N samples only and enter the value 25 in the field.
On the same dialog select the Shop floor tab.
Leave all other options at their default settings. Then enter the same password in the fields Password and Verify and click the Lock button. A message will notify you that the current chart and analysis will be locked (click Yes to confirm). The chart will be updated.
Now look at the results dialog. You will notice that most of the features are disabled. Thus, the operator will not be able to change any settings or manipulate the graph. Note that you can enable all features at any time by clicking the Unlock button in the results dialog and entering the correct password.
- Auto-updating the chart
- On the pretext that we have received new data from the ongoing process, we will now enter new values in the data file and see how the chart is updated.
Enter the following five values into rows 126 to 130 of variable Size in the data file:
After you entered the last value the chart will be updated. The range of plotted samples has now changed from 1 - 25 to 2 - 26. Apparently, no out-of-control condition occurred so far.
Now continue to fill the remaining rows of the spreadsheet in a similar fashion, using the following values:
You will notice that two dialogs will be displayed to prompt the operator for input (cause and action) of the out-of-control condition. At the same time, Notepad will be opened. Finally, you will see that the log file Alarm.log will be created. This file contains information about the out-of-control condition.
See also QC Chart Examples.