Arrow, Custom Bar Button
Click the
![]() button (or select Arrow from the Insert menu) to enter the arrow and error bar drawing mode. You can use the
Arrow tool to place arrows and error bars of various styles on a graph. When this button is clicked, the mouse pointer changes to a small vertical arrow. To draw an arrow, place the small vertical arrow on the graph to position the default-style arrow head. Then drag the arrow away from that point to create the arrow. The tail's length and position is determined by the location of the mouse pointer on the graph when the mouse button is released.
button (or select Arrow from the Insert menu) to enter the arrow and error bar drawing mode. You can use the
Arrow tool to place arrows and error bars of various styles on a graph. When this button is clicked, the mouse pointer changes to a small vertical arrow. To draw an arrow, place the small vertical arrow on the graph to position the default-style arrow head. Then drag the arrow away from that point to create the arrow. The tail's length and position is determined by the location of the mouse pointer on the graph when the mouse button is released.
The arrow style (including selecting error bar options) as well as the size and location of the arrow can be adjusted later.
- Moving or redimensioning arrows
- Click on the head or tail of the arrow to select the object for moving or redimensioning (a handle will be displayed at the head end and at the tail end of the arrow). To move the arrow, place the mouse pointer on the arrow shaft, click and drag it. To redimension or change the orientation of the arrow, drag either of the handles at the ends of the arrow.
- Rotating arrows
- In addition to moving or redimensioning an arrow, you can also rotate an arrow around its mid point, in a clock-wise direction, or in a counter clock-wise direction. To rotate an arrow around its mid point, select the arrow object, then hover over the arrow (or line) end points while pressing the CTRL button. The cursor will change to a circling arrow
 . If you move the end point (while pressing the CTRL button), the arrow will rotate around its mid point. You can even reverse the direction of the arrow by dragging the cursor towards the opposite end point. To rotate the arrow in either a clock-wise or counter clock-wise direction, select the arrow object and press the Page Up button (to move counter clock-wise) or Page Down (to move clock-wise). If you press the CTRL button while pressing Page Up or Page Down, the arrow will move in smaller increments.
- Customizing properties of arrows
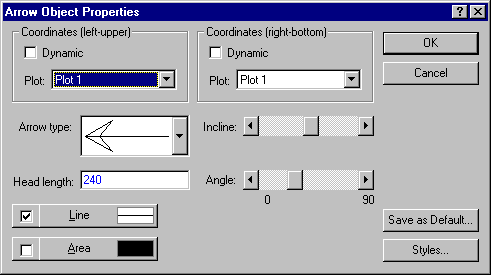
- To further specify properties of newly created arrows or to make changes to properties of existing arrows, double-click on either the head or the tail of the arrow to display the Arrow Object Properties dialog.
Use this dialog to specify a number of options for customizing the appearance of arrow heads and their fill characteristics as well as specify line colors and patterns for both arrow and error bars.
You can also specify whether the anchor points (head or first-defined end and tail or last-defined end) of the arrow are positioned in Dynamic or Fixed (the default) mode. In Dynamic mode, the specified end of the object is positioned with respect to scale values of the graph axes. In this mode, the head or tail moves if the scaling on the graph changes. In Fixed mode, the positioning is with respect to the dimensions of the graph window and arrow position does not change if scale values change.
See What is the difference between the dynamic and fixed status of custom objects in graphs?