Introductory Example - Confirmatory Factor Analysis
Confirmatory factor analysis is an extension of factor analysis in which specific hypotheses about the structure of the factor loadings and intercorrelations are tested. In confirmatory factor models the factor loadings, factor correlations, and/or residual variances and covariances can be specified to be equal to each other, or to specified numerical values. Confirmatory factor models are sometimes tested as a follow-up to the standard factor analysis procedures (sometimes referred to as exploratory factor analysis) performed by the Factor Analysis module of STATISTICA.
Open the Factor.sta data file via the File - Open Examples menu; it is in the Datasets folder. Then select Structural Equation Modeling from the Statistics - Advanced Linear/Nonlinear Models menu to display the Structural Equation Modeling - Startup Panel.

Before you begin to set up the confirmatory factor model, click the Options button
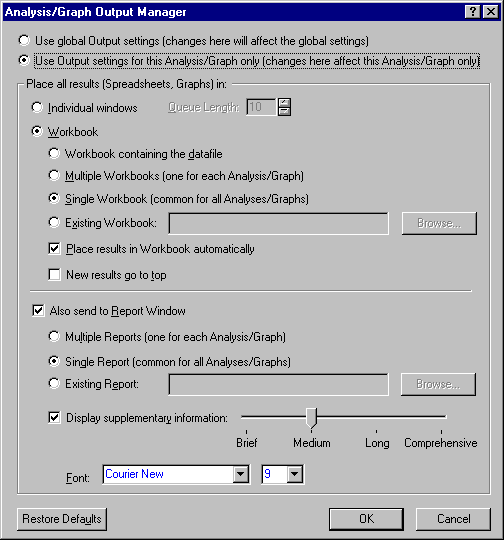
![]() in the Startup Panel and select Output from the menu to display the Analysis/Graph Output Manager dialog. In this dialog, select the Also send to Report Window check box, the Single Report (common for all Analyses/Graphs) option button, and the Display supplementary information check box, and move the slider to Comprehensive. This last option controls the amount of supplementary information that is displayed in the
Summary box of the results dialog. The Analysis/Graph Output Manager dialog should look like this:
in the Startup Panel and select Output from the menu to display the Analysis/Graph Output Manager dialog. In this dialog, select the Also send to Report Window check box, the Single Report (common for all Analyses/Graphs) option button, and the Display supplementary information check box, and move the slider to Comprehensive. This last option controls the amount of supplementary information that is displayed in the
Summary box of the results dialog. The Analysis/Graph Output Manager dialog should look like this:
Click the OK button in the Analysis/Graph Output Manager dialog, and now you are ready to set up the confirmatory factor model using Structural Equation Modeling's Confirmatory Factor Model Wizard. Click the Path wizards button on either the Quick tab or the Advanced tab of the Structural Equation Modeling Startup Panel to display the SEPATH Wizard - Select Wizard dialog.
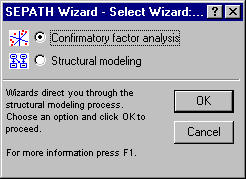
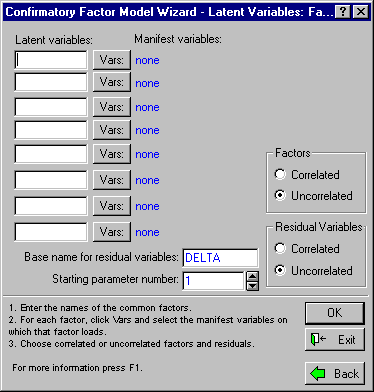
Select the Confirmatory Factor Analysis option button and click the OK button to display the Confirmatory Factor Model Wizard - Latent Variables dialog, which is used to specify the factor names and the factor pattern.
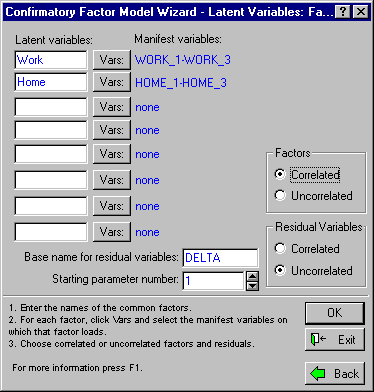
You can specify the names for up to eight factors by typing them in to the appropriate boxes. In this case, there will be two factors. Since one factor is common to the WORK variables and one is common to the HOME variables, enter Work and Home, respectively, into the first two boxes.
Once you have named your factors, the next step is to choose which variables will load on each factor. To select the variables that will load on the Work factor, click the Vars button next to the box containing its name. A variable selection dialog will be displayed from which to select the variables that load on Work. Select variables WORK_1, WORK_2, and WORK_3. Then click OK. In similar fashion, select variables HOME_1, HOME_2, and HOME_3 to load on the factor Home. Correlated factors (but uncorrelated residuals) are desired in this model, so select the Correlated option button under Factors and the Uncorrelated option button under Residual Variables. At this point, the dialog should appear as follows:
Now, you are ready to proceed to the next step, specifying the factor intercorrelations. Click the OK button to display the Confirmatory Factor Model Wizard - Correlate Factors dialog.
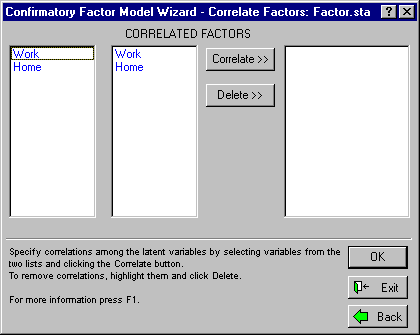
In this dialog, specify which inter-factor correlations you want to allow to be non-zero. Any possible correlation not specified at this stage will be constrained to zero during the parameter estimation process. In the dialog, you see two lists on the left. To specify one or more correlations between factors, highlight factor names on the two lists, then click the Correlate>> button. All non-redundant correlations between selected factors on the left and those on the right will be added to the list on the far right. By non-redundant, we mean that only correlations of the form rij for i>j will be added to the list. So, in the current example, you would obtain only the correlation between Home and Work, whether you highlighted Home in the left list and Work in the right list, Work in the left list and Home in the right list, or both Home and Work in both lists. To specify all possible correlations among the factors, highlight all factors in both lists and click the Correlate>> button.
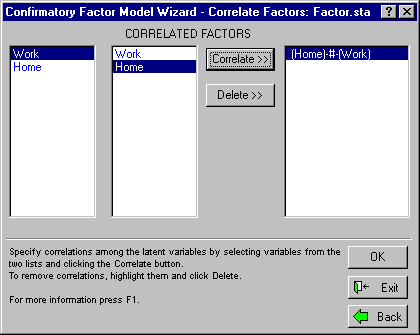
To complete this example, specify a correlation between Home and Work. Select Work on the left list, Home on the right, then click the Correlate>> button. The correlation path should appear in the list on the right side of the dialog as follows:
Then, click the OK button to display the final Wizard dialog, the SEPATH Wizard Model Placement dialog.
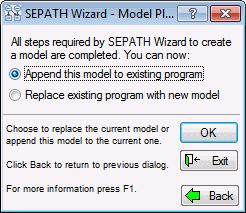
Use this dialog to either (1) append the current model to one already in the current model file, or (2) replace the model already in the model file with the current one. This example began with an empty model file, so either choice will be fine. Click the OK button and you will return to the Structural Equation Modeling (Startup Panel). Now you can examine the contents in the Analysis syntax box. The box contains the commands for specifying the model you have just created, in a special command language called PATH1. It should look like this:

See Inputting path diagrams with the PATH1 language for details about the PATH1 language and how it is used to specify structural equation models. For now, simply note that each line of text stands for a path, and the integers in certain paths are placeholders for free parameters, numerical coefficients that Structural Equation Modeling will estimate using an iterative procedure. You may want to use this file again, so click the Save model as button to display the standard Save dialog, and save the file as Demo1.cmd.
Before starting the statistical estimation process, you will need to adjust the analysis parameters. Covariance structural modeling procedures were originally designed to operate directly on a covariance matrix. However, unlike most other programs of its type, Structural Equation Modeling has the ability to analyze either covariances or correlations correctly and routinely. In this case, it is far more convenient to analyze correlations in the confirmatory factor model. Traditional exploratory factor analysis procedures are generally applied to a correlation matrix, and adopting the same approach here makes the results much easier to compare.
In order to configure Structural Equation Modeling to analyze correlations, click the Set parameters button to display the Analysis Parameters dialog.
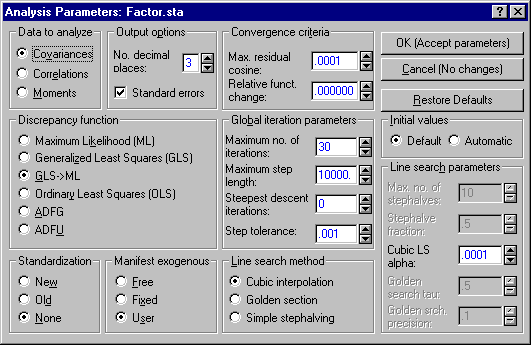
In the upper-left corner of the dialog under Data to analyze, select the Correlations option button and then click the OK (Accept parameters) button to return to the Structural Equation Modeling (Startup Panel).
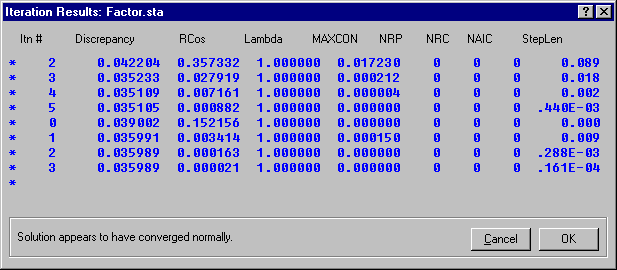
Click the OK (Run model) button on the Startup Panel to start the estimation process. When execution starts, the Iteration Results dialog will be displayed that shows the progress of the iterative estimation process and then the final results.
Once iteration converges, you can elect to Cancel and not examine program results, or proceed to the Results dialog. In this case, click the OK button to display the Structural Equation Modeling Results dialog to examine program output.
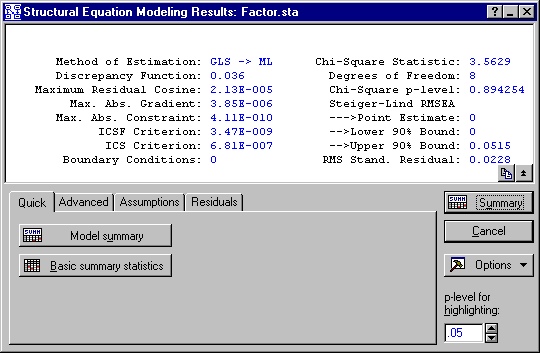
At this point in the analysis, results are actually available in two places. The report window contains a fair amount of program output resulting from the iteration just completed. Click on this window to review the output displayed (the Results dialog will minimize automatically).
Scroll past the beginning of the output, where basic information about the analysis variables is described. There is a section indicating the major options for the analysis, i.e., the name of the datafile, model file, type of data analyzed (remember, you chose to analyze the correlation matrix in this case), type of discrepancy function employed, and type of initial values used.
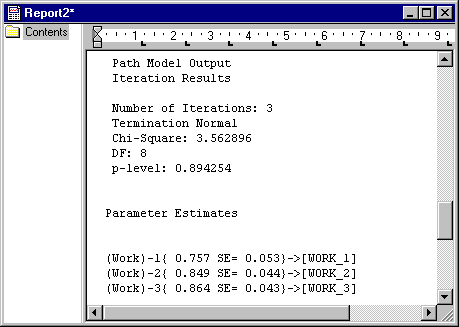
Path Model Output
Analysis Parameters
Data File: FACTOR.STA
Model File: DEMO1.CMD
Data to Analyze: Correlations
Discrepancy Function: GLS->ML
Initial Values: Default
This information is useful as an identification marker for the analysis, in case you perform several analyses in the same section, testing several different models (possibly with different analysis options) on the same data.
Following this information are several lines describing the basic outcome of the iteration.
Path Model Output
Iteration Results
Number of Iterations: 3
Termination Normal
Chi-Square: 3.562896
DF: 8
p-value: 0.894254
You can see from the low Chi-square value and the high probability level that the hypothesis of perfect fit for this model could not be rejected. The evidence so far suggests that this model fits these data quite well.
Next comes the output from the model estimation process. Notice that this output is in the same language as the input model, except that numerical coefficients are now reported for each model path. For example, the first 6 lines represent the factor loadings from common factor Work to the three WORK variables, and from factor Home to the three HOME variables. Beside each coefficient value, a standard error is also reported within the braces (see below). You can control whether standard errors are reported on the Analysis Parameters dialog under Output Options.
In this case, we see that all factor loadings are quite high, and greatly exceed their standard errors.
Parameter Estimates
(Work)-1{ 0.757 SE= 0.053}->[WORK_1]
(Work)-2{ 0.849 SE= 0.044}->[WORK_2]
(Work)-3{ 0.864 SE= 0.043}->[WORK_3]
(Home)-4{ 0.729 SE= 0.057}->[HOME_1]
(Home)-5{ 0.897 SE= 0.043}->[HOME_2]
(Home)-6{ 0.815 SE= 0.049}->[HOME_3]
Next come 6 paths for the residual variables, or "unique factors."
(DELTA1)-->[WORK_1]
(DELTA2)-->[WORK_2]
(DELTA3)-->[WORK_3]
(DELTA4)-->[HOME_1]
(DELTA5)-->[HOME_2]
(DELTA6)-->[HOME_3]
Finally, there are paths representing the variances of the unique factors, and the intercorrelation between the factors Home and Work.
(DELTA1)-7{ 0.428 SE= 0.080}-(DELTA1)
(DELTA2)-8{ 0.280 SE= 0.075}-(DELTA2)
(DELTA3)-9{ 0.253 SE= 0.075}-(DELTA3)
(DELTA4)-10{ 0.468 SE= 0.083}-(DELTA4)
(DELTA5)-11{ 0.195 SE= 0.078}-(DELTA5)
(DELTA6)-12{ 0.336 SE= 0.080}-(DELTA6)
(Home)-13{ 0.278 SE= 0.107}-(Work)
Now click on the Structural Equation Modeling icon on the Analysis bar to restore the Results dialog.

In the Summary box at the top of the dialog, you will see a text display of a number of indices designed to allow you to assess the quality of model fit quickly. For a description of the results presented here, see Statistics in the Structural Equation Modeling Results Summary box. In particular, numerical indices on the left side of the screen are, with the exception of the Discrepancy Function, generally close to zero if the model has been specified properly, and proper convergence of the iterative sequence has occurred.
With the Results dialog active, you have the option of examining a great deal of additional information. For example, click the Model summary button to see an overall summary of the model just fitted.
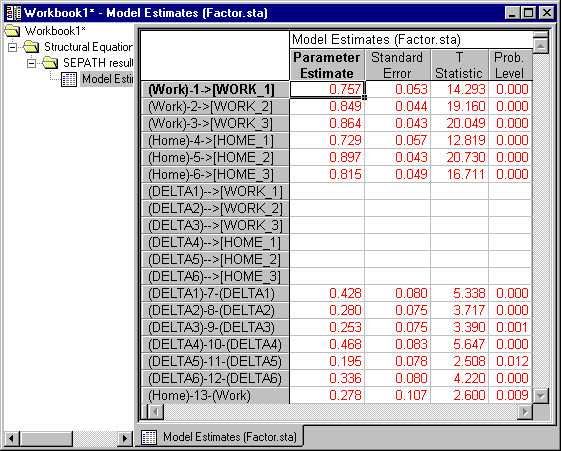
This summary shows, for each path, the Estimate for the free Parameter, the Standard Error, a T-Statistic, and the Probability Level. Paths with a probability level below .05 are highlighted to indicate they are "significant." (In this example, all paths meet this criterion and are highlighted.)
The noncentrality based index of fit is one class of statistic for evaluating the overall fit of a model to the data that is now gaining considerable favor with structural modeling experts. Some (but not all) fit indices based on noncentrality lend themselves naturally to a confidence interval approach to fit assessment. Rather than testing the overall hypothesis that fit is perfect (which often seems to work against you when sample size is high), these indices assess, with a confidence interval, how good fit is and how accurately fit has been determined. If you click the Noncentrality-based indices button on the Advanced tab, you can obtain several of these indices. The results, in this case, show that fit of this model is excellent.
See also, SEPATH Analysis - AutoIndex.