Example 1: Stability of Alienation
This example, from a paper on stability of alienation by Wheaton, Múthen, Alwin, and Summers (1977), is one of the classic examples of a full structural equation model discussed in many textbooks and program manuals.
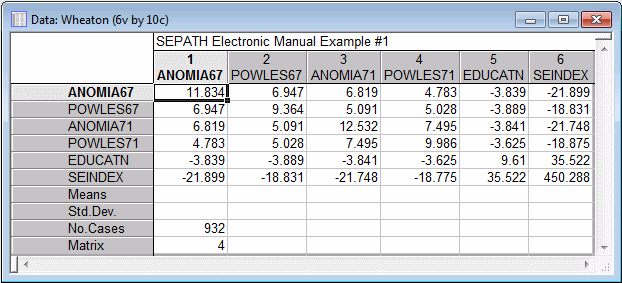
Ribbon bar. Select the Home tab. In the File group, click the Open arrow and on the menu, select Open Examples. The Open a STATISTICA Data File dialog box is displayed. Double-click the Datasets folder. The Wheaton.sta data file is located in the SEPATH folder.
Classic menus. On the File menu, select Open Examples to display the Open a STATISTICA Data File dialog box. Double-click the Datasets folder. The Wheaton.sta data file is located in the SEPATH folder.
This covariance matrix file does not contain entries for the means and standard deviations of the variables. In many cases, this will pose no problem. Structural Equation Modeling can compute standard deviations and correlations from the variances in a covariance matrix *.sta file, and variances and covariances from correlations and standard deviations in a correlation matrix file. Structural Equation Modeling will examine the selection (see the Analysis Parameters topic), and will evaluate whether the information in the current *.sta file is sufficient to continue. If it is, Structural Equation Modeling will automatically "fill in" any missing information it requires. If sufficient information is not available, an error message will be issued.
You should also note that correlation and covariance matrix files can be entered in full matrix form, as in the Wheaton.sta file, or in lower triangular form, with missing values in the positions above the diagonal, as in the Lawley.sta file used in Example 2. Structural Equation Modeling can handle either format. Obviously, if you are entering a covariance matrix by hand from some other source, you can save substantial effort by entering only the lower triangular part of the matrix.
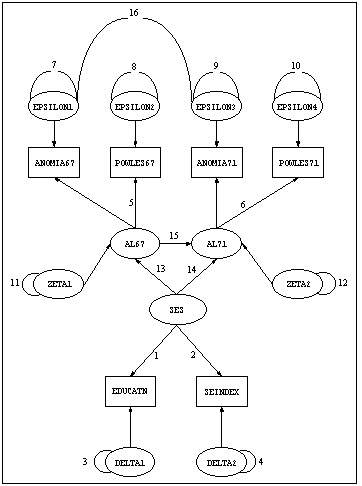
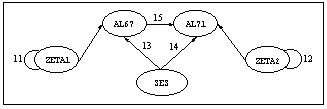
Jöreskog and Sörbom analyzed several models with these data. Below is the path diagram for the first model they analyzed. This diagram is similar to one in Jöreskog and Sörbom (1984).
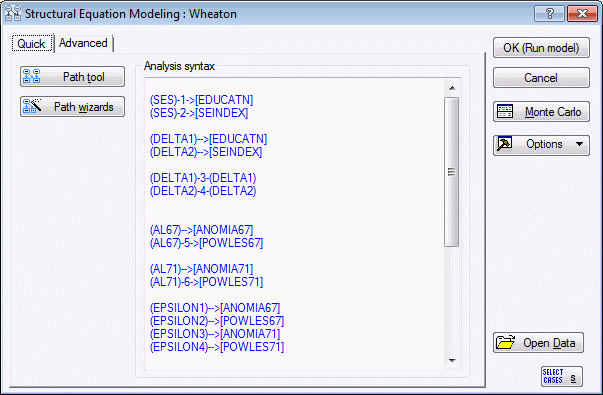
Remember, any arrow without any numerical index attached is assumed to have a fixed coefficient of 1. Such arrows may be given in the PATH1 language in a simplified form, for example, the arrow from EPSILON1 to ANOMIA67 is denoted as follows:
(EPSILON1)-->[ANOMIA67]
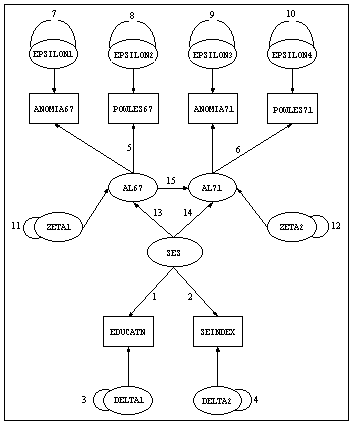
Before setting up this rather imposing looking model, try to "chop it down to size" conceptually. Like many structural equation models, this one can be conceptualized, according to the classic LISREL model of Karl Jöreskog, as being composed of three smaller models, two of them common factor models commonly referred to as "measurement models," and one a multiple regression model called the "structural model."
The basic goal of the study is to examine the regression relationships between socioeconomic status (SES) and personal alienation (AL), measured at two time points (1967) and (1971). As is frequently the case with social science data, the observed variables used to infer socioeconomic status and alienation have varying degrees of reliability of measurement. Hence, correlations among the observed variables are attenuated by unreliability, and regression relationships among them may as a consequence be misleading.
To combat these problems, LISREL models postulate regression relationships among latent variables that, as common factors of the observed variables, have error of measurement "partialled out." There are two measurement models: one a factor model for the exogenous latent variables and one a factor model for the endogenous latent variables.
In this case, the two measurement models are at the top and bottom of the path diagram, the structural model is in the center. At the bottom of the diagram, you can see a factor model with two manifest variables, EDUCATN and SEINDEX, and common factor SES.

At the top of the diagram, there is a two-factor model, shown below, with common factors AL67 and AL71 loading on variables ANOMIA67, POWLES67, ANOMIA71, and POWLES71.
In the center of the diagram, there is a regression model, shown below, relating SES, AL67, and AL71.
This is a good time to review a few aspects of the diagram.
First, the curved lines with the integers 3 and 4 attached to them are wires representing the variances for the residual variables DELTA1 and DELTA2. Each integer in the diagram represents a free parameter to be estimated by the program. The integers 1 and 2 attached to the arrows from SES to EDUCATN and SEINDEX represent the factor loadings for those latter variables on the factor SES. Near the top of the diagram, you will notice that two factor loadings (the paths from AL67 to ANOMIA67 and AL71 to ANOMIA71) do not have free parameters attached to them.
Recall that paths with neither an integer (representing a free parameter) nor a floating point number (representing a fixed numerical value) are assumed to have a fixed value of 1.0. These paths are fixed at 1.0 in order to identify the variances of the endogenous latent factors in the diagram.
With most structural modeling programs, it would take a considerable amount of time to enter the specifications for this model. To demonstrate the power of Structural Equation Modeling's user interface, use the Structural Modeling Wizard to set up the model in the path diagram.
Ribbon bar. Select the Statistics tab. In the Advanced/Multivariate group, click Advanced Models and on the menu, select Structural Equation to display the Structural Equation Modeling Startup Panel.
Classic menus. On the Statistics - Advanced Linear/Nonlinear Models submenu, click Structural Equation Modeling to display the Structural Equation Modeling Startup Panel.
On the Quick tab, click the Path wizards button to display the SEPATH Wizard - Select Wizard dialog box.

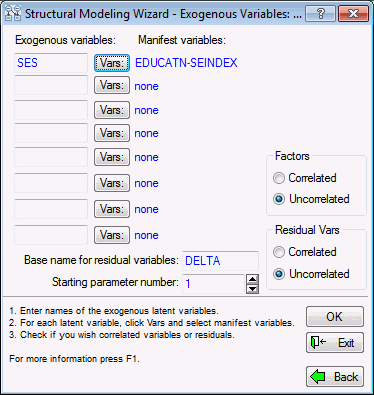
Select the Structural modeling option button, and then click the OK button to display the Structural Modeling Wizard - Exogenous Variables dialog box.
- Specifying the measurement model for exogenous factors
- The Structural Modeling Wizard prompts you for three submodels, in sequence. First, in the Structural Modeling - Exogenous Variables dialog box, specify the measurement model for the exogenous latent factors in your structural model. The exogenous latent factors are common factors that have no arrows pointing to them. In this case, there is only one exogenous factor in the center of the diagram, SES. The factor model for SES has the variable SES loading on two variables, EDUCATN and SEINDEX. It is this factor model that you specify in the first dialog box.
The Structural Modeling - Exogenous Variables dialog box is very similar to the dialog box in the Confirmatory Factor Analysis Wizard, but is tailored specially for application in structural equation modeling. In this model, there is only one exogenous variable to define.
Type SES into the first box, click the adjacent Vars button and select the two variables EDUCATN and SEINDEX that load on SES, and then click OK. This completes the specification of the measurement model for the exogenous factor.
- Specifying the measurement model for endogenous factors
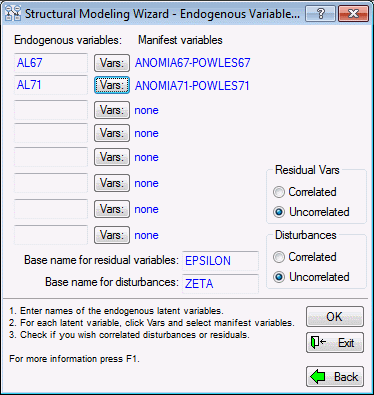
- Click the OK button in the Structural Modeling Wizard - Exogenous Variables dialog box to display the
Structural Modeling Wizard - Endogenous Variables dialog box.
These are common factors in the diagram that have at least one arrow pointing to them. There are two such common factors in the diagram, AL67 and AL71. For each factor, select all manifest variables loading on the factor. In this case, there are only two variables for each factor. When you are finished, the dialog box should appear as shown below.
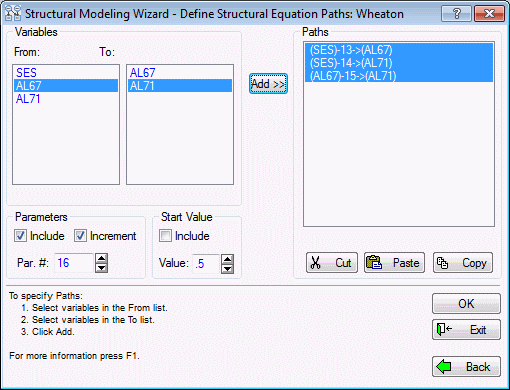
Click the OK button to display the Structural Modeling Wizard - Define Structural Equation Paths dialog box, which is used to specify paths between the latent factors in your model.
- Specifying structural paths
- Note that the Path Tool has already parceled the latent variables into appropriate groups. In the Variables group box, the From list contains both endogenous and exogenous variables because it is legal for paths to be drawn from one endogenous variable to another.
However, exogenous variables cannot receive arrows, so the exogenous latent variables are not included in the To list.
To add paths, we will highlight variables in the From and To lists and click the Add>> button. All paths from the (highlighted) From list and the (highlighted) To list will be added to the Paths list on the right side of the dialog box.
There are a number of options available in this dialog box to control the way in which paths are numbered as they are added. See Structural Modeling Wizard - Define Structural Equation Paths to learn more about these options.
In this case, we want to add 3 paths, each with a free parameter attached to it, so the procedure is simple.
First, add the paths from SES to AL67 and AL71. To do this, highlight SES in the From list and both AL67 and AL71 in the To list, and click the Add>> button.
Then add the path from AL67 to AL71. Highlight AL67 in the From list and AL71 in the To list and again click Add>>.
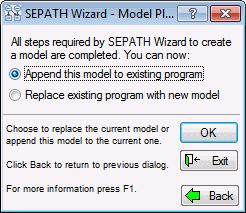
Now, click the OK button to display the SEPATH Wizard - Model Placement dialog box, a final dialog box to specify how we want to save the completed model.
In this case, since we are operating on an empty Analysis syntax window, it doesn't really matter. Choose either option button and click OK. At this point, we will be returned to the Structural Equation Modeling Startup Panel.
Scroll through the window, and carefully examine the paths, studying how they correspond to each path in the path diagram.
Then, click the OK (Run model) button to execute the model-fitting process and display the Iteration Results dialog box.
When iteration is finished, click the OK button to examine the analysis results.
You should see a Chi-square value of 71.4697 if the model has been specified according to the diagram. If you obtain some other value, you may be able to figure out what went wrong by comparing your current model with the model in the sample file Wheatona.cmd; it should be installed in the /Examples/Datasets/SEPATH directory of STATISTICA
- Simple modifications to a structural model
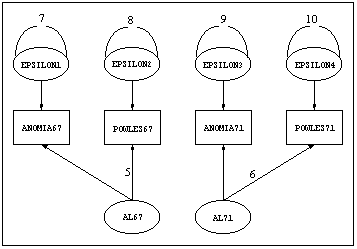
- Suppose we want to fit a slightly modified model with the same data. For example, suppose we want to allow the residuals attached to ANOMIA67 and ANOMIA71 to be correlated. We would do this by adding a single path, a wire from EPSILON1 to EPSILON3. The path diagram for this model is shown below.
One approach to specifying such a model is to start from scratch, using the Structural Modeling Wizard again. However, you have several other options that may be better in this case, because the desired modification is so simple.
One option is to simply add the single path manually. Click the Cancel button in the Structural Equation Modeling Results dialog box to return to the Startup Panel, and simply type in the following path at the bottom of the Analysis syntax list:
(EPSILON1)-16-(EPSILON3)
If you do this, and then click the OK (Run model) button, iteration will start again. Ultimately, you should obtain convergence, with a Chi-square value of 6.33071 with this new model.
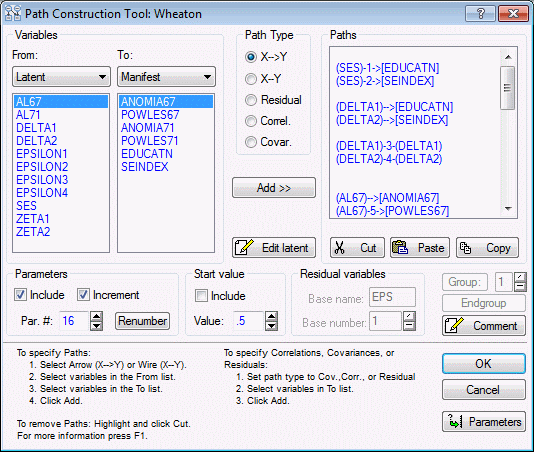
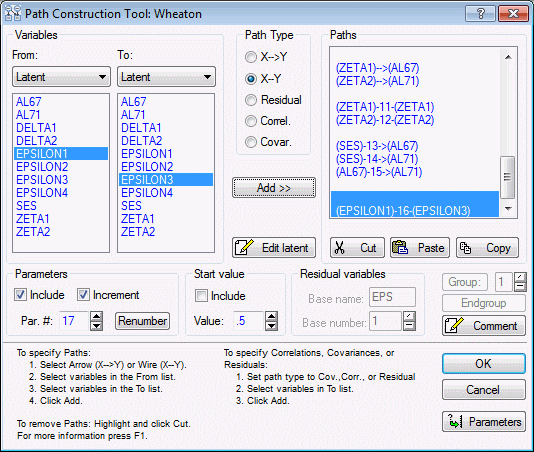
Another option is to use the Path Construction Tool, a powerful editor designed specifically to edit models specified in the PATH1 language.
Before trying the Path Construction Tool, go back to the Analysis syntax window in the Startup Panel, and delete the path you just added.
Then, click the Path tool button to display the Path Construction Tool dialog box.
The Path Construction Tool is similar in general layout to the Structural Modeling Wizard - Define Structural Equation Paths, but it is much more general and more powerful. Virtually any structural model can be specified in just a few moments with this tool with very little typing.
In the Path Construction Tool, you can see all the current paths listed in the Paths box. On the left are two user-selectable lists of variables (From, To). You can request manifest or latent variables in either list. There are a number of options for the types of paths you can construct. These are discussed in Path Construction Tool.
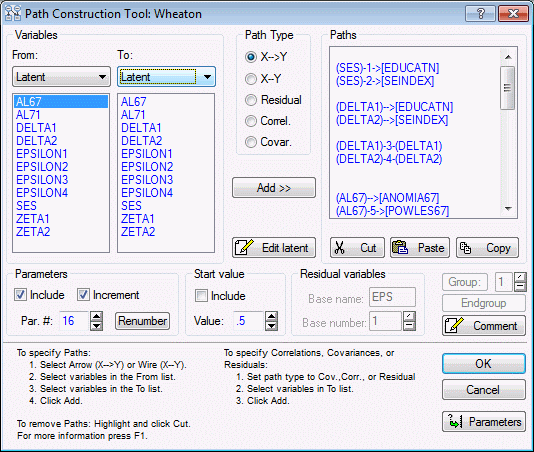
For now, simply add the desired path. We want to add a path between 2 latent variables, so select Latent as the variable type in the To drop-down list.
Now, highlight EPSILON1 in the From list of variables and EPSILON3 in the To list of variables.
Next, select the wire path type by clicking the X--Y option button under Path Type.
Then, scroll to the bottom of the list of current paths displayed in the Paths list on the right side of the dialog box. Click on the area at the bottom of the list and a bar will be displayed indicating where the next path will be inserted. Finally, click the Add>> button to add the new path to the list.
To exit the dialog box, click OK. A prompt will be displayed asking if you want to delete the current analysis syntax. Click the Yes button to replace the previous Analysis syntax on the Startup Panel with the one just specified with the new path added.
Now, click the OK (Run model) button, which will display first the Iteration Results, and then the new model being fitted to the data.
These introductory examples have given you some general notions about how Structural Equation Modeling works, and how the program's user interface design makes structural modeling less difficult. In subsequent examples, you will learn about the many powerful features of the program, and how these features can be used to perform different kinds of analyses quickly and efficiently.
See also, SEPATH Analysis - AutoIndex.