Example 2: One-Way ANOVA Design
This example is based on a data set presented in Milliken and Johnson (1992, p. 6). The data came from an experiment that was conducted to determine how six different kinds of work tasks affect a worker's pulse rate. In this experiment, 78 males were randomly assigned to perform 6 different work tasks (13 workers were assigned to be trained on each task). Due to attrition, only 68 workers completed the experiment. On a selected day after training, the pulse rates of workers (number of pulsations in 20 seconds) were measured after the workers performed their assigned tasks for one hour. The data are available in the example data set Pulse.sta.
Ribbon bar. Select the Home tab. In the File group, click the Open arrow and select Open Examples to display the Open a STATISTICA Data File dialog box. The Pulse.sta data file is located in the Datasets folder. Then, select the Statistics tab. In the Advanced/Multivariate group, click Advanced Models and from the menu, select General Linear to display the General Linear Models (GLM) Startup Panel.
Classic menus. From the File menu, select Open Examples to display the Open a STATISTICA Data File dialog box. The Pulse.sta data file is located in the Datasets folder. Next, from the Statistics - Advanced Linear/Nonlinear Models submenu, select General Linear Models to display the General Linear Models (GLM) Startup Panel.
Select One-way ANOVA as the Type of analysis and Quick specs dialog as the Specification method. Then click the OK button to display the GLM One-Way ANOVA Quick specs dialog box.
Click the Variables button to display the standard variable selection dialog box for one-way ANOVA designs.
Select Pulse from the Dependent variable list, select Task as the Categorical predictor (factor), and then click the OK button to close the variable selection dialog box and return to the GLM One-Way ANOVA Quick specs dialog box.
The remainder of the specifications for this analysis can use the default specifications, so the analysis could immediately be run by clicking the OK button. However, for this example we will look at the full set of specifications for the analysis.
Click the Syntax editor button to display the GLM Analysis Syntax Editor.
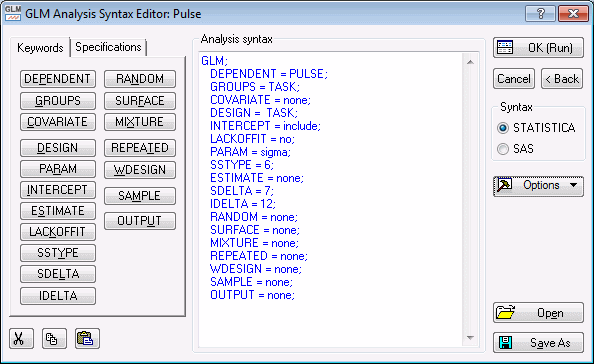
In the Analysis syntax field, we see a listing of the program generated from the specifications supplied in the GLM One-Way ANOVA Quick specs dialog box. Note that many keywords have none as their specification, which indicates the default specification. Even if you never expect to specify analyses using syntax, the listing of the analysis syntax program can provide useful documentation of the options used in an analysis.
To immediately run the analysis using the specifications that already have been supplied, click the OK (Run) button to display the GLM Results dialog box.
- Results
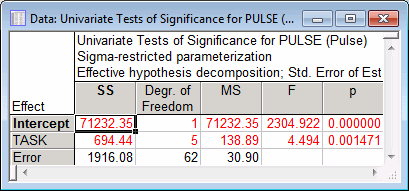
- To view the summary table for the one-way ANOVA of the overall effect of Task on Pulse, click the All effects button on the Quick tab.
- ANOVA results
- The ANOVA indicates an overall significant effect of Task on Pulse, p<.01. For one-way ANOVA designs, identical results are found using any method of coding the levels of the categorical predictor variable (either the default sigma-restricted parameterization used here, or the overparameterized model) and using any of the six types of sums of squares available on the Quick specs dialog box - Options tab (the default Effective hypothesis Type VI sum of squares decomposition used here, or any type of sums of squares decomposition from Type I through Type V).
- Specifying planned comparisons
- Milliken and Johnson (1992) also performed several
planned comparisons of the effects (different kinds of works tasks on Pulse for this data set). They also constructed a 90% confidence interval for a comparison of the Task 1 mean on Pulse with the average of the Task 3 through Task 6 means on Pulse.
To specify the use of 90% confidence limits (rather than the default 95% confidence limits), enter .90 in the Confidence limits box on the Quick tab.
Then, select the Comps tab to see the available options for performing comparisons. See the ANOVA topic Contrast analysis and post-hoc tests for further details on planned comparisons (contrast analysis).
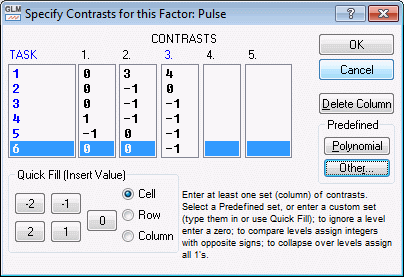
To perform the planned comparisons, click the Contrasts for LS means button to display the Specify Contrasts for this Factor dialog box, which is used for specifying the contrast coefficients for the Task effect.
Milliken and Johnson (1992) performed planned comparisons of (1) the Task 4 mean on Pulse with the Task 5 means on Pulse, (2) the Task 1 mean on Pulse with the average of the Task 2 through Task 4 means on Pulse, and (3) the Task 1 mean on Pulse with the average of the Task 3 through Task 6 means on Pulse.
Enter appropriate contrast coefficients for these comparisons, with each set of coefficients summing to zero, in the first 3 Contrasts columns.
- Planned comparisons results
- After entering the coefficients, click the OK button. On the
Comps tab of the GLM Results dialog box, click the Compute button to produce a series of spreadsheets reporting the results of the planned comparisons.
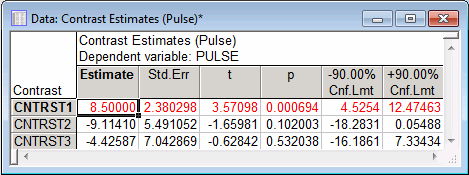
The Contrast Estimates spreadsheet provides tests of significance and confidence intervals for each comparison.
The results presented in the spreadsheet show that only the first planned comparison is significant, p<.001. The value of 0.0 is within the 90% confidence interval limits for both of the last two planned comparisons, consistent with the respective significance probabilities of p>.10 for these comparisons.
See also GLM - Index.