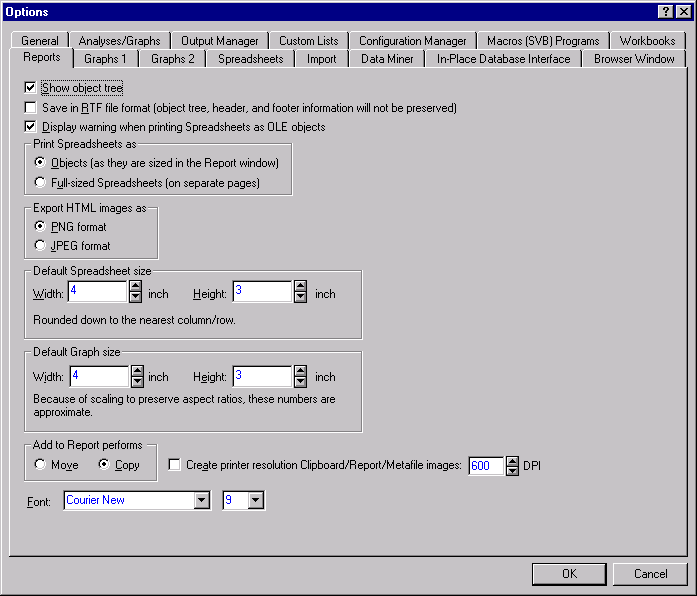
| Show object tree
|
Select the
Show object tree check box if you want to show the navigation tree by default whenever a report is opened. Note that if you clear this check box and want to view the tree for a particular report, you can display the navigation tree by selecting
Show Tree from the
View menu.
|
| Save in RTF file format
|
Select the
Save in RTF file format (object tree information will not be preserved) check box to save the report in RTF (Rich Text Format, *.rtf) format. By default, STATISTICA Reports are saved (and viewed) using the *.str file format. Using this format allows you to preserve the tree information with object names (when the report is opened in STATISTICA), so you can use the navigation tree to locate specific items in the report; also, Custom Header and/or Footer information will only be preserved (and applied to printed reports), when the report is saved as a *.str file (they will be lost if reports are saved as *.rtf files). By default, the
Save in RTF file format check box is cleared.
|
| Print Spreadsheets as
|
Use the options under
Print Spreadsheets as to determine whether spreadsheets are printed as objects or full-sized spreadsheets when the report is printed. If you select the
Objects option button, the spreadsheet is printed exactly as it is shown in the report, using the default dimensions. This means that only a portion of the spreadsheet is printed. If you select the
Full-sized Spreadsheets (on separate pages) option button, then the entire spreadsheet is printed using separate pages.
|
| Export HTML images as
|
Use the options under
Export HTML images as to specify a format for saving graphs when reports are saved in HTML format. Select the
PNG format option button to save images in PNG format. Select the
JPEG format option button to save images in JPG format. For more information on these image formats, see What is the PNG (Portable Network Graphics) files format? and What is the JPEG graphics format?.
|
| Default Spreadsheet size
|
Use the options under
Default Spreadsheet size to set the default
Width and default
Height of all spreadsheets that are sent to reports. Note that the values entered in the
Width and
Height boxes are rounded down to the nearest column/row. You can control whether the width and height are measured in inches or centimeters. To measure in centimeters, select the
Use metric measurements check box on the
General tab of the Options dialog. To measure in inches, clear the
Use metric measurements check box (the default setting).
|
| Default Graph size
|
Use the options under
Default Graph size to set the default
Width and default
Height of all graphs that are sent to reports. Note that because of scaling to preserve aspect ratios, these numbers are approximate. You can control whether the width and height are measured in inches or centimeters. To measure in centimeters, select the
Use metric measurements check box on the
General tab of the Options dialog. To measure in inches, clear the
Use metric measurements check box (the default setting)
|
| Add to Report performs
|
Use the options under
Add to Report performs to specify what action is taken when the
 button is clicked. Select the
Move option button to move the selected file to the report (and remove it from its stand-alone window) when the button is clicked. Select the
Copy option button to copy the selected file to the report (the original is left in its stand-alone window). By default, the
Move option button is selected. button is clicked. Select the
Move option button to move the selected file to the report (and remove it from its stand-alone window) when the button is clicked. Select the
Copy option button to copy the selected file to the report (the original is left in its stand-alone window). By default, the
Move option button is selected.
|
| Font
|
Specify a
Font and font size in these boxes to use in the specified report.
|

